Advertisement
Quick Links
Advertisement

Related Manuals for Fenix Reference G12


Summary of Contents for Fenix Reference G12
- Page 1 Fenix Reference G12 Fenix Reference G12 Rev. 0.2.1 October 2020 Rev. 0.2.1...
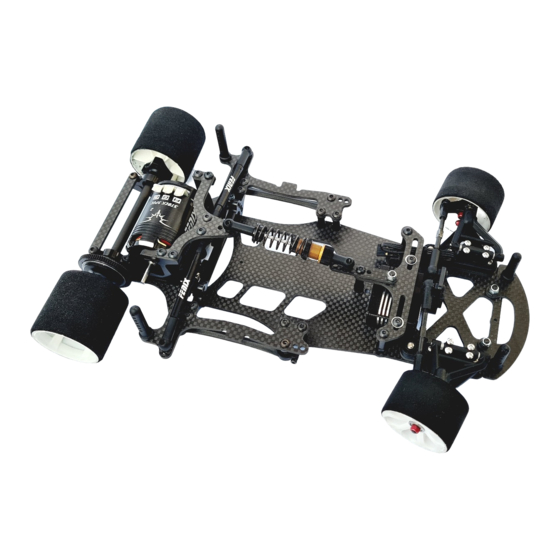
- Page 2 Fenix Reference G12 REFERENCE G12 is an high-competition, high-quality, 1/10-scale model car intended for persons aged 16 years and older with previous experience building and operating RC model racing cars. This is not a toy; it is a precision racing model. This model racing car is not intended for use by beginners, inexperienced customers, or inexperienced racers or by children without direct supervision of a responsible, knowledgeable adult.
- Page 3 Fenix Reference G12 Genuine CRC 3240 front end Bag A Assembly it by the provided instruction sheet. Front End Note: Please note that turnbuckles and plastic ball cup will be used when assembly Bag B. Bag B Servo Mount Rev. 0.2.1...
- Page 4 Fenix Reference G12 Servo is not included, Reference G12 need a Mini servo. Note the dimension of the servo suggested You can also use Sanwa servo, with the special servo holder. Please note that the Sanwa holder is provided as option, or special version for certain market.
- Page 5 Fenix Reference G12 Using 2 x HW008 M3x6 Button, fix the servo group to the G12-7 servo holder. Insert 2 washer under the M3x6 screws Take care to centre the servo saver toward the servo holder. Note: Servo is held in place...
- Page 6 Fenix Reference G12 There is an optional shock locator which allow to use the damper with a more gentle angle and with several different shock locations. To use this insert the HW033 M3x10 countesink hole, insert the G12-8 shock holder and fix it with the M3 nylock.
- Page 7 Bag C Motor Pod NOTE: Before start to assembly the rear end of Reference G12, we strongly suggest you, to visit the Fenix Racing Youtube channel and look the “V-link suspension setup” video, here is the link. https://www.youtube.com/watch?v=SEwNQcn12A0 There, you’ll also found some video useful when dealing with the Fenix Gear Diff.
- Page 8 Fenix Reference G12 Build 2 set of link using 2 x TR15 and 4 FX0037 - short Keep this dimensions. Fix the link over the V- link F2 Using 4 x HW012 countersunk screws, fix the motor holder to the motor pod.
- Page 9 Fenix Reference G12 Fix the G12-C to the bulkheads with 2 HW003 M3x8 button screw in the front holes. Rear holes, you need to install the G12-10 brace and fix brace and G12-C using HW029 M3x12 button screws. Tight the screws evenly using an “X”...
- Page 10 Fenix Reference G12 How about a cup of coffee now? You deserve it! Bag D Rear V-link and common parts Rev. 0.2.1...
- Page 11 Fenix Reference G12 Prepare 2 sets – note the position of the spheres. Use 2 x HW0014 M2x 6 screws and 2 FX002 spheres each Spring holder Note spring holder might have 2 different shape. Hex one or round one.
- Page 12 Fenix Reference G12 Prepare 2 mirror like side element, using G12-3 Fix the body post using HW003 M3x8 button screw. FU-FX48 using HW008 M3x6 button screw. Insert side spring group into the carbon fibre Note: Use special attention when “thread” the grub screw in the carbon fibre, lubricate the grub screw often during the operation and insert it slowly.
- Page 13 Fenix Reference G12 From Bag C, insert 2 x male stud. Fix the short link between V-link F1 and V-link F2 Note Please, check in the tech section about the V-link settings. Install the side link you’ve prepared before using...
- Page 14 Fenix Reference G12 Install the G12-4 shock holder, using 4 by HW008 3x6 button screw Install now the side dampers Install the CRC front end using 4 by G12- K1 8-32” Titanium screws Insert between the chassis front end the G12-6...
- Page 15 Fenix Reference G12 Bag E Differential Rev. 0.2.1...
- Page 16 Fenix Reference G12 Bag F Shock Absorber Step 1: Slide 1 E-Clip over the shock shaft Insert the piston Slide the second E-Clip over the shock shaft Step 2: Insert the O-ring into the preload nut Step 3: Insert the preload nut onto the shock body.
- Page 17 Fenix Reference G12 Step 4: Lube the 2x6mm oring with some shock oil or diff grease, insert it into the recess. Lube the plastic insert with some shock oil or diff grease, insert it into the recess, over the oring.
- Page 18 Fenix Reference G12 Tech area REFERENCE G12 represent a major breakthrough in the 1/12 class. Nothing comes close to this 1/12 model. We’ve had several drivers developing the car, from Club racers to ETS and Nationals A-main finalist, and we’d like to thank all of them for the time and dedication they put in this project.
- Page 19 Fenix Reference G12 Millimetre per revolution aka Rollout Pancar (1/10 – 1/12) are using foam tires, where ratio need to be adjusted after each run, the system is MM (millimeter) Per Revolution aka Rollout. It means you want to check how many mm the motor move each revolution.
Need help?
Do you have a question about the Reference G12 and is the answer not in the manual?
Questions and answers