Advertisement
Quick Links
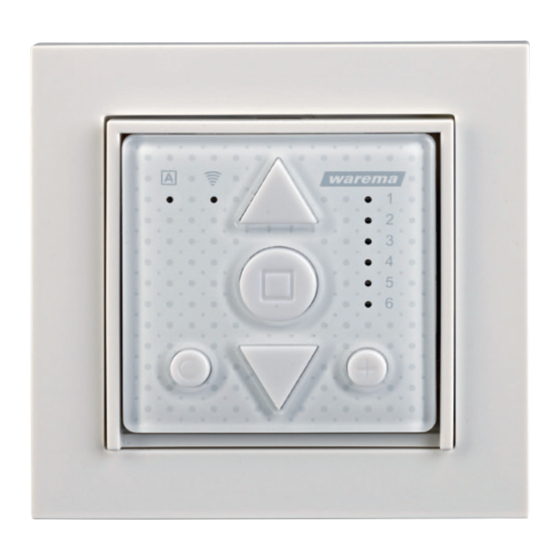
WMS Wall-mounted
transmitter plus
Operating and installation instructions
General information
Fig. 1
WMS Wall-mounted transmitter plus
The WMS Wall-mounted transmitter plus is used for
remotely controlling WAREMA WMS receivers for awning,
roller shutter, external venetian blind, window and light
products.
Safety instructions
Intended use
This WMS Wall-mounted transmitter plus is an electronic
device developed to control WMS receivers. Any use other
than the purpose described in these instructions requires
approval from the manufacturer.
C
AUTION
The wall-mounted transmitter plus is for
indoor use only. It is not water-proof. Do
not leave the wall-mounted transmitter plus
outdoors!
C
AUTION
Never activate buttons on your WMS Wall-
mounted transmitter plus arbitrarily without
a line of sight to the sun shading system.
Children must not play with this product –
keep remote controls and transmitters out of
the reach of children!
You can find instruction videos on our
YouTube channel
at:
http://www.youtube.com/user/SonnenLichtManager/videos
Learn the WMS Wall-mounted transmitter plus into the
receiver (see also the WMS Practical handbook
art. no. 2031186).
Commissioning can also be carried out using the
WMS studio pro or homee PC software.
warema_2018151_alhb_en_v4•2021-01-01
Installation
Fig. 2
Mounting structure for the WMS Wall-mounted transmitter
plus
WMS Wall-mounted transmitter plus (included in the
scope of delivery),
Central frame/plate (on-site or can be ordered as an
optional accessory),
Switch program frame (on-site or can be ordered as an
optional accessory),
Mounting frame (included in the scope of delivery).
Attach the mounting frame to the wall using the
countersunk head screws and screw anchors included.
Position the central frame/plate of the switch program
you require.
Clip on the wall-mounted transmitter.
Clipping the wall-mounted transmitter and central
frame/plate into the available snap-in latches will hold
them in place on the mounting frame.
Only use countersunk head screws so that the
screws are flush with the mounting frame and the
WMS Wall-mounted transmitter plus can be secure-
ly clipped on.
We reserve the right to make technical modifications
Valid from
1 January 2021
Keep for future use.
1
Advertisement

Related Manuals for WAREMA WMS plus


Summary of Contents for WAREMA WMS plus
- Page 1 Mounting structure for the WMS Wall-mounted transmitter plus The WMS Wall-mounted transmitter plus is used for remotely controlling WAREMA WMS receivers for awning, WMS Wall-mounted transmitter plus (included in the roller shutter, external venetian blind, window and light scope of delivery), products.
-
Page 2: Operating Elements And Displays
Operating elements and displays ¾ µ ¸ Fig. 3 Operating panel of the WMS Wall-mounted transmitter Fig. 4 Back of the WMS Wall-mounted transmitter plus plus Pos. Function Result Front Switch the comfort control modes on or off by briefly pressing the Control button buttons at the same time (this is the control button on other WMS Hand-held... - Page 3 Briefly press the stop button Transmission LED lights up Press change channel button, select channel. Selected channel lights up red (here 2) Transmission LED lights up green for 2 s = Target device (receiver, transmitter or sensor) found, receiver detected, scan continues Transmission LED lights up orange for 2 s = no target device found,...
- Page 4 Operating products When the button is pressed again while the sun shading product is being lowered, it always moves to 100% (lower limit position) and the “Position DOWN” value is ignored. Press change channel button, select channel. Selected channel lights up red (here 2) The external venetian blind moves in the selected direction e.g.
- Page 5 Briefly press the up or down arrow button once The awning moves in the selected direction e.g. up Press and briefly hold the up or down arrow button The valance roller blind moves in the selected direction e.g. up once Awning position does not change ...
- Page 6 Comfort position If a product is already in the comfort position or if a comfort position has not been stored, the selected product does not respond when the comfort button is pressed. If the unit does not move to the comfort position correctly, the run time in the receiver has to be adjusted. Move to desired position (in this case, e.g.
- Page 7 Deleting learned-in products from the WMS wall-mounted transmitter plus and the network Devices that do not need to be deleted must be de-energised. If you delete a receiver from the network, it can no longer be operated via other transmitters. It must be learned into a network again.
-
Page 8: Maintenance
This device complies with the EMC directives for use in residential and commercial areas. Fig. 5 Removing the battery WAREMA Renkhoff SE declares herewith that this radio system type [WMS Wall-mounted transmitter plus] is in compliance with the current guidelines. Ambient conditions Operating temperature °C...
Need help?
Do you have a question about the WMS plus and is the answer not in the manual?
Questions and answers