Table of Contents
Advertisement
Quick Links
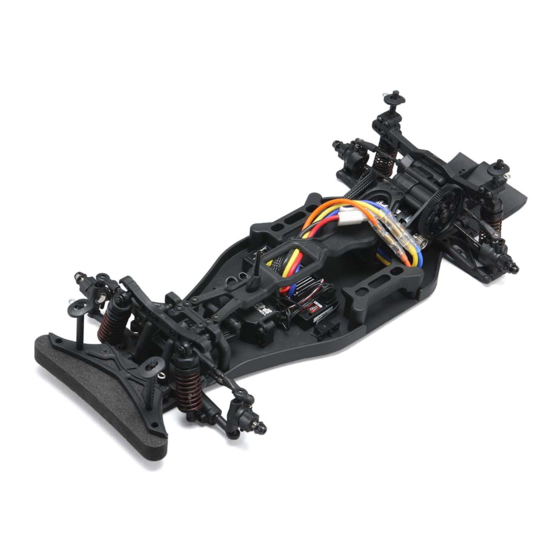
1/10 EP RWD R/C DRIFT CAR ASSEMBLED CHASSIS SET
This set does not contain body shell, tires and wheels. Please prepare them individually.
Also, please prepare 4pcs of AA / LR6 batteries for transmitter.
※ Please read before start running the car. ※
●Attaching
body mount seesaws.
●Setting tires and wheels.
※When installing the wheel, be careful not to
drop the pin that secures the brake disc
wheel hub.
●Battery and
AC quick chargers
Battery included in the set is
1400mAh Ni-cd type. Charge the
battery with charger before running
the car.
※For your safety, please follow the
precautions for handling the charger
and Ni-Cd battery.
Tires / wheels (sold separately)
M4 Nylon nut
Box wrench
When charging the battery, connect the
battery to quick charger, then plug the
charger into an outlet. It will take about 70
minutes to fully charge the supplied battery.
Please follow instruction attached in the body shell set
purchased separately.
body mount seesaws
Hood pin
Hood pin
●Fitting body shell
Body will be fixed with hood pins.
※Cut unnecessary parts of the body post with nippers.
When charging is completed, first unplug the
charger, then remove the battery.
Body (sold separately)
Advertisement
Table of Contents

Related Manuals for Yokomo YD-2 AC


Summary of Contents for Yokomo YD-2 AC
- Page 1 1/10 EP RWD R/C DRIFT CAR ASSEMBLED CHASSIS SET This set does not contain body shell, tires and wheels. Please prepare them individually. Also, please prepare 4pcs of AA / LR6 batteries for transmitter. ※ Please read before start running the car. ※ Please follow instruction attached in the body shell set ●Attaching purchased separately. body mount seesaws. body mount seesaws Hood pin Tires / wheels (sold separately) M4 Nylon nut ●Setting tires and wheels. Box wrench ※When installing the wheel, be careful not to drop the pin that secures the brake disc wheel hub. Hood pin Body (sold separately) ●Fitting body shell ...
- Page 2 Switch 2 : Setting Forward or Reverse ③If the LED stops blinking and stays on, it is a sign that the Switch 1 : Setting Digital or Analog neutral setting is completed. Maximum rudder angle setting button ④However, if the fast blinking of the LED does not change to lighting and then changes to slow blinking, it is a sign that the normal neutral setting has failed to complete, so start over again servo from ①. ⑤Turn the steering wheel to the right on the transmitter side, press the switch briefly at the point where it hits the steering receiver stopper, the red-blue light blinks twice at high speed, then blue lights up, and red lights up slowly indicates that the setting has been saved. ⑥Next, as same with the right side, press the switch briefly at the point where it hits the stopper. The red-blue light blinks twice at high speed, and then the red-blue lights turn on at the same time, ●Gyro need to be fixed with double sided tape in flat area of upper deck or main it indicates that the second setting has also been saved. chassis. ⑦The steering is set to neutral and the gyro endpoint setting is ●Switch 1 (Right side): There are two types of signals that the servo moves: analog and digital. The set at the time of purchase is in the digital mode used completed. by many people. If the servo does not respond, set the switch up to make it *This product cannot be used if the 3rd channel of the transmitter analog. is push button type. ●Switch 2 (Left Side) : Setting the operating direction of the servo with the *When adjusting the endpoint, adjust it within the range where the gyro. The set at the time of purchase is reversed and is set on the switch. If try load is not applied to the servo. Please note that when a load is turning the steering wheel before driving and the servo does not move in the counter direction, set the switch 2 to the lower / forward rotation again. applied to the servo, a load sound will be generated from the servo. YOKOMO LTD. 4385-2 Yatabe, Tsukuba City, Ibaraki Prefecture, 305-0861.JAPAN TEL +8129-896-3888 FAX +8129-896-3889 E-Mail support@teamyokomo.com...
- Page 3 Initial Settings are installed as " ※ " marked on Mode Parameter table. Yokomo Speed Controller (ESC) SCR-BR Instruction Manual ■ SPEC 1. Input voltage: 7.2V to 8.4V (Ni-cd / Ni-MH), 7.4V (Li-Po), 6.6V (Li-Fe) 1.Number of Ni-cd / Ni-MH cells 6 to 7 (7.2V / 8.4V) 2.Number of Li-Po cells: 2 (7.4V) 3.Number of Li-Fe cells: 2 (6.6V) 2. Output voltage: Forward continuous maximum current 70A Instantaneous maximum current 500A / 10 seconds, Reverse continuous maximum current 100A (FET specifi ed) Steady current (forward): 5 minutes / 70A, 30 seconds / 80A, 1 second / 106A...
- Page 4 P r e s s t h e s e t b u t t o n a g a i n momentarily. If the red LED blinks twice, it will Hold down the set button and release when hearing a short and long sound. When the LED be in the second set mode. color changes from yellow to red, and select the mode parameters. (Start power) Selection of Mode Parameters ● ●● ●●● ●●●● Press the set Press the set Press the set button once button again button again Standard Available to select up to fourth set ▼ ▼ ▼ ▼ mode. Press the set button for at least 1 second until hearing a short and long sound, and when hearing the sound, the ESC setting is complete and are ready to use. The above instructed LEDs are built into ESC. The other LEDs installed in ESC only lights up in red. YOKOMO LTD. 4385-2 Yatabe, Tsukuba City, Ibaraki Prefecture, 305-0861.JAPAN TEL +8129-896-3888 FAX +8129-896-3889 URL http://www.teamyokomo.com mail : support@teamyokomo.com 2021.03...
- Page 5 1 ¥10,800 ★ ● Y4-010A Universal Axle for DP-YD2/YD4 ¥500 ● ● Y2-002 Main Chassis(Mold) for DP-YD2 ¥3,500 ● ★ Y4-010490 49mm Universal Bone for YD2/YD4 ¥600 ● ● ZC-002P Chassis Protective Sheet w/Yokomo Logo ¥980 ★ ★ Y4-010B Universal Bone for DP-YD4 ¥600 ★ ★ Y2-003MG Mat Graphite Upper Deck for YD-2/PLS ¥2,160 ★ ● BD-010440 44.0mm Universal Bone for BD7/BD5 ¥520 ★ ★ Y2-003 Upper Deck(Mold) for DP-YD2...
- Page 6 Y4-201PB Brass Bellcrank Post for DP-YD2/4 ¥250 ★ ★ Y2-301S 1.0mm Sus-mount spacers for YD-2 ¥500 ★ ★ Y2-202V Chamf.Variable ST Bell Crank Set YD-2 ¥8,500 ★ ★ Y2-302MD SusMount/F.Bulk/U.Arm Hold forYD2S/S-PL ¥980 ● ● Y2-202VH Cen.Link Holder Variable ST Bellcrank ¥2,400 ★ ★ Y2-415S2 Steering Block Ver.2 for YD2 ¥580 ★ ★ Y2-202VCL Cen.Link(Left)of Variable ST Bellcrank ¥1,300 ★ ★ Y2-415SA Adjustable Kingpin Angle ST Block for YD ¥5,900 ★ ★ Y2-202VCR Cen.Link(Right)of Variable ST Bellcrank ¥1,300 ★...
- Page 7 φ 10X φ 15x4mm Super Prec.Bearing(2pcs) ¥980 ★ ★ CS-DG Diff .Grease for Diff .Ball ¥480 ★ ★ BB-1050CB φ 5x φ 10x4mm Ceramic Ball bearing(2pcs) ¥1,000 ★ ★ CS-BG Yokomo Super Black Grease ¥480 ★ ★ BB-1510CB φ 10x φ 15x4mm Ceramic Ball bearing(2pcs) ¥1,200 ★ ★ RP-031 30 mm Cooling Fan ¥980 ★ ★ D-132 4X8 Ball Bearing,unfl...
Need help?
Do you have a question about the YD-2 AC and is the answer not in the manual?
Questions and answers