Table of Contents
Advertisement
Quick Links
Advertisement
Table of Contents

Related Manuals for Thermo Scientific thermoscientific HyPerforma Smartainer 3.0


Summary of Contents for Thermo Scientific thermoscientific HyPerforma Smartainer 3.0
- Page 1 HyPerforma Smartainer 3.0 User’s Guide DOC0059 • Revision A May 2020...
-
Page 2: Table Of Contents
Temperature validation Chapter 6 Specifications and parts information 6.1 Hardware features and dimensions 6.1.1 200 L Smartainer 3.0 design features 6.1.2 500 L and 1,000 L Smartainer 3.0 design features 6.1.3 1,500 L– 3,000 L Smartainer 3.0 design features Thermo Scientific... - Page 3 6.2 Smartainer 3.0 specifications 6.3 Part numbers Chapter 7 General ordering information 7.1 Ordering instructions 7.2 Ordering and support contact information 7.3 Technical support Thermo Scientific...
-
Page 4: Warnings, Safety, And Warranty Information
Warnings, safety, and warranty information Warnings, safety, and warranty information Thank you for purchasing the Thermo Scientific ™ HyPerforma ™ ™ Smartainer 3.0. Each of our products is designed and manufactured according to our high standards. We have included safety information in this guide, based on our knowledge and experience. - Page 5 The heating jacket is designed to heat the inner vessel wall. Normal operating conditions generate heat and could create hot surfaces. • Hot surface inside. • Contact with surfaces may cause burns. • Do not touch while in operation. Thermo Scientific HyPerforma Smartainer 3.0 User’s Guide...
- Page 6 Warnings, safety, and warranty information WARNING: The Thermo Scientific HyPerforma Smartainer 3.0 may not be installed in a potentially explosive atmosphere as set forth in the applicable EU ATEX Directive. It is the responsibility of the end user to review and understand the potential dangers listed in the ATEX 2014/34/EU guidelines.
- Page 7 Thermo Scientific HyPerforma Smartainer 3.0 User’s Guide...
- Page 8 ASCE 7, it should be noted that such equipment is susceptible to overturning during a seismic event. Therefore, it is the responsibility of the buyer to address seismic safety for movable equipment at the designated facility. Thermo Scientific HyPerforma Smartainer 3.0 User’s Guide...
-
Page 9: How To Use This Guide
This user’s guide contains information about the Thermo Scientific ™ ™ ™ HyPerforma Smartainer 3.0. It is intended for use by people who may or may not have experience with Thermo Scientific systems. Document change information Revision Date Section Change made Author... -
Page 10: Smartainer 3.0 Overview
Smartainer 3.0. Note: Figure 1.1 does not show the optional temperature display. The temperature display will be mounted on the opposite top corner from the load cell display (see Figure 1.2 later in this section). Thermo Scientific HyPerforma Smartainer 3.0 User’s Guide... - Page 11 13. Cart (optional)—helps move the Smartainer 3.0 when empty over level surfaces, for short distances 14. Load cells (4) Figure 1.1. Smartainer 3.0 components shown on 500 L system. Thermo Scientific HyPerforma Smartainer 3.0 User’s Guide...
- Page 12 The temperature display (Figure 1.2) features a variable intensity display, four setpoint alarm outputs (with option card), communication and bus capabilities (with option card), and NEMA 4X/IP65 sealed front bezel. It is powered by 85–264 VAC. Figure 1.2. Mounted temperature display. Thermo Scientific HyPerforma Smartainer 3.0 User’s Guide...
-
Page 13: Hardware Setup
For Smartainer 3.0 units containing load cells, the load cells must be in the locked position (centering washer and nut are threaded up) prior to moving the system. For this reason, the Smartainer 3.0 is shipped Thermo Scientific HyPerforma Smartainer 3.0 User’s Guide... - Page 14 If the Smartainer 3.0 unit needs to be moved, the load cells must be locked again before transport. Use the following steps to lock load cells for mobile units. Thermo Scientific HyPerforma Smartainer 3.0 User’s Guide...
- Page 15 2. Reattach the tri-clamp and turn the clamp key clockwise to close (Figure 2.3). Figure 2.3. Reattaching tri-clamp to close it. Refer to Figures 2.4–2.8 and the following steps to unlock the load cells for stationary units. Thermo Scientific HyPerforma Smartainer 3.0 User’s Guide...
- Page 16 3. Prior to inserting the screw jack (from load cell unlocking kit, Mettler Toledo part #30219938), ensure that the bottom bolt on the load cells is fastened tightly. Then insert the small screw jack at the top of the bolt (Figure 2.6). Thermo Scientific HyPerforma Smartainer 3.0 User’s Guide...
- Page 17 (Figure 2.7). Figure 2.7. Using adjustable wrench to raise jack (only required after initial uncrating). 5. Once it is raised enough, remove the large plastic locking plate (Figure 2.8). Thermo Scientific HyPerforma Smartainer 3.0 User’s Guide...
- Page 18 #30219938). Use an adjustable wrench to tighten the bolt (Figure 2.10). Once it begins to feel tight, tighten another 1/4 turn to ensure it is fully tightened. Both centering spacers should be below the bolt when tightened. Thermo Scientific HyPerforma Smartainer 3.0 User’s Guide...
-
Page 19: Moving The Smartainer
Forklift tines should be placed in the forklift hole locations on the unit (Figure 2.11) and spaced as close to the casters or stationary feet as possible. Thermo Scientific HyPerforma Smartainer 3.0 User’s Guide... -
Page 20: Stacking Smartainer 3.0 Units
The 200 L and 500 L units can be stacked up to three units high, and the 1,000 L unit can be stacked up to two units high. Units 1,500 L and larger cannot be stacked. Thermo Scientific HyPerforma Smartainer 3.0 User’s Guide... -
Page 21: Operating Information
Figure 3.2. Handle in Open position. A silent locking device engages the door mechanism when the BPC liquid level is above the lock. This prevents accidental opening of the door while the BPC is in use. Thermo Scientific HyPerforma Smartainer 3.0 User’s Guide... -
Page 22: Opening And Closing The Lid With Dual-Action Gas Spring Lever
While the Smartainer 3.0 lid can be opened and closed manually, the lid may also be equipped with a dual-action gas spring lever. Open and close the lid as needed according to internal processes. Thermo Scientific HyPerforma Smartainer 3.0 User’s Guide... -
Page 23: Installing The Port Holder On The Bpc
Most standard Smartainer BPCs are vertically-gusseted. • For the 200 L unit, load the BPC through the top of the container, and for 500 L and larger units, load the BPC through the door. Thermo Scientific HyPerforma Smartainer 3.0 User’s Guide... - Page 24 Figure 3.6. BPC properly placed inside the unit. 5. Guide the tubing through the cutouts on the Smartainer 3.0 unit, and latch the bottom of the port holder to secure the tubing (Figure 3.7). Thermo Scientific HyPerforma Smartainer 3.0 User’s Guide...
-
Page 25: Using The Bpc Hoist And Unfolding The Bpc (For 500 L- 3,000 L Systems)
(Figure 3.8) to the hoist with a minimum pressure of 5 bar (75 psi) and maximum pressure of 6.9 bar (100 psi). Figure 3.8. Air line (8 mm) connected. Thermo Scientific HyPerforma Smartainer 3.0 User’s Guide... - Page 26 BPC into the corners of the container, and smooth away any large wrinkles so that the base of the BPC will lie flat on the bottom of the container when filled. HyPerforma Smartainer 3.0 User’s Guide Thermo Scientific...
- Page 27 DO NOT leave the BPC unattended while inflating. Figure 3.12 shows the inflated BPC inside of the Smartainer unit. Figure 3.12. Fully inflated BPC inside the unit. HyPerforma Smartainer 3.0 User’s Guide Thermo Scientific...
-
Page 28: Inserting The Rtd
Adjust as needed. 3.6 Filling the BPC Use the following steps to fill the BPC with liquid. 1. Make a connection between the liquid supply and the inlet of the BPC. Thermo Scientific HyPerforma Smartainer 3.0 User’s Guide... - Page 29 BPC (Figure 3.15). The tubing can be coiled on top of the BPC (Figure 3.16). Figure 3.15. Incorrect—tubing caught Figure 3.16. Correct—Tubing coiled on top of between the BPC and the walls of the unit. the BPC. Thermo Scientific HyPerforma Smartainer 3.0 User’s Guide...
-
Page 30: Dispensing
1. Disconnect any process lines connected to the Smartainer 3.0 BPC. 2. For units 500 L and larger, open the Smartainer 3.0 door. 3. Where applicable, detach the hoist clips from the BPC and raise the BPC hoist. Thermo Scientific HyPerforma Smartainer 3.0 User’s Guide... - Page 31 200 L units, remove the BPC from the top of the container. 6. Return the port holder covers to the Smartainer 3.0 for future use. 7. For units 500 L and larger, close the door. Thermo Scientific HyPerforma Smartainer 3.0 User’s Guide...
-
Page 32: Maintenance
• Bent legs, dented surfaces, or misaligned components indicate damage and potentially unsafe conditions. If any of these conditions are found upon inspection, contact Thermo Scientific tech support (see section 7.3). Thermo Scientific HyPerforma Smartainer 3.0 User’s Guide... -
Page 33: Temperature Validation
200 L: ThermoFlex TF5000 • 500 L: ThermoFlex TF10000 • 1,000 L, 1,500 L, 2,000 L, 2,500 L, and 3,000 L: ThermoFlex TF24000 Figure 5.1 shows the location of the temperature probes on the unit. HyPerforma Smartainer 3.0 User’s Guide Thermo Scientific... - Page 34 Chapter 5 Temperature validation Figure 5.1. Temperature probe location and TCU connections. HyPerforma Smartainer 3.0 User’s Guide Thermo Scientific...
- Page 35 Chapter 5 Temperature validation Graph 5.1. Temperature mapping of 200 L: cooling data, no circulation. Graph 5.2. Temperature mapping of 200 L: cooling data, with circulation. HyPerforma Smartainer 3.0 User’s Guide Thermo Scientific...
- Page 36 Chapter 5 Temperature validation Graph 5.3. Temperature mapping of 200 L: heating data, no circulation. Graph 5.4. Temperature mapping of 200 L: heating data, with circulation. HyPerforma Smartainer 3.0 User’s Guide Thermo Scientific...
- Page 37 Chapter 5 Temperature validation Graph 5.5. Temperature mapping of 500 L: cooling data, no circulation. Graph 5.6. Temperature mapping of 500 L: cooling data, with circulation. HyPerforma Smartainer 3.0 User’s Guide Thermo Scientific...
- Page 38 Chapter 5 Temperature validation Graph 5.7. Temperature mapping of 500 L: heating data, no circulation. Graph 5.8. Temperature mapping of 500 L: heating data, with circulation. HyPerforma Smartainer 3.0 User’s Guide Thermo Scientific...
- Page 39 Chapter 5 Temperature validation Graph 5.9. Temperature mapping of 1,000 L: cooling data, no circulation. Graph 5.10. Temperature mapping of 1,000 L: cooling data, with circulation. HyPerforma Smartainer 3.0 User’s Guide Thermo Scientific...
- Page 40 Chapter 5 Temperature validation Graph 5.11. Temperature mapping of 1,000 L: heating data, no circulation. Graph 5.12. Temperature mapping of 1,000 L: heating data, with circulation. HyPerforma Smartainer 3.0 User’s Guide Thermo Scientific...
- Page 41 Chapter 5 Temperature validation Graph 5.13. Temperature mapping of 1,500 L: cooling data, no circulation. Graph 5.14. Temperature mapping of 1,500 L: cooling data, with circulation. HyPerforma Smartainer 3.0 User’s Guide Thermo Scientific...
- Page 42 Chapter 5 Temperature validation Graph 5.15. Temperature mapping of 1,500 L: heating data, no circulation. Graph 5.16. Temperature mapping of 1,500 L: heating data, with circulation. HyPerforma Smartainer 3.0 User’s Guide Thermo Scientific...
- Page 43 Chapter 5 Temperature validation Graph 5.17. Temperature mapping of 2,000 L: cooling data, no circulation. Graph 5.18. Temperature mapping of 2,000 L: cooling data, with circulation. HyPerforma Smartainer 3.0 User’s Guide Thermo Scientific...
- Page 44 Chapter 5 Temperature validation Graph 5.19. Temperature mapping of 2,000 L: heating data, no circulation. Graph 5.20. Temperature mapping of 2,000 L: heating data, with circulation. HyPerforma Smartainer 3.0 User’s Guide Thermo Scientific...
- Page 45 Chapter 5 Temperature validation Graph 5.21. Temperature mapping of 2,500 L: cooling data, no circulation. Graph 5.22. Temperature mapping of 2,500 L: cooling data, with circulation. Thermo Scientific HyPerforma Smartainer 3.0 User’s Guide...
- Page 46 Chapter 5 Temperature validation Graph 5.23. Temperature mapping of 2,500 L: heating data, no circulation. Graph 5.24. Temperature mapping of 2,500 L: heating data, with circulation. Thermo Scientific HyPerforma Smartainer 3.0 User’s Guide...
- Page 47 Chapter 5 Temperature validation Graph 5.25. Temperature mapping of 3,000 L: cooling data, no circulation. Graph 5.26. Temperature mapping of 3,000 L: cooling data, with circulation. Thermo Scientific HyPerforma Smartainer 3.0 User’s Guide...
- Page 48 Chapter 5 Temperature validation Graph 5.27. Temperature mapping of 3,000 L: heating data, no circulation. Graph 5.28. Temperature mapping of 3,000 L: heating data, with circulation. Thermo Scientific HyPerforma Smartainer 3.0 User’s Guide...
-
Page 49: Specifications And Parts Information
Figure 6.1 illustrates the features of the 200 L Smartainer 3.0. Temperature Load cell display display Document holder Handle Forklift locations (2) Jacket inlet/outlet ports (2) Load cells Tray assembly (optional) Cart (optional) Figure 6.1. Front view of 200 L Smartainer 3.0. Thermo Scientific HyPerforma Smartainer 3.0 User’s Guide... -
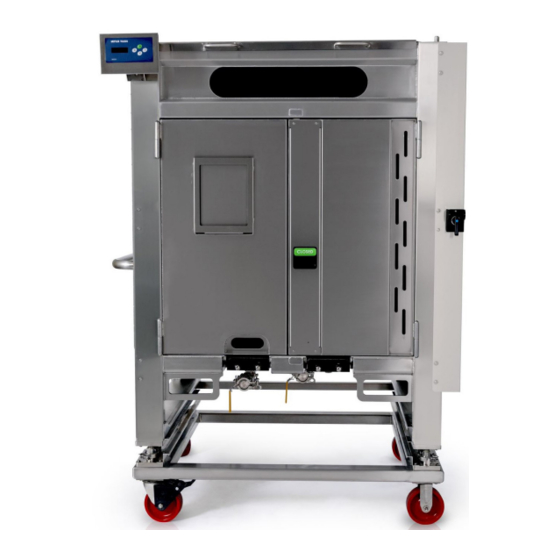
Page 50: 500 L And 1,000 L Smartainer 3.0 Design Features
Port holder covers (2) RTD port cutout Jacket inlet/ Forklift outlet ports (2) locations (2) Tray Load cells assembly (optional) Cart (optional) Figure 6.2. Front view of 500 L and 1,000 L Smartainer 3.0. Thermo Scientific HyPerforma Smartainer 3.0 User’s Guide... -
Page 51: 1,500 L- 3,000 L Smartainer 3.0 Design Features
Document holder Door handle RTD port Port holder cutout covers (2) Forklift Jacket inlet/ locations (2) outlet ports (2) Load cells Figure 6.3. Front view of 1,500 L– 3 ,000 L Smartainer 3.0. Thermo Scientific HyPerforma Smartainer 3.0 User’s Guide... - Page 52 < 70 dB at 1.5 m Environmental operating temperature range Ambient to 40°C ± 0.5°C (104°F ± 0.9°F) Volume range 0–200 L Maximum BPC pressure 0.03 bar (0.5 psi) *Vessel-only estimate. Accessories will add additional weight. Thermo Scientific HyPerforma Smartainer 3.0 User’s Guide...
- Page 53 < 70 dB at 1.5 m Environmental operating temperature range Ambient to 40°C ± 0.5°C (104°F ± 0.9°F) Volume range 0–500 L Maximum BPC pressure 0.03 bar (0.5 psi) *Vessel-only estimate. Accessories will add additional weight. Thermo Scientific HyPerforma Smartainer 3.0 User’s Guide...
- Page 54 < 70 dB at 1.5 m Environmental operating temperature range Ambient to 40°C ± 0.5°C (104°F ± 0.9°F) Volume range 0–1,000 L Maximum BPC pressure 0.03 bar (0.5 psi) *Vessel-only estimate. Accessories will add additional weight. Thermo Scientific HyPerforma Smartainer 3.0 User’s Guide...
- Page 55 < 70 dB at 1.5 m Environmental operating temperature range Ambient to 40 ± 0.5°C (104 ± 0.9°F) Volume range 0–1,500 L Maximum BPC pressure 0.03 bar (0.5 psi) *Vessel-only estimate. Accessories will add additional weight. Thermo Scientific HyPerforma Smartainer 3.0 User’s Guide...
- Page 56 < 70 dB at 1.5 m Environmental operating temperature range Ambient to 40 ± 0.5°C (104 ± 0.9°F) Volume range 0–2,000 L Maximum BPC pressure 0.03 bar (0.5 psi) *Vessel-only estimate. Accessories will add additional weight. Thermo Scientific HyPerforma Smartainer 3.0 User’s Guide...
- Page 57 < 70 dB at 1.5 m Environmental operating temperature range Ambient to 40 ± 0.5°C (104 ± 0.9°F) Volume range 0–2,500 L Maximum BPC pressure 0.03 bar (0.5 psi) *Vessel-only estimate. Accessories will add additional weight. Thermo Scientific HyPerforma Smartainer 3.0 User’s Guide...
- Page 58 < 70 dB at 1.5 m Environmental operating temperature range Ambient to 40 ± 0.5°C (104 ± 0.9°F) Volume range 0–3,000 L Maximum BPC pressure 0.03 bar (0.5 psi) *Vessel-only estimate. Accessories will add additional weight. Thermo Scientific HyPerforma Smartainer 3.0 User’s Guide...
- Page 59 3,000 L Non-jacketed, with load cells, document holder, port holder, SBN3000.7001 tray in vessel, and pneumatic hoist 3,000 L Jacketed, with load cells, document holder, port holder, tray in vessel, SBN3000.7002 temperature display, and pneumatic hoist Thermo Scientific HyPerforma Smartainer 3.0 User’s Guide...
- Page 60 SH31188.03 SH31058.03 SS00197-I 1,000 L, vertically-gusseted SH31188.04 SH31058.04 SS00198-I 1,500 L, vertically-gusseted SH31188.05 SH31058.05 SS00199-I 2,000 L, vertically-gusseted SH31188.06 SH31058.06 SS00200-I 2,500 L, vertically-gusseted SH31188.07 SH31058.07 SS00201-I 3,000 L, vertically-gusseted SH31188.08 SH31058.08 SS00202-I Thermo Scientific HyPerforma Smartainer 3.0 User’s Guide...
- Page 61 Tel: +1 435 792 8500 Email: customerservice.bioprocessing@thermofisher.com In Europe Unit 9 Atley Way Cramlington, NE 23 1WA Great Britain Tel: +44 (1) 670 734 093 Fax: +44 (1) 670 732 537 Email: customerservice.bioprocessing@thermofisher.com Thermo Scientific HyPerforma Smartainer 3.0 User’s Guide...
- Page 62 Training Training can be provided for start-up and operation of the Smartainer 3.0. Contact your Thermo Fisher Scientific sales representative for more information. Thermo Scientific HyPerforma Smartainer 3.0 User’s Guide...
- Page 63 Find out more at thermofisher.com/sut For Research or Further Manufacturing. Not for diagnostic use or direct administration into humans or animals. © 2020 Thermo Fisher Scientific Inc. All rights reserved. All trademarks are the property of Thermo Fisher Scientific and its subsidiaries unless otherwise specified.
Need help?
Do you have a question about the thermoscientific HyPerforma Smartainer 3.0 and is the answer not in the manual?
Questions and answers