Table of Contents
Advertisement
PAC3760 DL
Operating Instructions
Represented in Australia by:
EMONA Instruments Pty Ltd
78 Parramatta Rd
Camperdown NSW 2050
Tel: 1 800 632 953
www.emona.com.au
www.protag.com.au
testinst@emona.com.au
Represented in New Zealand by:
Electrotest Ltd
12A Te Kea Place
Albany
Auckland
Tel: +64 (09) 4482600
www.electrotest.co.nz
Advertisement
Table of Contents

Related Manuals for Seaward PAC3760 DL


Summary of Contents for Seaward PAC3760 DL
- Page 1 PAC3760 DL Operating Instructions Represented in Australia by: EMONA Instruments Pty Ltd 78 Parramatta Rd Camperdown NSW 2050 Tel: 1 800 632 953 www.emona.com.au www.protag.com.au testinst@emona.com.au Represented in New Zealand by: Electrotest Ltd 12A Te Kea Place Albany Auckland Tel: +64 (09) 4482600...
- Page 3 78 Parramatta Rd Camperdown NSW 2050 Tel: 1 800 632 953 www.emona.com.au www.protag.com.au testinst@emona.com.au Represented in New Zealand by: Electrotest Ltd 12A Te Kea Place Albany Auckland Tel: +64 (09) 4482600 www.electrotest.co.nz Part Number 403A557 Revision 1.2 © 2014 Seaward Electronic Ltd...
- Page 4 SEAWARD Electronic Limited. This also applies to accompanying drawings and diagrams. Due to a policy of continuous development SEAWARD Electronic Limited reserves the right to alter the equipment specifi cation and description outlined in...
- Page 5 EMC and Safety Standards. The product identifi ed above conforms to the requirements of Council Directive 2004/108/EC and 2006/95/EC. Seaward Electronic Ltd is registered under BS EN ISO9001:2000 Certifi cate No: Q05356.
-
Page 6: Table Of Contents
PAC3760 DL Operating Instructions Contents Important Information ............Introduction ..................Performing Tests ............... Testing a Class I Appliance ..........Testing a Class I Appliance with Leakage ... Testing a Class II Appliance ........... Testing a Class II Appliance with Leakage .. -
Page 7: Important Information
Before use, ensure unit is clean and dry; visually inspect all leads, connectors, and case. Any damage or wear must be rectifi ed prior to use. If the PAC3760 DL is used in a manner not specifi ed by these operating instructions then the protection provided may be impaired. - Page 8 Do not touch conductive parts of the appliance while tests are active. Do not operate the PAC3760 DL in an explosive gas or dust environment. The PAC3760 DL has been designed to make measurements in a dry environment.
-
Page 9: Introduction
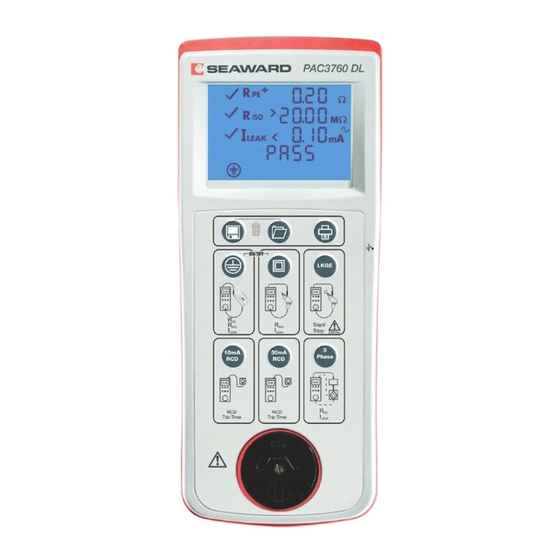
PAC3760 DL Operating Instructions Introduction Figure 1. PAC3760 DL Front View Figure 2. PAC3760 DL End View... - Page 10 PAC3760 DL Operating Instructions The PAC3760 DL is a hand held battery powered unit suitable for carrying out electrical safety checks on: • Class I appliances • Class II appliances • IEC mains leads • Extension leads • 10mA Installation and portable RCDs •...
- Page 11 Tests are initiated using the six push buttons. Power ON/OFF = press and hold the Class I and Class II test buttons simultaneously, PAC3760 DL will power on/off when buttons are released. Note: The unit will automatically switch OFF after approximately 3 minutes if no keys are pressed.
-
Page 12: Performing Tests
Operating Instructions Performing Tests Press CLI and CLII keys simultaneously to switch on the PAC3760 DL. When the unit is ready the display will be as shown below. Testing a Class I Appliance Visually inspect the appliance as per requirements of AS/NZS 3760:2010. - Page 13 If the LO LOAd enunciator is displayed, the load presented by the appliance may be too small for the PAC3760 DL to detect. In this case, press the Class I test button to continue. If the Insulation test measures below the 1Mohm pass/fail threshold, the measured value is displayed and the unit indicates a fail.
-
Page 14: Testing A Class I Appliance With Leakage
Visually inspect the appliance as per requirements of AS/NZS 3760:2010. If the appliance passes a visual inspection proceed with the electrical tests. Plug the mains lead into the PAC3760 DL and a mains supply socket. When plugging the mains lead into the PAC3760 DL ensure that the polarity orientation of the connector is correct. - Page 15 If the LO LOAd enunciator is displayed, the load presented by the appliance may be too small for the PAC3760 DL to detect. In this case, press the Leakage button to continue. Note: If the High Load enunciator is displayed,...
-
Page 16: 3.3 Testing A Class Ii Appliance
PAC3760 DL will display LO LOAd. If the LO LOAd enunciator remains on the display, the load presented by the appliance may be too small for the PAC3760 DL to detect. In this case, press the Class II test button to continue. -
Page 17: Testing A Class Ii Appliance With Leakage
Visually inspect the appliance as per requirements of AS/NZS 3760:2010. If the appliance passes a visual inspection proceed with the electrical tests. Plug the mains lead into the PAC3760 DL and a mains supply socket. When plugging the mains lead into the PAC3760 DL ensure that the polarity orientation of the connector is correct. - Page 18 If the LO LOAd enunciator is displayed, the load presented by the appliance may be too small for the PAC3760 DL to detect. In this case, press the Leakage button to continue. Note: If the High Load enunciator is displayed,...
-
Page 19: Testing A Mains Cord
PAC3760 DL. Press the Class I test sequence button. The PAC3760 DL will fi rst test the continuity of the protective earth. If the measured value is greater than 1 ohm a cross is placed next to the R enunciator, a FAIL is indicated. -
Page 20: Testing An Extension Lead
Plug the mains plug of the extension lead into the front panel mains socket on the PAC3760 DL. The extension lead can now be tested in the same manner as an IEC as described above. - Page 21 4. Press the Class I and LKGE buttons simultaneously. The PAC3760 DL performs an earth test. 5. The PAC3760 DL will give warning beeps. Repeat step 4 on every socket until the last socket – press buttons for 2 secs.
-
Page 22: Test An Epod/Extension Lead With Mov And/Or Rcds
Note: For extension leads with RCDs, follow 3.7b Procedure A and carry out a single socket test. Procedure A: 1. Plug the mains lead into the PAC3760 DL and a mains supply socket. 2. Plug powerboard lead into mains outlet socket on the PAC3760 DL. - Page 23 7. Repeat sequence on every socket. Procedure B: 1. Plug the mains lead into the PAC3760 DL and a mains supply socket. 2. Plug powerboard lead into mains outlet socket on the PAC3760 DL.
-
Page 24: Testing 3-Phase Equipment
RCDs. Plug the supplied 0.5m IEC lead into the IEC socket on the end of the PAC3760 DL and into the mains outlet which is protected by the installation RCD under test. To test the RCD operating time, fi rst identify the rated... -
Page 25: Testing Portable Rcd Operating Time
RCDs. Plug the supplied 0.5m IEC lead into the IEC socket on the end of the PAC3760 DL and into the mains outlet on the portable RCD. Plug the portable RCD in to the front panel test socket. - Page 26 RCD. The operating time for each RCD test will be shown on the PAC3760 DL display. For 10mA RCD tests the PAC3760 DL will indicate a pass for ≤40ms. For 30mA RCD tests the PAC3760 DL will indicate a...
-
Page 27: Memory & Print Functions
The STORE icon will be displayed and the results displayed on the LCD will be recorded in memory. Viewing Test Results When the PAC3760 DL is waiting to start a new test sequence press and hold the STORE / RECALL button, this will display the last recorded results. -
Page 28: Transferring Test Results
Select the correct COM port. Click on Download. A progress bar will appear. On the PAC3760 DL in order to transfer the entire test storage area to PC press and hold the STORE/ RECALL for 5 seconds until the screen displays the last recorded result. -
Page 29: Printing Test Results
PAC3760 DL Operating Instructions Printing Test Results Tester will automatically SAVE the test result when user press PRINT after a test sequence is completed. In order to print a test label press the PRINT Key when the test sequence has been completed or when the test result is being reviewed. -
Page 30: Setting The Real Time Clock
Operating Instructions Setting the Real Time Clock Setting time and date: Ensure that the PAC3760 DL is powered off. Press and hold the RETEST PERIOD key and then press simultaneously the class I and class II keys to power on the tester. -
Page 31: Troubleshooting
The PAC3760 DL shows a ‘HIGH LOAD’ warning. The appliance under test is greater than 10A, proceeding with the Leakage test may blow the fuse in the PAC3760 DL. It is suggested that the sequence is aborted and a sequence which include an Insulation test be performed. -
Page 32: Specifi Cation
PAC3760 DL Operating Instructions Specifi cation Earth Continuity Display Range 0.01ohms to 19.99ohms Measuring Range 0.05ohms to 19.99ohms Accuracy ± (5% + 2 digits) Test current 200mA minimum Test voltage 6V nominal Insulation resistance Display Range 0.01Mohms to 19.99Mohms Measuring Range 0.10Mohms to 19.99Mohms... - Page 33 PAC3760 DL Operating Instructions Factory Set Pass/Fail limits Class I Class II Earth 1.0 ohms Continuity Insulation 1.0Mohm 1.0Mohm Resistance Insulation 5.00mA 1.00mA 10mA RCD 30mA RCD Test Time 40ms 300ms Environmental rating IP Rating IP40 Operating temperature range 0°C to 40°C, without moisture condensation.
-
Page 34: Maintenance
If an Error warning should appear on the display please contact Emona Instruments or Electrotest Ltd for advice. Battery Check The PAC3760 DL is powered from a 6 AA cells which are checked before a test is performed. When the battery voltage is low the enunciator is illuminated. -
Page 35: Battery Replacement
Switch off the unit by pressing and holding the CLI and CLII keys. Disconnect all leads from the PAC3670 DL. Place the PAC3760 DL face down and release the captive screw in the battery compartment cover. Remove the battery compartment cover and remove the discharged batteries. -
Page 36: Service And Calibration
PAC3760 DL Operating Instructions Service and Calibration To maintain the specifi ed accuracy of the measurement results, the instrument must be recalibrated at regular intervals by either the manufacturer, Emona Instruments or by Electrotest Ltd. We recommend a recalibration period of one year. - Page 37 PAC3760 DL Operating Instructions NEW ZEALAND Service Department: Electrotest Ltd 12A Te Kea Place Albany Auckland PO Box 300-475 Albany Auckland 0752 Tel: +64 (09) 4482600 Fax: +64 (09) 448 2611 Email: info@electrotest.co.nz...
- Page 38 PAC3760 DL Operating Instructions...
- Page 39 PAC3760 DL Operating Instructions...
- Page 40 PAC3760 DL Operating Instructions...
- Page 41 PAC3760 DL Operating Instructions...
- Page 42 PAC3760 DL Operating Instructions...
- Page 44 403A557 Rev 1.2...
Need help?
Do you have a question about the PAC3760 DL and is the answer not in the manual?
Questions and answers