Table of Contents
Advertisement
Quick Links
This User Manual is optimized for
Acrobat Reader.
Interactive buttons may not
appear in other applications.
Professional Fidelity
Phonitor se
INPUT
Digital
Digital
Coax
USB
Analog
Optic
VOLTAiR
120V DC Audio Rail
Phonitor se – User Manual
Headphone Amplifier
Mastering Grade Listening
Headphone Amplifier
CROSSFEED
C 1
Off
C 2
ON
Advertisement
Table of Contents

Related Manuals for SPL Phonitor se


Summary of Contents for SPL Phonitor se
- Page 1 Professional Fidelity Mastering Grade Listening Headphone Amplifier Phonitor se INPUT CROSSFEED Digital Digital Coax Analog Optic VOLTAiR 120V DC Audio Rail Phonitor se – User Manual This User Manual is optimized for Acrobat Reader. Headphone Amplifier Interactive buttons may not appear in other applications.
- Page 2 Phonitor se. The Phonitor se is our entry model into the world of VOLTAiR headphone amplifiers. The Phonitor se has the same audio signal amplification as its bigger brothers Phonitor x and Phonitor xe and therefore offers the same sound experience.
-
Page 3: Table Of Contents
Content Source selection Headphone output Getting started DIP switch Front view Level increase of the headphone output Specifications Rearview Inputs Bottom view Outputs DIP switches Internal operating voltages VOLTAiR – 120V Rail Technology Power supply Comparisons Dimensions (incl. feet) Phonitor Matrix Weight Basics of stereo listening Important Notes... -
Page 4: Getting Started
Getting started Getting started Read thoroughly and follow the instructions as well as the security advices of the Quickstart which is enclosed in the scope of delivery! You can also download the Quickstart here. By pressing the -Button you get to the table of contents. By pressing the -Button you get to the front view of the unit. -
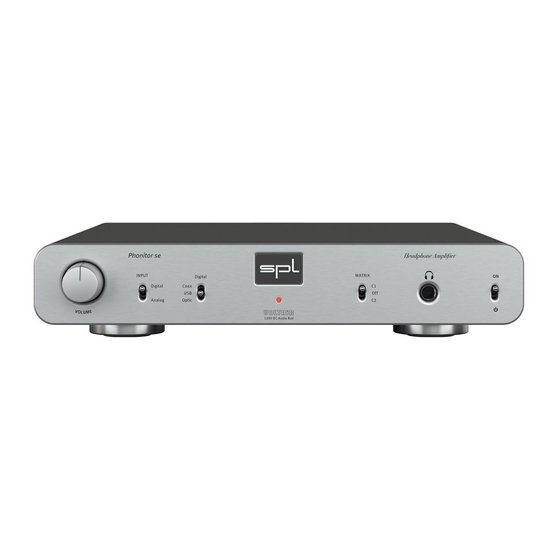
Page 5: Front View
Front view Front view Input Selection Crossfeed C1/Off/C2 Headphone Output Volume Standby Headphone Amplifier Phonitor se INPUT CROSSFEED Digital Digital Coax Analog Optic VOLTAiR 120V DC Audio Rail Digital Source Power LED F R B... -
Page 6: Rearview
Mains Switch optional ~115 V AC/~230 V AC, 50 Hz/60 Hz, P max. 30 W COAX Fuses: Phonitor se 230 V: T 315 mA L 250V OPTICAL 115 V: T 630 mA L 250V Voltage Selection: 1. Remove Fuse Holder 2. -
Page 7: Bottom View
Bottom view Bottom view DIP Switch DIP switches Factory setting. F R B... -
Page 8: Voltair - 120V Rail Technology
Music sounds absolutely natural. SPL’s 120V Rail Technology is the internal audio processing voltage (+/- 60V DC). It is not to be confused with the external mains voltage (e.g. 115V or 230V AC). -
Page 9: Comparisons
Operating Voltage Dynamic Range Volt 120 V 141,4 30 V 124,2 OPA 134@30 V SPL-OP@120 V + / - 15 Volt + / - 60 Volt F R B... - Page 10 130%. The operating level most commonly used for audio equipment is +/- 15 volts. Max. Audio Level THD&N -105 -106 33,2 -107 -109 21,5 -111 -113 -114,2 -115 TL 071@30 V SPL-OP@120 V OPA 134@30 V SPL-OP@120 V F R B...
-
Page 11: Phonitor Matrix
Phonitor Matrix Phonitor Matrix Basics of stereo listening When listening to speakers sound coming from the right is not only perceived with the right ear (red line) but it is also perceived with the left ear (green line). The sensation is time delayed, lower in level and has a reduced fre- quency range (this applies to the left speaker accordingly). -
Page 12: Stereo Listening With An "Traditional" Headphone Preamplifier
Phonitor Matrix Our brain determines the direction of the sound by perceiving the time delay (interaural time difference) and the level difference (interaural level difference). Stereo listening with an “traditional“ headphone preamplifier When listening to music with a traditional headphone amplifier, the right ear only perceives the right signal (red line) and the left ear only perceives the left signal (green line). -
Page 13: How Does The Phonitor Matrix Work
Phonitor Matrix How does the Phonitor Matrix work? In simple terms, the Phonitor Matrix creates a speaker-like listening experience on headphones. It calculates the time and level differences with their specific frequency responses to deliver a true rendition of a speaker playback. Because time and level differences are set like real loudspeaker place- ment, the brain is able to correctly identify the direction of the sound. -
Page 14: Angle
Phonitor Matrix In Detail The Phonitor se makes use of analog filter networks to create the interaural level and time differences. The time difference relates to the standard stereo speaker placement of 30°. The Phonitor se offers two crossfeed settings to create the interaural level difference. Angle The Phonitor se has a fixed 30°... -
Page 15: Crossfeed
Phonitor Matrix Crossfeed Crossfeed defines the interaural level difference. The two crossfeed values approximate the influences of room size, reflection and absorption characteristics. Frequency corrected level difference at Crossfeed C1 and 30° Angle of the Frequency corrected time difference at Crossfeed C1 and 30° Angle of the right channel (red = right signal, green = left signal) right channel (red = right signal, green = left signal) µs... -
Page 16: Phonitor Matrix Presets
Phonitor Matrix Phonitor Matrix presets Phonitor se The Phonitor se offers two presets. The Speaker Angle is fixed to 30°. For the Crossfeed INPUT CROSSFEED Digital there are two settings: C1 and C2. Digital Coax Analog Optic The value C1 has less crossfeed and therefore a lower time difference than C2. -
Page 17: Source Selection
Up to four audio sources can be connected to the Phonitor se. Connect your analog source to the RCA Input (10). Phonitor se Phonitor se can be equipped with a DA converter. With that installed the analog input is expanded by USB, coaxial and optical digital stereo inputs (11). -
Page 18: Headphone Output
Headphone output Headphone output Up to 2 x 5 watts of output power is available at the Headphone Output (2). This allows even very power-hungry headphones such as magnetostats or electrostats to be driven effortlessly. To protect the headphone power amplifier stage and guarantee a long and consistent performance please note: •... -
Page 19: Dip Switch
DIP switch DIP switch With the DIP switch (12) on the bottom the level of the headphone output can be increased: Level increase of the headphone output By using the DIP switch 1 you can increase the level of the headphone output to better feed power-hungry headphones. -
Page 20: Specifications
Specifications Specifications Inputs RCA input • Unbalanced • Impedance: 20 kohms • Max. Input level: +32.5 dBu Digital inputs (optional DAC 768xs) / sample rates • Coaxial SPDIF (RCA) - sample rates PCM (kHz): 44.1, 48 , 88.2, 96, 176.4, 192 •... -
Page 21: Outputs
Specifications Outputs Standard headphone output Warning: Never connect a mono jack cable to the standard headphone output (front panel stereo jack). Make sure that the stereo jack is fully inserted, otherwise a short circuit might damage the headphone amplifier! • 6.35 mm TRS connector •... -
Page 22: Internal Operating Voltages
Specifications Internal operating voltages • Operating voltage for analog audio: +/- 60 V • Operating voltage for relays and LEDs: 12 V • Operating voltage for DAC768xs: +7 V, +3.3 V Power supply • Mains voltage (switchable): 230 V AC / 50 Hz or 115 V AC / 60 Hz •... -
Page 23: Important Notes
Technical specifications are subject to change. © 2020 SPL electronics GmbH. This document is the property of SPL and may not be copied or reproduced in any manner, in part or fully, without prior authorization by SPL. Sound Performance Lab (SPL) continuously strives to improve its products and reserves the right to modify the product described in this manual at any time without prior notice.
Need help?
Do you have a question about the Phonitor se and is the answer not in the manual?
Questions and answers