Table of Contents
Advertisement
Quick Links
Advertisement
Table of Contents

Related Manuals for Essilor Instruments EyeViz 300


Summary of Contents for Essilor Instruments EyeViz 300
- Page 1 User manual...
-
Page 2: Table Of Contents
> C SER MANUAL ONTENTS ONTENTS I. I NTRODUCTION II. G ENERAL WARNINGS 1. About this manual 2. Description of device 3. Types of warnings, cautions and notes 4. List of abbreviations 5. Symbols & Label a. Symbols marked on the instrument III. - Page 3 > C SER MANUAL ONTENTS 2. Start the tests VII. T ESTS RESULTS 1. Results 2. CT and ACT results key VIII. M & S AINTENANCE ERVICE 1. Maintenance a. Determining the battery state b. Led low battery indicator c. Indicator on the lenses for low battery d.
-
Page 4: Introduction
I. I NTRODUCTION... - Page 5 The complete user manual is available on a web space. To access other available languages, please scan the QR code at the end of this user manual > Chapter QR code p.66) EyeViz 300 - Vision assessment system > V1 - 07-2019...
-
Page 6: General Warnings
II. G ENERAL WARNINGS... -
Page 7: About This Manual
YPES OF WARNINGS CAUTIONS AND NOTES Three types of special message appear in this user manual: Warning A warning indicates precautions to avoid the possibility of personal injury or death. EyeViz 300 - Vision assessment system > V1 - 07-2019... -
Page 8: List Of Abbreviations
Oculus Dextrus (Right Eye) Oculus Sinister (Left Eye) Pupillary Distance Date of Birth Visual Acuity Contrast Sensitivity Small Medium Large Towards the nose Outwards from the nose Hypo Too low Hyper Too high EyeViz 300 - Vision assessment system > V1 - 07-2019... -
Page 9: Symbols & Label
Manufacturer Authorized Representative Information FCC symbol QR code RoHS compliance Warning This side up Fragile Keep dry Recyclable Type BF (B = Body, F = Floating applied part) applied part EyeViz 300 - Vision assessment system > V1 - 07-2019... -
Page 10: Conditions For Use
III. C ONDITIONS FOR USE... -
Page 11: Use
Patient movement and fidgeting may lead to difficulty in completing testing. d. Contraindications • Significant neurological or behavioral problems • Patients with only one eye • Patients whose binocular visual system has not yet fully developed EyeViz 300 - Vision assessment system > V1 - 07-2019... -
Page 12: Safety
If you are unsure how to reach your distributor, please call Essilor for your distributor's contact information. • Do not disassemble any part from the device. • This device is not user-serviceable. EyeViz 300 - Vision assessment system > V1 - 07-2019... -
Page 13: Set Up The System
IV. S ET UP THE SYSTEM... - Page 14 Connect the power adaptor to AC power. Make sure that the system display is clean. Wipe if necessary with a damp cloth. Check the glasses. Check that the glasses are clean and in proper working order. EyeViz 300 - Vision assessment system > V1 - 07-2019...
- Page 15 The glasses will then shut down. In addition to the LED indicator, when powering down the glasses, the glasses will display a long blink and open both lenses. EyeViz 300 - Vision assessment system > V1 - 07-2019...
-
Page 16: Power On And Login To System
To start the system, press the power on button on the top of the system. Contact customer service if the system does not turn on after the power supply has been checked. > The login screen will be displayed. EyeViz 300 - Vision assessment system > V1 - 07-2019... -
Page 17: Shut Down The System
After you have run the desired tests and viewed the results, you may shutdown the system by pressing [Power] on the main menu: The program will close and the system will shut down. Contact customer service if the system does not turn off. EyeViz 300 - Vision assessment system > V1 - 07-2019... -
Page 18: Position The Patient
Small children can be seated on their mother's lap. Correct placement of device, with the patient sitting directly in-front of the system at a distance between 50 and 80 cms. EyeViz 300 - Vision assessment system > V1 - 07-2019... -
Page 19: Put On The Glasses
Proper placement of the glasses Glasses should be placed on top of the patient's prescription glasses. When putting on the glasses, make sure that the glasses do not slip down the nose. EyeViz 300 - Vision assessment system > V1 - 07-2019... -
Page 20: Main Menu
To access the settings screen, you must select settings from the menu on the top panel. A dialog box will open where you are required to enter the admin user name and password. EyeViz 300 - Vision assessment system > V1 - 07-2019... -
Page 21: Facility Name]
Press to edit the facility name. [Cancel] / [OK] Press [Cancel] or [OK] to collapse this section. [Exit Administrator] Press to exit from the [Settings] screen. Arrows Press to open or close a setting. EyeViz 300 - Vision assessment system > V1 - 07-2019... - Page 22 [Facility name] The facility name is the name of the hospital, clinic or other organization that is using the system. From the main menu, choose [Settings > Facility name]: EyeViz 300 - Vision assessment system > V1 - 07-2019...
-
Page 23: Date And Zone Time]
If the system is connected to the internet, there is no need to manually alter the date and time zone. If no internet connection is available, the system date and time must be maintained by the user. From the main menu, choose [Settings > Date and zone time]: EyeViz 300 - Vision assessment system > V1 - 07-2019... -
Page 24: Change Password]
[OK] to accept the change • [Cancel] to ignore the change c. [Change password] This screen allows you to change the administrator and user passwords. From the main menu, choose [Settings > Change password]: EyeViz 300 - Vision assessment system > V1 - 07-2019... -
Page 25: Default Mandatory Subject Info]
If you forget the current password, contact Essilor service for assistance. d. [Default mandatory subject info] This screen allows you to change the default subject info. From the main menu, choose [Settings > Default mandatory subject info]: EyeViz 300 - Vision assessment system > V1 - 07-2019... -
Page 26: Set Modes]
[Cancel] to ignore the change e. [Set modes] This screen allows you to change the modes (baby, toddler, child, adult) settings. From the main menu, choose [Settings > Set modes]: EyeViz 300 - Vision assessment system > V1 - 07-2019... -
Page 27: Categories]
[OK] to accept the change • [Cancel] to ignore the change f. [Categories] This screen allows you to change the patient categories. From the main menu, choose [Settings > Set Categories]: EyeViz 300 - Vision assessment system > V1 - 07-2019... - Page 28 > A popup will display. Enter the new category text and press: • [OK] to accept the change • [Cancel] to ignore the change Select which categories should be displayed on the category list. EyeViz 300 - Vision assessment system > V1 - 07-2019...
-
Page 29: Language Configuration]
You may edit a category by selecting the pencil icon, or deselect categories by selecting the trash bin symbol. g. [Language configuration] This screen allows you to change the language system. From the main menu, choose [Settings > Language configuration]: EyeViz 300 - Vision assessment system > V1 - 07-2019... - Page 30 The [Language configuration] screen will display: Select the marker to view the list of available languages. Select the desired language, and press: • [OK] to accept the change • [Cancel] to ignore the change EyeViz 300 - Vision assessment system > V1 - 07-2019...
-
Page 31: User Logo Settings]
Select the desired logo, and press: • [OK] to accept the change • [Cancel] to ignore the change The logo must be 80x20 pixels in order to fit the report formatting properly. EyeViz 300 - Vision assessment system > V1 - 07-2019... -
Page 32: Visual Acuity Units Settings]
This screen allows you to select which units are used for displaying the visual acuity and contrast sensitivity test results From the main menu, choose [Settings > Visual acuity units settings]: The [Visual acuity units settings] screen will display: EyeViz 300 - Vision assessment system > V1 - 07-2019... - Page 33 Press the arrow indicator and the list of available units will appear. Select the desired units, and press: • [OK] to accept the change • [Cancel] to ignore the change EyeViz 300 - Vision assessment system > V1 - 07-2019...
-
Page 34: Set Up The Tests
V. S ET UP THE TESTS... -
Page 35: Overview Of Initial Setup Screen
List of which tests to run, and the detailed settings for each test. In this section, you can filter the available tests based on glasses type and testing distance. Filtering by each of these will change the list of available tests. EyeViz 300 - Vision assessment system > V1 - 07-2019... -
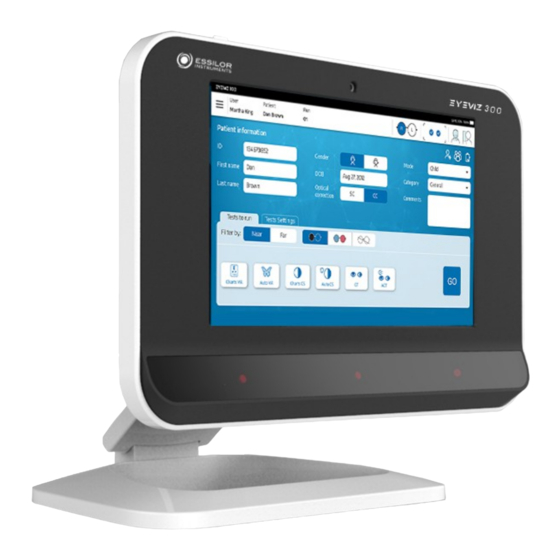
Page 36: Patient Information
In addition, the patient database may be accessed to review previous test results and trends over time. Basic identifying information ◦ Patient's ID ◦ First name ◦ Last name ◦ Gender ◦ Date of birth (DOB) EyeViz 300 - Vision assessment system > V1 - 07-2019... -
Page 37: Tests To Run
Press on each test that you wish to run. The button will change to green to indicate that the test has been selected: [Near / Far] Based on the selected toggle, the tests will be run in near or far mode. This toggle will also change the available tests view. EyeViz 300 - Vision assessment system > V1 - 07-2019... - Page 38 Auto VA ◦ Charts CS ◦ Auto CS ◦ ◦ Toggle when anaglyph glasses is selected, tests which may be run: ◦ Worth 4-dot ◦ Fusional Vergence ◦ Stereo Test EyeViz 300 - Vision assessment system > V1 - 07-2019...
- Page 39 The fusional, Worth 4-dot and reading tests can only be performed for the near procedure. Only the CT and ACT may be performed using far procedure. EyeViz 300 - Vision assessment system > V1 - 07-2019...
-
Page 40: Tests Settings
Possible values: Choose a position from the grid. [Volume] ◦ Description: Enables setting of the sounds which are emitted from the system, including during the tests. ◦ Possible values: 0 to 100. EyeViz 300 - Vision assessment system > V1 - 07-2019... - Page 41 The default values in this screen are set by the [Settings/Set Mode] screen. If you find that you are often changing these values, you may wish to change the default values. EyeViz 300 - Vision assessment system > V1 - 07-2019...
-
Page 42: Run The Tests
VI. R UN THE TESTS... -
Page 43: Verify Correct Operation
The system must be checked for correct operation before running tests, as shown in the table below. It is required to correct any error condition before proceeding with the tests. EyeViz 300 - Vision assessment system > V1 - 07-2019... - Page 44 An arrow pointing to the tracker. right means that the patient is too close. • : OK • : NOK (patient too close to Eye Tracker) EyeViz 300 - Vision assessment system > V1 - 07-2019...
-
Page 45: Start The Tests
[Worth 4 dot]: 20 seconds • [Reading]: 40 seconds • [Color Test]: 30 seconds for short test, 2 minutes for full test (if suspected non-normal color vision) • [Stereo Test]: 30 seconds EyeViz 300 - Vision assessment system > V1 - 07-2019... -
Page 46: Tests Results
VII. T ESTS RESULTS... - Page 47 Patient information Results fields for all available tests Arrows If more than one test of a particular-type was run, press on arrow to see test details. EyeViz 300 - Vision assessment system > V1 - 07-2019...
-
Page 48: Results
The actual result and the simulated VA result are reported. Simulated VA result units may be set from “settings” menu- 20/20, 6/6, LogMar and Decimal. Sitting distance from screen is also reported. EyeViz 300 - Vision assessment system > V1 - 07-2019... - Page 49 An image showing the reading results is also displayed. With: • Green circles > indicate fixations • Red circles > indicate regressions • Blue circles > indicate line beginning • Connecting lines > show direction of reading movement EyeViz 300 - Vision assessment system > V1 - 07-2019...
-
Page 50: Ct And Act Results Key
2. CT RESULTS KEY • letter- deviating eye • letter- direction • letter- tropia / phoria **Add brackets if intermittent** Deviating eye Right Left Alternating Direction Hyper Hypo Hypo EyeViz 300 - Vision assessment system > V1 - 07-2019... - Page 51 (hypo/hyper), but rather a description of which eye is positioned above the other eye- L/R (left higher than right) or R/L (right higher than left). EyeViz 300 - Vision assessment system > V1 - 07-2019...
-
Page 52: Maintenance & Service
VIII. M & S AINTENANCE ERVICE... -
Page 53: Maintenance
Glasses should be turned off at the end of each patient session in order to maintain maximal battery life. • The glasses battery is not user-replaceable. If the glasses fail to charge, replace the glasses. EyeViz 300 - Vision assessment system > V1 - 07-2019... -
Page 54: Clean And Disinfect
Essilor warrants that the EyeViz300 system meet their published specifications at the time of shipment from the factory. Essilor further warrants that the product was calibrated at the factory prior to shipment. EyeViz 300 - Vision assessment system > V1 - 07-2019... - Page 55 IX. T ROUBLESHOOTING...
-
Page 56: Troubleshooting
Make sure all of the required information is I want to begin a test, but the entered entered and that at least one test has been “run” button is not enabled selected No tests are selected EyeViz 300 - Vision assessment system > V1 - 07-2019... -
Page 57: Error Messages
Crucial setting parameters have been Crucial settings have been altered. Please contact Essilor altered- Checksum error service for assistance. Database cannot be accessed properly. Please contact Essilor Database fault service for assistance. EyeViz 300 - Vision assessment system > V1 - 07-2019... -
Page 58: Specifications
X. S PECIFICATIONS... - Page 59 • Equipment Classification: IEC 60601-1 • Type of Protection (battery power): Internally powered • Degree of Protection – Glasses: Type BF-Applied Part • Enclosure degree of ingress protection- Glasses: IPX0 EyeViz 300 - Vision assessment system > V1 - 07-2019...
-
Page 60: Qr C Ode
XI. QR C... - Page 61 Täydellinen käyttöohje on käytettävissä verkossa. Avaa käyttöohje skannaamalla QR-koodi asianmukaisella sovelluksella. Το πλήρες εγχειρίδιο χρήσης διατίθεται σε έναν ιστοχώρο. Για να μεταβείτε σε αυτόν, σαρώστε τον παρακάτω κωδικό QR μέσω μιας ειδικής εφαρμογής. EyeViz 300 - Vision assessment system > V1 - 07-2019...
- Page 62 Versiunea integrală a manualului de utilizare este disponibilă pe un site web. Pentru a-l accesa, scanați codul QR de mai jos cu ajutorul unei aplicații dedicate. Полное руководство пользователя доступно в Интернете. Для доступа просканируйте приведенный ниже QR-код с помощью специального приложения. EyeViz 300 - Vision assessment system > V1 - 07-2019...
- Page 63 наведений нижче QR-код за допомогою спеціального додатку. Câm nang hương dân s dung hoan chinh hiên có trên không gian web. Đ truy câp, vui long quet m, QR bên dươi bằng ưng dung chuyên dung. EyeViz 300 - Vision assessment system > V1 - 07-2019...
- Page 64 Essilor Instruments USA 8600 W. Catalpa Avenue, Suite 703 Chicago, IL 60656 Phone: 855.393.4647 Email: info@essilorinstrumentsusa.com www.essilorinstrumentsusa.com...
Need help?
Do you have a question about the EyeViz 300 and is the answer not in the manual?
Questions and answers