Table of Contents
Advertisement
Advertisement
Table of Contents

Related Manuals for Essilor Instruments VISIOSMART 500


Summary of Contents for Essilor Instruments VISIOSMART 500
- Page 1 Quick start guide...
-
Page 2: Part No
Copyright © 2019 Essilor... - Page 3 Visiosmart 500 (C87) is a device for performing an automatic and autonomous visual screening test. The quick start guide provides an overview of the Visiosmart device. It contains: ● basic information on the device, ● the material necessary for its initiation, ●...
-
Page 4: Table Of Contents
เข ้ า ถ ึ ง ข ้อม ู ล กรุ ณ าสแกนรห ั ส QR ด ้ า นล่ า งโดยใช ้ แ อปพล ิ เ คช ั น เฉพาะ Để truy cập, vui lòng quét mã QR bên dưới bằng ứng dụng chuyên dụng. Untuk mengaksesnya, silakan pindai kode QR berikut menggunakan aplikasi khusus. -
Page 5: Description
Description 1. Packaging and accessories Headset* Protective cover Accessories box Left protective foam Device Packaging Screen cleaning cloth Power supply cable Device power supply USB key* Right protective foam (*) Options included or at extra cost... -
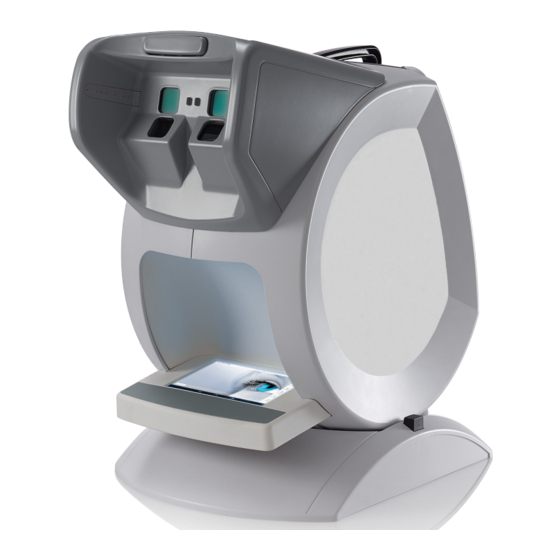
Page 6: Overview
Description 2. Overview a. Front view Stationary forehead rest* Eyepieces for far vision Eyepieces for near vision External screen Handle Connector for peripheral devices Height adjustment button b. Back view Hatch (access to the inside of the device) ON/OFF button 24V power socket Outlet for push button* Outlet for USB uploading... -
Page 7: First Steps
First steps 1. Unpack the device Remove the upper cardboard boxes and put them on a table. Remove the cardboard containing the accessories. Take the device out of its protective foam by holding it by the handle and remove the protective plastic covering it. - Page 8 First steps Open the boxes of accessories. Remove the protective cover and put it away for later use. Remove the device’s cable and power unit, plug them into the device and then into the main power source. Before plugging in the device, ensure that your power supply voltage complies with the external power indicated.
-
Page 9: Turn On And Off
First steps 2. Turn on and turn off Press on the button located on the back of the device to turn it on. › The mask turns on. Wait several seconds for the software to open up on the viewer on the front of the device. -
Page 10: Configuring The Device
First steps 3. Configuring the device a. Toolbar description Product ID Product Software Version Electronic Card Connection Indicator WIFI Configuration indicator Configured Not configured Email inbox configuration indicator Configured Not Configured Configuration menu b. Menu configuration description Press WIFI and email address settings Not used Language settings Acuity format settings... -
Page 11: Wifi And Email Address Settings
First steps c. WIFI and email address settings WIFI setup Press Type the password 1847 on the keyboard and press to validate it. Press to configure the WIFI. › The following screen will appear. Set the field [Enable wifi] to [ON]. Select the desired network Press to detect the desired network if it does not appear. - Page 12 First steps Press to save the configuration. › The icon appears in the toolbar. › Press to return to the configuration menu. Email address Press to configure the e-mail address that test reports will be sent to. › The following screen will appear. Enter the email address that you want and press to validate it.
-
Page 13: Language Settings
First steps Log in to the email that you entered to verify that you received the test report. Press to save the configuration. d. Language settings Press to configure which languages will appear on the home screen. › The following screen will appear. Select the desired languages. -
Page 14: Acuity Format Settings
First steps Select the desired language. Press to save the configuration. e. Acuity format settings Press to configure the acuity format. › The following screen will appear: Select the desired format and the accuracy of the desired acuity. Press to save the configuration. f. -
Page 15: Start The Test
First steps 4. Start the test Once the language is chosen, a series of preliminary questions will determine the most appropriate type of protocol for the subject. Equipment Light sensitivity Main activities... - Page 16 First steps Installation guidelines are given. The headset is a crucial item because all the guidelines for properly running the test are given orally. Finally, press the screen to start the test.
-
Page 17: Main Features
Main Features 1. Protocol description Visiosmart allows you to run four test protocols according to four age groups. a. Protocol No. 1 Right eye/left eye Far vision Day Vision Test Binocular Near vision Mesopic vision Acuity Red/Green Acuity Red/Green Fusion Ishihara b. -
Page 18: Protocol No. 3 (44-54 Years Old)
Main Features c. Protocol No. 3 Right eye/left eye Far vision Day Vision Test Binocular Near vision Mesopic vision Acuity Acuity Acuity Acuity + Horizontal visual field Glare recovery d. Protocol No. 4 Right eye/left eye Far vision Day Vision Test Binocular Near vision... -
Page 19: Description Of A Test Report
Main Features 2. Description of a test report a. Part No. 1 Patient Profile Equipment worn Activities/Interests using vision Light sensitivity ID Number The date that the test is performed on. Tests done for far vision and near vision. b. Part No. 2 Day vision Mesopic vision (low brightness) Interpretation... -
Page 20: Part No
Main Features b. Part No. 3 Interpretation Answer Your vision is good. You seem to be slightly myopic. We recommend that you seek advice from a vision professional. You seem to be slightly hyperopic. We recommend that you seek advice from a vision professional. -
Page 21: Recommendations
Recommendations 1. General guidelines ● Place the device in a room where the temperature is not too high (<40 °C) or too low (>10 °C). ● Protect the device from vibrations and knocks. ● Do not put the device in contact with chemicals and gases. Never try to dismantle the device. -
Page 22: Position Of The Person
Recommendations 4. Position of the person a. Recommendations Before starting the tests, ensure that the person to be examined is seated in front of the device correctly. If the patient must strain his/her neck, sit on the edge of the seat or hunch over to see the eyepieces, the device is not set to the correct height. - Page 23 Recommendations Tilt the device until you achieve the required height. Let go of the button and wait for a click sound. Let go of the handle. › The height of the device has been adjusted.
-
Page 24: Maintenance And Servicing
Maintenance & servicing 1. Cleaning the unit To avoid any incidents, unplug the device before cleaning. Clean the interior and exterior screen with a soft, dry cloth. The screens must never come into contact with liquid (e.g. water, alcohol, window cleaner). To clean the interior screen: Unplug the device. -
Page 25: Technical Data
Technical Data This device is a class I medical device without measurement function. 1. The device ● Dimensions: 483 x 283 x 456 (mm) ● Weight: 6.700 Kg ● Power supply: ● AC Input: 100-240 VAC, 1.5 A max, 50-60 Hz ●... -
Page 26: General Information
General information 1. Symbols Symbols on the device Symbols on the packaging Make sure to read and learn the Complies with R&TTE regulations; information accompanying documents (user manual, etc…). Polarity This way up Manufacturing date (year) Fragile Manufacturer Keep dry This instrument is a class I type B Do not put in a pile product... - Page 27 General information 2. Modifications The information contained in this document is non-contractual and provided as a guide. It may be changed without prior notice. Errors or omissions may occur in this type of document, although the greatest care has been taken to ensure the accuracy of the information provided.
- Page 28 General information 6. Materials and products Do not place this device in a dusty environment, in a room where the temperature is too high or too low or in a damp place. Perchlorate material warning applies to the primary Manganese Dioxide Lithium button cell batteries found in the device. Special handling precautions may apply.
- Page 29 Notes...
- Page 30 Notes...
- Page 32 Essilor Instruments USA 8600 W. Catalpa Avenue, Suite 703 Chicago, IL 60656 Phone: 855.393.4647 Email: info@essilorinstrumentsusa.com www.essilorinstrumentsusa.com...
Need help?
Do you have a question about the VISIOSMART 500 and is the answer not in the manual?
Questions and answers