Table of Contents
Advertisement
Quick Links
Operations & Maintenance Manual
For Commercial Use Only
Form No. L9724 CA 07/20 ©Tornado Industries, LLC. All rights reserved
*Always follow manufacturer instructions*
MINI MARATHON 425
MODEL NO: 98150
Save These Instructions
*AAA Rent-All 225-291-1356*
TORNADO INDUSTRIES, LLC
3101 WICHITA COURT
FORT WORTH, TX 76140
PHONE 800-VACUUMS
FAX 817-551-0719
WWW.TORNADOVAC.COM
Advertisement
Table of Contents

Subscribe to Our Youtube Channel
Related Manuals for Tornado MINI MARATHON 425


Summary of Contents for Tornado MINI MARATHON 425
- Page 1 FORT WORTH, TX 76140 PHONE 800-VACUUMS FAX 817-551-0719 WWW.TORNADOVAC.COM Operations & Maintenance Manual For Commercial Use Only MINI MARATHON 425 MODEL NO: 98150 Form No. L9724 CA 07/20 ©Tornado Industries, LLC. All rights reserved Save These Instructions *AAA Rent-All 225-291-1356*...
- Page 2 *Always follow manufacturer instructions* NOTES Within 30 days, to activate the warranty, go to; https://tornadovac.com/services/warranty-registration-form.aspx For warranty information go to www.tornadovac.com *AAA Rent-All 225-291-1356*...
- Page 3 *Always follow manufacturer instructions* Congratulations on your purchase of a Self-Contained Carpet Extractor. You are now equipped to handle any and all commercial carpet cleaning jobs. Your new unit is a high quality, precision- made product. All parts used in the manufacturing of this unit have passed rigid quality control standards prior to assembly.
- Page 4 *Always follow manufacturer instructions* • Do not use citrus-based cleaners in this machine. • Do not use cleaning chemicals in this machine except those recommended for commercial extraction equipment. The use of any chemical with abrasive additives voids the warranty. •...
-
Page 5: General Instructions
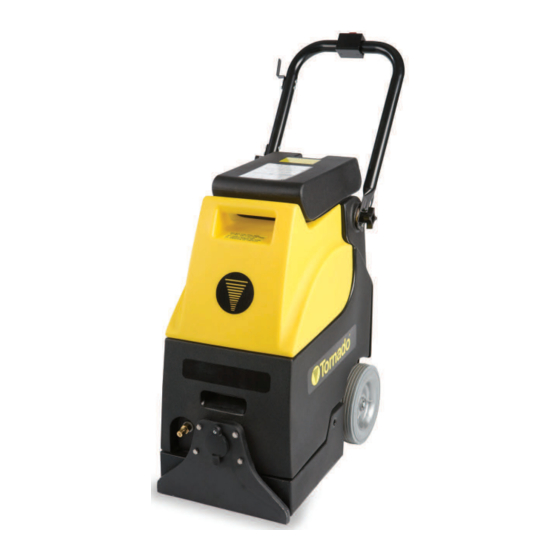
*Always follow manufacturer instructions* GENERAL INSTRUCTIONS MACHINE COMPONENTS & SETUP 1) Main power ON/OFF 2) Pump reset button 3) Brush reset button switch 4) Power cord wrap 5) Folding handle lock 6) Solution tank drain hose knob 7) Solution switch 8) Folding handles 9) Recovery tank cover 10) Recovery tank... -
Page 6: Pre-Operation
*Always follow manufacturer instructions* ATTENTION: Do not use recovery tank to fill solution tank. Residual dirt or debris could cause damage to solution pump. WARNING: Flammable materials can cause an explosion or fire. Do not use flammable materials in tank(s). FOR SAFETY: When using machine, follow mixing and handling instructions on chemical containers. -
Page 7: Cleaning With Accessory Tools
*Always follow manufacturer instructions* Figure 7 Figure 8 CLEANING WITH ACCESSORY TOOLS 1) Connect accessory tool hoses to solution hose coupler and vacuum hose port located at front of machine (Figure 9). 2) Turn main power switch on (Figure 10). 3) Operate accessory tools as normal. -
Page 8: Draining Solution Tank
*Always follow manufacturer instructions* DRAINING SOLUTION TANK 1) Pull solution tank drain hose off of hose barb at rear of machine and empty remaining solution (Figure 12). 2) Replace drain hose. Figure 12 STORING MACHINE 1) Before storing machine, be certain to empty and rinse both tanks of all solution. 2) Store machine in a dry area in the upright position. - Page 9 *Always follow manufacturer instructions* Figure 15 Figure 16 WEEKLY (EVERY 20 HOURS OF OPERATION) 1) Inspect vacuum hoses for holes and loose cuffs. 2) Inspect spray pattern for clogs. If clogged, remove spray tips by twisting spray tip body counter-clockwise and clean orifices. 3) Inspect cord and cord grip for damage.
-
Page 10: Internal Filter
*Always follow manufacturer instructions* FILTER MAINTENANCE EXTERNAL FILTER 1) Remove the recovery tank and locate the filter (Figure 17). 2) Grasp the inner handles and pull out the filter. 3) Rinse the filter bag inside and out. 4) Replace the filter by snapping the filter back into place. Figure 17 INTERNAL FILTER 1) Take off the back cover by removing the four screws. - Page 11 *Always follow manufacturer instructions* Vacuum motor does not operate CAUSE: SOLUTION: 1) Loose or broken wiring. 1) Contact manufacturer or service center. 2) Faulty main power switch. 2) Contact manufacturer or service center. 3) Defective vacuum motor. 3) Contact manufacturer or service center. 4) Worn carbon brushes.
- Page 12 *Always follow manufacturer instructions* Form No. L9724 CA 07/20 *AAA Rent-All 225-291-1356*...
Need help?
Do you have a question about the MINI MARATHON 425 and is the answer not in the manual?
Questions and answers