
Related Manuals for American Dynamics Intellex DV8000


Summary of Contents for American Dynamics Intellex DV8000
- Page 1 ® Intellex Digital Video Management System DV8000 Installation and Operating Instructions Part Number 8200-0029-99 REV A0...
- Page 2 ® Intellex Digital Video Management System Installation and Operating Instructions Notice Copyright Trademarks The information in this manual was current when published. The manufacturer reserves the right to revise and improve its products. All specifications are therefore subject to change without notice. Under copyright laws, the contents of this manual may not be copied, photocopied, reproduced, translated or reduced to any electronic medium or machine-readable form, in whole or in part, without prior...
-
Page 3: License Information
® Intellex Digital Video Management System Installation and Operating Instructions LICENSE WARNING:to Reduce Risk of electric shock, do not remove cover. no user serviceable parts inside. refer servicing to qualified service personnel. INFORMATION DO NOT EXPOSE THIS APPLIANCE TO RAIN OR MOISTURE. DO NOT INSTALL THIS PRODUCT IN HAZARDOUS AREAS WHERE HIGHLY COMBUSTIBLE OR EXPLOSIVE PRODUCTS ARE STORED OR USED. - Page 4 ® Intellex Digital Video Management System Installation and Operating Instructions OTHER RIGHTS AND LIMITATIONS UPGRADES COPYRIGHT LIMITED WARRANTY CUSTOMER REMEDIES License Information with specified Sensormatic supplied equipment. If the Software is protected by a software or hardware key or other device, the Software may be used on any computer where the key is installed.
- Page 5 ® Intellex Digital Video Management System Installation and Operating Instructions NO OTHER WARRANTIES The above warranty is in lieu of all other warranties, express or implied, including, but not limited to the implied warranties of merchantability and fitness for a particular purpose. No oral or written information or advice given by Sensormatic, its representatives, distributors or dealers shall create any other warranty, and you may not rely on such information or advice.
- Page 6 ® Intellex Digital Video Management System Installation and Operating Instructions SAMPLE The Intellex DV8000 digital video management system displays and records images from multiple video cameras. It provides a CONFIGURATION variety of display and recording options which you can configure according to your specific needs.
-
Page 7: Sample Network
® Intellex Digital Video Management System Installation and Operating Instructions SAMPLE One or more Intellex units can be connected over a TCP/IP local area network (LAN) or a wide area network (WAN). Its data can NETWORK then be managed from a central site using the Network Client (sold CONFIGURATION... - Page 8 ® Intellex Digital Video Management System Installation and Operating Instructions FEATURES Video segments can be exported to optional CD-RW if ExportPack is purchased. Mark beginning and end of video segments in Playback Mode to export. Optional CD-RW for exporting video. Enhanced duplex operation...
- Page 9 ® Intellex Digital Video Management System Installation and Operating Instructions On-screen display includes date, time, alarm status, video loss and 10-character camera titles. Hard disk storage protects all system configuration information against power loss. Unit storage capacity can be increased by installing an additional internal storage or an optional external data storage unit.
-
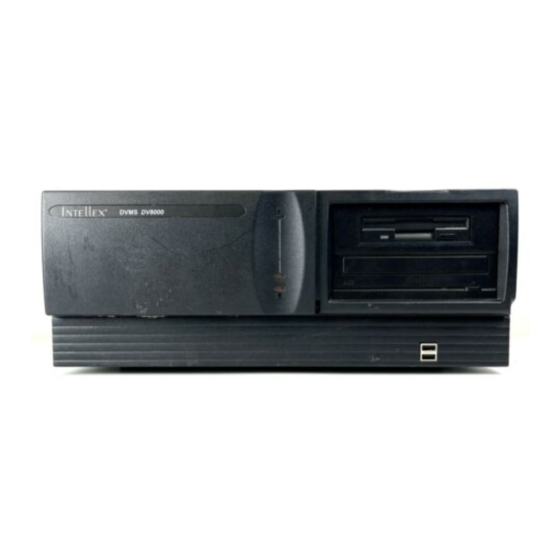
Page 10: Front Panel
® Intellex Digital Video Management System Installation and Operating Instructions FRONT PANEL Front Panel Figure 3 — Controls and Indicators 1. Power Indicator — This light appears when the unit is operating. 2. Power — Insert a paper clip into this pinhole to turn unit power on or off. -
Page 11: Rear Panel
® Intellex Digital Video Management System Installation and Operating Instructions REAR PANEL Rear Panel Figure 4 — Rear Panel Connectors 1. Power In — This connector accepts any AC main power cord with an IEC-320-C13 plug. (Most standard computer cords meet this requirement.) CAUTION: Before connecting power, set the voltage switch to the correct voltage (“115”... - Page 12 ® Intellex Digital Video Management System Installation and Operating Instructions Rear Panel 9. DB9-P — NOT USED 10. Network — This RJ-45 connector connects the unit to a local area network. The unit supports 10BASE-T (10Mbps) and 100BASE-TX (100Mbps) network operation. 11.
- Page 13 ® Intellex Digital Video Management System Installation and Operating Instructions INSTALLING THE INTELLEX UNIT Required Connections Cameras In Monitor Power Setting Power In Mouse Installing the Intellex Unit Select a location for the unit that is clean and dry and where temperature and humidity extremes do not exceed the product specifications (see Technical...
- Page 14 ® Intellex Digital Video Management System Installation and Operating Instructions Optional Connections Alarms Video Out Keyboard Network Installing the Intellex Unit CAUTION: Do not apply power until you have connected all optional items. The Intellex unit will start operating immediately once power is applied. CAUTION: Protect the unit against lightning.
-
Page 15: System Setup
® Intellex Digital Video Management System Installation and Operating Instructions SYSTEM SETUP STARTING THE INTELLEX UNIT System Setup CAUTION: Before connecting power, set the voltage switch to the appropriate voltage (“115” or “230”). To start up the Intellex unit, simply plug it in. If the unit does not power up, insert the special tool provided (or a paper clip) in the pinhole beneath the power indicator to turn on unit power. -
Page 16: Exit To Windows
® Intellex Digital Video Management System Installation and Operating Instructions EXIT TO WINDOWS Exit to Windows CAUTION: Do NOT modify any BIOS or system settings. Do NOT reconfigure any hard drives. Do NOT install any other software, including screen savers. Otherwise you will affect unit operation. - Page 17 ® Intellex Digital Video Management System Installation and Operating Instructions Exit to Windows the mouse pointer to Settings. The Settings menu appears. Move the mouse pointer to Control Panel and click. The Control Panel screen appears. Refer to the appropriate instructions to configure: Regional settings (see Right- or left-handed mouse settings (see Time zone settings (see...
-
Page 18: Regional Settings
® Intellex Digital Video Management System Installation and Operating Instructions REGIONAL SETTINGS Regional Settings You must configure the unit to display dates and times in the format appropriate to your language and country or region. To configure the regional settings: NOTE: Do NOT change any other regional settings or you may affect unit operation. -
Page 19: Mouse Settings
® Intellex Digital Video Management System Installation and Operating Instructions MOUSE SETTINGS Mouse Settings You can configure the mouse for either right- or left-handed operation. The default is right-handed operation. Right-handed — The LEFT mouse button is the main mouse button. - Page 20 ® Intellex Digital Video Management System Installation and Operating Instructions TIME ZONE SETTINGS Time Zone Settings You must configure the unit for operation in your time zone. The unit will keep track of daylight savings time if applicable. To configure the time zone: NOTE: Do NOT change any other time settings or you may affect unit operation.
-
Page 21: Network Settings
® Intellex Digital Video Management System Installation and Operating Instructions NETWORK SETTINGS Network Settings You must configure the network settings for Network Client operation. You must assign a computer name and a workgroup. The TCP/IP properties must also be set to match your network requirements. -
Page 22: Language Setup
® Intellex Digital Video Management System Installation and Operating Instructions LANGUAGE SETUP Language Setup The Intellex unit is configured for a specific language at the factory. It will display all Intellex screens and help topics in the configured language. At any time, the unit can be reconfigured for a different language. - Page 23 ® Intellex Digital Video Management System Installation and Operating Instructions SHUTTING DOWN AND RESTARTING SYSTEM Shutting Down and Restarting System When finished, click X (close screen) in the upper right corner to close the Control Panel screen. Move the mouse pointer to the bottom of the screen. The Windows task bar appears.
-
Page 24: Main Screen
® Intellex Digital Video Management System Installation and Operating Instructions INTELLEX MAIN SCREEN Intellex Main Screen The Intellex main screen is shown below. Most unit functions can be accessed from this screen. The main screen controls and indicators are described below: 1. - Page 25 ® Intellex Digital Video Management System Installation and Operating Instructions On-screen Controls and Indicators Intellex Main Screen Operate the unit using the mouse pointer and the following on- screen controls: 4. Record — This indicator is lit when the unit is recording images.
- Page 26 ® Intellex Digital Video Management System Installation and Operating Instructions Intellex Main Screen 9. 1x1 — Click to select the single window format (1x1). Only one camera can be displayed at a time unless you start camera sequencing. See for more information. 10.
-
Page 27: Initial Configuration
® Intellex Digital Video Management System Installation and Operating Instructions INITIAL CONFIGURATION Initial Configuration When the Intellex unit is first powered up, the main screen appears (see Intellex Main Screen). NOTE: Security is disabled at the factory. However, if the unit displays the login screen, enter the administrator’s default PIN code (1234). -
Page 28: Setup Options Screen
® Intellex Digital Video Management System Installation and Operating Instructions SETUP OPTIONS Access each system setting through the Setup Options screen. Click the Setup button on the main screen. The Setup Options SCREEN screen appears. NOTE: You must possess the appropriate privilege to access a setup option (see Security Setup). -
Page 29: Camera Setup
® Intellex Digital Video Management System Installation and Operating Instructions CAMERA SETUP Camera Setup The Camera Setup screens let you define the name and termination settings for each camera. You must possess the Setup Cameras privilege to access it (see From the main screen, click the Setup button. - Page 30 ® Intellex Digital Video Management System Installation and Operating Instructions SECURITY The Intellex unit manages user activity through a system of user names and personal identification numbers (PINs). When CONSIDERATIONS changing users at the login screen, the unit checks the PIN against the user list.
-
Page 31: Security Setup
® Intellex Digital Video Management System Installation and Operating Instructions SECURITY SETUP Security Setup The Security Setup screens let the system administrator define the name, personal identification number (PIN) and privileges for each user. This protects the system from unauthorized use. You must possess the Setup Security privilege to access it. - Page 32 ® Intellex Digital Video Management System Installation and Operating Instructions Add a New User Security Setup Use the Add option to define the security information (name, PIN and privileges) for a new user. From the user list screen, click Add. The User screen appears. User —...
- Page 33 ® Intellex Digital Video Management System Installation and Operating Instructions Security Setup Port Address — This privilege lets this user change the Port Address assignment (see Record Enable — This privilege lets this user access the Begin Record button on the Utility Options screen (see Options).
- Page 34 ® Intellex Digital Video Management System Installation and Operating Instructions Edit a User Security Setup Use the Edit option to change a user’s security information. Select the user from the user list. To view other users, click up arrow or down arrow or drag the scroll button up or down.
- Page 35 ® Intellex Digital Video Management System Installation and Operating Instructions Delete a User Security Setup Use the Delete option to erase a user’s security information. The user will no longer have access to the system. Select the user from the user list. To view other users, click up arrow or down arrow or drag the scroll button up or down.
- Page 36 ® Intellex Digital Video Management System Installation and Operating Instructions Enable/Disable Security Security Setup NOTE: This function is only available to the Administrator. The Enable (or Disable) button only appears when the system administrator is logged in. Use this option to either enable or disable system security. The unit displays the appropriate button: Enable or Disable.
- Page 37 ® Intellex Digital Video Management System Installation and Operating Instructions d. Press the Enter or Return key to enable (or disable) system security. The system verifies the code. If you entered the correct code, the system enables (or disables) security and closes this screen.
-
Page 38: Schedule Setup
® Intellex Digital Video Management System Installation and Operating Instructions SCHEDULE SETUP Schedule Setup The Schedule Setup screens let you configure how the unit records images under a variety of circumstances. You must possess the Setup Schedule privilege to access it (see User). - Page 39 ® Intellex Digital Video Management System Installation and Operating Instructions Regular Schedule Setup Regular Rate/Quality Setup Schedule Setup Use the Regular Schedule Setup screens to use the same schedule for all cameras. The unit uses the same schedule for weekdays, weekends and holidays.
- Page 40 ® Intellex Digital Video Management System Installation and Operating Instructions Regular Time Setup Schedule Setup Sensitivity — This setting lets you control how Intellex responds to small, subtle changes between images. Select the sensitivity for regular operation. The default is Normal. High —...
- Page 41 ® Intellex Digital Video Management System Installation and Operating Instructions Regular Cameras Setup Schedule Setup Select another Regular Schedule Setup Option for configuration. Otherwise, click OK to accept the new start times, as well as any changes on the other Regular Schedule Setup screens, and return to the Setup Options screen.
- Page 42 ® Intellex Digital Video Management System Installation and Operating Instructions Regular Schedule Popup Menu Schedule Setup Setup — Select a filter; then click Setup to configure it (see Filter Configuration). Select another Regular Schedule Setup Option for configuration. Otherwise, click OK to accept the new day/night filter settings, as well as any changes on the other Regular Schedule Setup screens, and return to the Setup Options screen.
- Page 43 ® Intellex Digital Video Management System Installation and Operating Instructions Schedule Setup Copy — Use this option to copy a filter configuration into the unit’s memory. Then, use Paste or Replace to assign the filter configuration to the other filter field (Day Filter or Night Filter). Select the filter to copy.
- Page 44 ® Intellex Digital Video Management System Installation and Operating Instructions Schedule Setup Click the right mouse button to display the regular schedule popup menu. Select Copy. The unit copies the filter’s configuration into memory. Select the filter to replace. Click the right mouse button to display the regular schedule popup menu.
- Page 45 ® Intellex Digital Video Management System Installation and Operating Instructions Custom Schedule Setup Custom Rate Setup Schedule Setup Use the Custom Schedule Setup screens to create a custom schedule for each camera. For weekdays, weekends and holidays, select operating hours, recording modes and filters for each camera.
- Page 46 ® Intellex Digital Video Management System Installation and Operating Instructions Custom Time Setup Schedule Setup Use the Time screen to set the start and end times for weekends and holidays. This tab only appears if Include Weekend or Include Holiday is selected on the Mode screen (see Schedule Setup).
- Page 47 ® Intellex Digital Video Management System Installation and Operating Instructions Schedule Setup Start at … — Set the time to start weekend processing on the day before the weekend. The default is 18:00 (6:00 p.m.). Click the hours display. Click up arrow or down arrow to display the desired hour (24-hour format).
- Page 48 ® Intellex Digital Video Management System Installation and Operating Instructions Weekday/Weekend/Holiday Setup Schedule Setup to display the desired minutes (30-minute increments). Include part of day after — Select this option to stop holiday processing at a specific time on the day after the holiday.
- Page 49 ® Intellex Digital Video Management System Installation and Operating Instructions Schedule Setup NOTE: Disabled segments cannot be configured. Disabled — Select this option to define a disabled segment. During a disabled segment, the unit does not record or display any images from the camera. It also ignores any alarms. (See Working with Schedule Segments disabled segment.) Setup —...
- Page 50 ® Intellex Digital Video Management System Installation and Operating Instructions Schedule Setup Undo — Each time you access these screens, the unit keeps track of the changes. It remembers up to the last 10 changes on each Custom Schedule Setup screen (Weekday, Weekend and Holiday). Click this button to undo the last change.
- Page 51 ® Intellex Digital Video Management System Installation and Operating Instructions Set Holidays Schedule Setup Use the Set Holidays screen to identify the days that will operate using the holiday schedule. This tab only appears if Include Holiday is selected on the Mode screen. (Date) —...
- Page 52 ® Intellex Digital Video Management System Installation and Operating Instructions Single Camera Setup Single Camera Setup Screen Schedule Setup Use the Single Camera Setup screens to record images from a single camera at a specific rate and quality. Select the Use Single Camera Schedule option.
- Page 53 ® Intellex Digital Video Management System Installation and Operating Instructions Schedule Setup Extended Record — Record images at the highest level of compression. This setting requires the lowest amount of storage space. Sensitivity — This setting lets you control how Intellex responds to small, subtle changes between images.
- Page 54 ® Intellex Digital Video Management System Installation and Operating Instructions Working with Schedule Segments Defining a New Segment Schedule Setup Schedule segments define how the unit processes images from any camera at any time. The unit can record at all times or only during alarms or filter events.
- Page 55 ® Intellex Digital Video Management System Installation and Operating Instructions Changing a Segment Schedule Setup NOTE: To change a start time of 00:00 or an end time of 24:00, define a new segment which starts at 00:00 or ends at 24:00, respectively (see Select the appropriate screen: Weekday, Weekend or Holiday.
- Page 56 ® Intellex Digital Video Management System Installation and Operating Instructions Deleting a Segment Schedule Setup Select the appropriate screen: Weekday, Weekend or Holiday. Use one of the following methods to delete a segment: Create a new segment over the segment to delete. Change the start time of the segment to match its end time.
- Page 57 ® Intellex Digital Video Management System Installation and Operating Instructions Copying a Camera Schedule Schedule Setup Select the appropriate screen: Weekday, Weekend or Holiday. Move the mouse pointer to the name of the camera to copy. Click and hold the mouse button. The mouse pointer changes Drag the mouse pointer to the camera to change.
- Page 58 ® Intellex Digital Video Management System Installation and Operating Instructions Custom Schedule Popup Menu Schedule Setup The custom schedule popup menu provides access to a variety of custom schedule configuration options. Select a segment or move the mouse pointer over a camera name.
- Page 59 ® Intellex Digital Video Management System Installation and Operating Instructions Schedule Setup segment on the line into memory. Paste Segment(s) — Use this option to copy one or more segments from one camera to another. NOTE: This option is disabled until one or more segments have been copied into memory.
- Page 60 ® Intellex Digital Video Management System Installation and Operating Instructions Schedule Setup Select Paste Segment(s). The time information for all the segments is added to the new camera. Paste Filter — Use this option to copy a filter configuration from one segment of a camera to another segment of the same camera on another screen.
- Page 61 ® Intellex Digital Video Management System Installation and Operating Instructions Schedule Setup Click the right mouse button to display the custom schedule popup menu. Select Paste Filter to All Segments. The filter and its configuration information are added to every active and alarmed segment on the line.
- Page 62 ® Intellex Digital Video Management System Installation and Operating Instructions Schedule Setup segments and filters to delete. Click the right mouse button to display the custom schedule popup menu. Select Delete Segment(s). The unit deletes all segments and filters on the line. Delete Filter(s) —...
- Page 63 ® Intellex Digital Video Management System Installation and Operating Instructions Schedule Setup Click the right mouse button to display the custom schedule popup menu. Select Delete Segment(s) and Filter(s). The unit deletes all segments and filters on the line. MORE>>>...
- Page 64 ® Intellex Digital Video Management System Installation and Operating Instructions Configuring an Active Segment Schedule Setup Use the Active Segment screen to configure both the record quality and the live filter for the segment. NOTE: You must have purchased the Smart Pack option to use Live Filter Configuration Define the segment (see Use one of the following options to display the Active...
- Page 65 ® Intellex Digital Video Management System Installation and Operating Instructions Schedule Setup Normal — At this setting, Intellex ignores the smaller, more subtle changes between images. Live Filter — Use this option to select the live filter to use during this segment.
- Page 66 ® Intellex Digital Video Management System Installation and Operating Instructions Configuring an Alarmed Segment Schedule Setup Use the Alarmed Segment screen to configure the pre-alarm record quality and duration for the segment as well as the live filter. NOTE: You must have purchased the Smart Pack option to use Live Filter Configuration Define the segment (see Use one of the following options to display the Alarmed...
- Page 67 ® Intellex Digital Video Management System Installation and Operating Instructions Schedule Setup between images, improving the perceived picture quality. As a result, this setting requires more storage space. Normal — At this setting, Intellex ignores the smaller, more subtle changes between images. Live Filter —...
-
Page 68: Data Lifetime
® Intellex Digital Video Management System Installation and Operating Instructions DATA LIFETIME Data Lifetime Use the Data Lifetime screen to enable or disable deletion of selected video data and to select the cameras that will use Data Lifetime deletion. From Setup Options, select Schedule, then click on the Data Lifetime tab. -
Page 69: Record Mode Setup
® Intellex Digital Video Management System Installation and Operating Instructions RECORD MODE SETUP Record Mode Setup The Record Mode screen lets you configure how the unit records images during regular (nonalarm) operation. You must possess the Setup Record privilege to access it (see From the main screen, click the Setup button. - Page 70 ® Intellex Digital Video Management System Installation and Operating Instructions Record Mode Setup CAUTION: When the database is full and “Circular” is selected, the unit starts recording at the beginning of the database. As recording continues, the unit overwrites older images, including alarm images. Once overwritten, images cannot be recovered.
-
Page 71: Alarm Setup
® Intellex Digital Video Management System Installation and Operating Instructions ALARM SETUP Alarm Setup The Alarm Setup screens let you configure alarm operation for the unit. You must possess the Setup Alarms privilege to access it (see Security Setup). From the main screen, click the Setup button. The Setup Options screen appears (see Click the Alarm button. - Page 72 ® Intellex Digital Video Management System Installation and Operating Instructions Alarm Setup the Utility Options screen. Otherwise, alarm messages remain on the screen until either the duration time expires or the event is cleared. Unit Alarm Out — Use this option to energize alarm output 16 whenever any alarm event occurs.
- Page 73 ® Intellex Digital Video Management System Installation and Operating Instructions Alarm Setup Normal — At this setting, Intellex ignores the smaller, more subtle changes between images Click OK to accept the displayed alarm setup options, as well as any changes on the other Alarm Setup screens, and return to the Setup Options screen.
- Page 74 ® Intellex Digital Video Management System Installation and Operating Instructions Alarm In Names Setup Use the Alarm In Names screen to define the name of each alarm input. These names are used when reviewing alarm images and when searching the image database. 1–8 —...
- Page 75 ® Intellex Digital Video Management System Installation and Operating Instructions Alarm In Polarity Setup Alarm Setup Use the Alarm In Polarity screen to set the polarity for each of the alarm inputs. NOTE: The virtual keyboard is disabled on the Alarm In Polarity screen.
-
Page 76: Display Setup
® Intellex Digital Video Management System Installation and Operating Instructions DISPLAY SETUP Display Setup The Display Setup screens let you configure how the unit displays live video images. You must possess the Setup Display privilege to access it (see Security From the main screen, click the Setup button. - Page 77 ® Intellex Digital Video Management System Installation and Operating Instructions Display Mode Setup Display Setup Use the Mode screen to select the live video monitor and the sequencer dwell time. Sequencer Dwell — Use this option to set the amount of time the unit displays a camera’s images before switching to the next camera.
- Page 78 ® Intellex Digital Video Management System Installation and Operating Instructions Playback Overlay Enable — Select Yes to display image information in the image area during playback. The unit name, camera name, date, time and alarm input (if any) appear in the designated corner. The default is Yes.
- Page 79 ® Intellex Digital Video Management System Installation and Operating Instructions Camera Location Display Format Setup Display Setup Use the desired camera format (2x2, 3x3, 4x4) to specify the location of each camera. (Cameras) — The name of each camera is listed in order from 1 to 8.
-
Page 80: Date/Time Setup
® Intellex Digital Video Management System Installation and Operating Instructions DATE/TIME SETUP Date/Time Setup The Date/Time Setup screen lets you change the unit’s date and time settings, which the unit encodes on each image. You must possess the Setup Date/Time privilege to access it (see Setup). - Page 81 ® Intellex Digital Video Management System Installation and Operating Instructions PORT ADDRESS In the Port Address setup screen you may specify a fixed port address for the Intellex unit to use for connecting to a network. SETUP The default settings are 5000 for the Communications Port and 5001 for the LiveVideo Port.
-
Page 82: Basic Operation
® Intellex Digital Video Management System Installation and Operating Instructions BASIC OPERATION Logging In and Changing Users Logging In Basic Operation NOTE: If system security is enabled, you must enter a valid PIN code before the unit will clear the Enter PIN Code screen and give you access to system controls (see Setup). - Page 83 ® Intellex Digital Video Management System Installation and Operating Instructions Changing Users Basic Operation NOTE: This option is only available if system security is enabled (see Security Setup). When another person takes control of the unit, the previous operator must log out and the new operator must log in. Click Utility on the main screen.
-
Page 84: Image Display
® Intellex Digital Video Management System Installation and Operating Instructions CONTROLLING IMAGE DISPLAY Controlling Image Display Image display is located in the central area of the screen, where the unit displays images. The image area is affected by the following: Screen Format Image Area Popup Menu Full-Screen Operation... - Page 85 ® Intellex Digital Video Management System Installation and Operating Instructions Screen Format Controlling Image Display You can select from the following four screen formats: Click this button to select the single window (1x1) format. The camera assigned to this format will display. In this format, only one camera can be displayed at a time.
- Page 86 ® Intellex Digital Video Management System Installation and Operating Instructions Image Area Popup Menu Switch to Full Screen Single Pane Generate Alarm Controlling Image Display The Image Area Popup menu provides access to several live display settings. This menu is especially helpful in full-screen mode.
- Page 87 ® Intellex Digital Video Management System Installation and Operating Instructions Camera Mode Cancel Switch to Menu Controlling Image Display Move the mouse pointer over the camera’s image in the image area. Click the right mouse button. The Image Area Popup menu appears.
- Page 88 ® Intellex Digital Video Management System Installation and Operating Instructions Full-Screen Operation Controlling Image Display Use the full-screen option to hide the screen controls and display live images full-screen in the selected screen format. NOTE: Image resolution does not increase; images are simply displayed over a larger area.
- Page 89 ® Intellex Digital Video Management System Installation and Operating Instructions Camera Sequencing Controlling Image Display The unit can display cameras sequentially in any available format. Cameras display in camera number order at the Live Display Sequencer Dwell rate (see In the single-pane format, the unit displays images from each camera in camera order.
- Page 90 ® Intellex Digital Video Management System Installation and Operating Instructions Live Monitor (Optional) If an optional live monitor is installed, the unit displays all live images continuously on the optional monitor. Live display commands, such as selecting a camera or a screen format, appear immediately on the optional monitor.
-
Page 91: Reviewing Unit Status
® Intellex Digital Video Management System Installation and Operating Instructions REVIEWING UNIT STATUS Reviewing Unit Status At any time, you can review unit and camera status. When you press or click the Status button, the Status screen appears: The information on this screen reflects the camera schedule settings as well as the general unit configuration settings. - Page 92 ® Intellex Digital Video Management System Installation and Operating Instructions Live Filter Configuration functions. Record Mode — Displays the current record mode (Circular or Linear), which is configured in the Record Mode portion of the Setup Options screen. Time Span — Displays the amount of time between the oldest and newest image in the image database, in days, hours and minutes.
-
Page 93: Utility Options
® Intellex Digital Video Management System Installation and Operating Instructions UTILITY OPTIONS The Utility Options screen provides access to various system utility functions. NOTE: You must possess the appropriate privilege to access many of the utility options. To access any of the utility options, click the Utility button from the main screen. - Page 94 ® Intellex Digital Video Management System Installation and Operating Instructions Begin Record Utility Options When the image database fills completely with unarchived images, recording stops and the unit displays a message. Use this option to start recording again at the beginning of the image database.
- Page 95 ® Intellex Digital Video Management System Installation and Operating Instructions Generate Alarms Utility Options Use this option to manually generate an alarm event for one or more cameras. These alarm events are treated like true alarms (see Alarm Operations). NOTE: This feature is only available for active cameras and will not affect any cameras already in an alarm state.
- Page 96 ® Intellex Digital Video Management System Installation and Operating Instructions Clear Latched Utility Options Use this option to clear alarm messages from the live display. It does not clear the actual alarm. This option is only available when the Latch Messages option is selected in the Alarms portion of the Setup Options screen and when one or more alarm messages appear on the live display.
- Page 97 ® Intellex Digital Video Management System Installation and Operating Instructions Log Out Utility Options Use this option to inform the system that you are transferring control to a different user. The unit blocks all access until a new user logs in. Normal processing continues whether or not a user is logged in.
- Page 98 ® Intellex Digital Video Management System Installation and Operating Instructions Shutdown Restart Utility Options The Intellex digital recorder is designed to operate continuously. However, if you must shut it down, use the following procedure. CAUTION: Always complete the shutdown procedure before turning off unit power.
- Page 99 ® Intellex Digital Video Management System Installation and Operating Instructions Exit to System Utility Options CAUTION: Do NOT modify any BIOS or system settings. Do NOT reconfigure any hard drives. Do NOT install any other software, including screen savers, or you will affect unit operation.
- Page 100 ® Intellex Digital Video Management System Installation and Operating Instructions Utility Options screen (see Shutdown). Utility Options MORE>>>...
- Page 101 ® Intellex Digital Video Management System Installation and Operating Instructions About Intellex Utility Options Use this option to display system version, copyright and hardware information. This is also where you can upgrade your software license. To access the About Intellex screen: From the main screen, click the Utility button.
-
Page 102: Playback Operation
® Intellex Digital Video Management System Installation and Operating Instructions PLAYBACK OPERATION Playback Operation NOTE: Access to the playback screen controls and indicators is a protected feature. You must possess the Playback Enable privilege to access it (see This chapter describes playback operation on the Intellex unit. It describes: Playback screen controls and indicators Using date/time, camera and alarm criteria to search the... -
Page 103: Playback Screen
® Intellex Digital Video Management System Installation and Operating Instructions PLAYBACK SCREEN Playback Screen To display the playback screen, click the Play/Pause button. The playback screen appears. The playback screen controls and indicators are described below: 1. Playback Controls — Use the mouse pointer to access unit functions. - Page 104 ® Intellex Digital Video Management System Installation and Operating Instructions Playback Screen finish. 4. Click Export to export any selected clip(s) to the CD-RW drive. After you click Export, the Export Directory dialog appears, where Export to CD-R(W) is the default option. 5.
- Page 105 ® Intellex Digital Video Management System Installation and Operating Instructions Playback Controls and Indicators Playback Screen Use the mouse pointer and the following on-screen controls to play back images: 8. Record — This indicator is lit when the unit is recording images.
- Page 106 ® Intellex Digital Video Management System Installation and Operating Instructions Playback Screen (see Camera Sequencing). If in playback mode, the unit changes the format on the live display, but does not exit playback. If an optional live monitor is installed, camera sequencing appears immediately.
- Page 107 ® Intellex Digital Video Management System Installation and Operating Instructions Using the Playback The playback screen can be accessed in several ways. Screen From the main screen, click the Play/Pause button to access the most recent images in the image database. Then use the controls to review activity backward from this moment.
- Page 108 ® Intellex Digital Video Management System Installation and Operating Instructions Playback Screen In Play mode, the unit keeps playing video segments for the selected camera at normal speed. Play and the display speed show on the button. The unit also uses a higher speed scale when clicking and dragging the reverse or forward arrows on the Play/Pause button.
- Page 109 ® Intellex Digital Video Management System Installation and Operating Instructions Switching Cameras Full-Screen Operation Playback Screen NOTE: The farther you drag the arrows on the button counterclockwise, the faster the playback proceeds in reverse. Click the Play/Pause button to select either Play mode or Pause mode.
-
Page 110: Image Database
® Intellex Digital Video Management System Installation and Operating Instructions IMAGE DATABASE SEARCH Image Database Search The Searching with Filters and Searching without Filters screens let you search the image database using a variety of criteria. NOTE: Playback search is a protected feature. You must possess the Playback Enable privilege to access it (see Security Setup). - Page 111 ® Intellex Digital Video Management System Installation and Operating Instructions Searching without Filters Date/Time Search Image Database Search Use the Searching without Filters screens to select the search criteria, which the unit combines from each screen. Select No Image Filters. The unit displays the Date/Time, Cameras and Alarm tabs.
- Page 112 ® Intellex Digital Video Management System Installation and Operating Instructions Image Database Search display the correct hour (24-hour format). 3. Click the minutes display. Click up arrow or down arrow to display the correct minutes. 4. Click down arrow in the date box to display the calendar. Click left arrow to select the previous month or right arrow to select the next month.
- Page 113 ® Intellex Digital Video Management System Installation and Operating Instructions Camera Search Image Database Search search results from the screen. Click Close to close this screen. Either the main screen or the playback screen appears. Search Results — The unit lists all video segments that match the search criteria in this area (see Use the Cameras screen to search for video segments from a specific camera.
- Page 114 ® Intellex Digital Video Management System Installation and Operating Instructions Alarm Search Image Database Search Click Play to begin playing the video segment. The playback screen appears (see Using the Playback Click New to clear the current search criteria on all of the search screens and begin a new search.
- Page 115 ® Intellex Digital Video Management System Installation and Operating Instructions Image Database Search Any Filter — Use this option to include any video segments in the search which the unit recorded because a filter was triggered. Specific Filter — Use this option to include video segments in the search which the unit recorded because a specific filter was triggered.
- Page 116 ® Intellex Digital Video Management System Installation and Operating Instructions Search Results — The unit lists all video segments that match the search criteria in this area (see Working with Search Results). Image Database Search MORE>>>...
- Page 117 ® Intellex Digital Video Management System Installation and Operating Instructions Searching with Filters Date/Time Search Image Database Search Use the Searching with Filters screens to select the search criteria, which the unit combines from each screen. Select With Image Filters. The unit displays the Date/Time and Filters tabs and removes the Cameras and Alarm tabs.
- Page 118 ® Intellex Digital Video Management System Installation and Operating Instructions Image Database Search associated fields. Click the hours display. Click up arrow or down arrow to display the correct hour (24-hour format). Click the minutes display. Click up arrow or down arrow to display the correct minutes.
- Page 119 ® Intellex Digital Video Management System Installation and Operating Instructions Filters Search Image Database Search Click New to clear the current search criteria on all of the search screens and begin a new search. The unit erases the previous search results from the screen. Click Close to close this screen. Either the main screen or the playback screen appears.
- Page 120 ® Intellex Digital Video Management System Installation and Operating Instructions Image Database Search Click up arrow or down arrow to display the correct number of seconds (five-second increments). NOTE: When searching the database, the unit may skip a few seconds more or less than the setting. Filter —...
- Page 121 ® Intellex Digital Video Management System Installation and Operating Instructions to display online help for this screen. Search Results — The unit lists all video segments that match the search criteria in this area (see Working with Search Results). Image Database Search MORE>>>...
- Page 122 ® Intellex Digital Video Management System Installation and Operating Instructions Search Filter Configuration Light Change Motion Detection Perimeter Violation Image Database Search Set search filters to select video segments for playback based on a user-defined target area and type of activity. The method for defining the search target area is identical to defining live filter target areas.
- Page 123 ® Intellex Digital Video Management System Installation and Operating Instructions Working with Search Results Sorting the Search Results Selecting a Segment to Review Image Database Search Whenever a search is started, the unit displays the results in the lower portion of the search screen. It lists each video segment that matches the search criteria.
-
Page 124: Alarm Operations
® Intellex Digital Video Management System Installation and Operating Instructions ALARM OPERATIONS Alarm Operations The Intellex unit detects and responds to four types of alarm events: Mechanical Alarms Live Filter Events Video Loss Alarms Generated Alarms NOTE: The unit only processes alarm events for cameras that are being recorded when the alarm occurs. - Page 125 ® Intellex Digital Video Management System Installation and Operating Instructions Mechanical Alarms Alarm Operations A mechanical alarm occurs when there is a contact closure or polarity change at any alarm input. The alarm connector provides one alarm input and one alarm output for each camera.
- Page 126 ® Intellex Digital Video Management System Installation and Operating Instructions Alarm Operations Setup), the unit enables the Clear Latched button on the Utility Options screen (see d. The unit suspends camera sequencing on the live display monitor. If the Unit Alarm Out option is selected, the unit energizes the alarm output associated with camera 16 (see The unit remains in the alarm state until ALL of the following occur:...
- Page 127 ® Intellex Digital Video Management System Installation and Operating Instructions Live Filter Events Alarm Operations NOTE: You must have purchased the Smart Pack option to use Live Filter Configuration The Intellex live filters enable the unit to respond to specific activity at specific cameras.
- Page 128 ® Intellex Digital Video Management System Installation and Operating Instructions Alarm Operations d. The unit suspends camera sequencing on the live display monitor. If the Unit Alarm Out option is selected, the unit energizes the alarm output 16 (see The unit remains in the alarm state until ALL of the following occur: The activity that triggered the live filter ceases, and all other alarms are released.
- Page 129 ® Intellex Digital Video Management System Installation and Operating Instructions Video Loss Alarms Alarm Operations The Intellex system can detect loss of the video signal at any connected camera input. The Alarm on Video Loss option in the Alarms portion of the Setup Options screen must be selected to enable this feature (see Alarm When the unit detects loss of video signal at any connected...
- Page 130 ® Intellex Digital Video Management System Installation and Operating Instructions b. The Duration time elapses (see Alarm Setup). Once the unit exits the alarm state, it returns to the previous display mode, record mode and quality settings. If the Latch Messages option is selected (see Alarm Setup), the unit displays the alarm message until the Clear Latched button...
- Page 131 ® Intellex Digital Video Management System Installation and Operating Instructions Generated Alarms Alarm Operations At any time, the operator can flag specific activity as an alarm event, even if the activity does not trigger a filter or trip an alarm. For more information on generating alarms, see When the operator generates an alarm: The unit energizes the alarm output associated with the...
- Page 132 ® Intellex Digital Video Management System Installation and Operating Instructions Alarm Operations occur: All alarms, including mechanical, are released. b. The Duration time elapses (see Once the unit exits the alarm state, it returns to the previous display mode, record mode and quality settings. If the Latch Messages option is selected (see unit displays the alarm message until the Clear Latched button on the Utility Options screen is clicked (see...
- Page 133 ® Intellex Digital Video Management System Installation and Operating Instructions Alarm Groups Alarm Operations During normal operation, the Intellex unit samples cameras in camera number order. Each time through the sequence, the unit samples one image from each camera (unless disabled). For example, with nine cameras connected, the sequence is: When an alarm is detected, the unit increases the number of samples from the camera associated with the alarm.
-
Page 134: Alarm Review Screen
® Intellex Digital Video Management System Installation and Operating Instructions ALARM REVIEW SCREEN Alarm Review Screen When one or more alarms have not been reviewed, the Alarms indicator is lit. Click Alarms to display the alarm review screen. This screen displays all video segments that contain alarm images. - Page 135 ® Intellex Digital Video Management System Installation and Operating Instructions Alarm Review Screen Click Yes to clear the highlighted alarm from the list and return to the alarm review screen. Click No to cancel the operation and return to the alarm review screen. Select Play to play back a video segment containing a recorded alarm (see Selecting a Segment to...
- Page 136 ® Intellex Digital Video Management System Installation and Operating Instructions Selecting a Segment Whenever the alarms list is too long for the display area, a scroll bar appears along the right side, with arrows at the top and to Review bottom and a slide button between.
- Page 137 ® Intellex Digital Video Management System Installation and Operating Instructions OPTIONS LIVE FILTER CONFIGURATION Options NOTE: Before following any procedures in this section, select the live filter and click Setup (see Configuring an Active Segment Segment). After you select a live filter, use the appropriate filter configuration screen to configure it.
- Page 138 ® Intellex Digital Video Management System Installation and Operating Instructions Light Change Live Filter Configuration Use the Light Change screen to configure the target area for the light change filter. Once configured, the filter is triggered whenever the light level changes. The light level can change when someone turns lights on or off, uses a flashlight or blocks the camera lens.
- Page 139 ® Intellex Digital Video Management System Installation and Operating Instructions Live Filter Configuration used. NOTE: You can only configure one light change target area at a time. Set the Sensitivity: 1 to 100. Move the mouse pointer to the image area. The mouse pointer changes to Draw the boundaries of the target area.
- Page 140 ® Intellex Digital Video Management System Installation and Operating Instructions Motion Detection Live Filter Configuration Use the Motion Detection screen to configure the target area for the motion detection filter. Once configured, the filter is triggered whenever movement occurs in the target area. After you select the Motion Detection filter and click the Setup button, the Motion Detection screen appears.
- Page 141 ® Intellex Digital Video Management System Installation and Operating Instructions Live Filter Configuration exterior cameras recording from day to night or interior cameras recording areas with lighting turned on or off. To ensure that useful video is recorded or filtered, nominal lighting in the area is required.
- Page 142 ® Intellex Digital Video Management System Installation and Operating Instructions Live Filter Configuration mouse button. The boundary lines disappear and the target area is defined by a semitransparent grid. To draw an additional target area, repeat steps 1 through 3. To deactivate some of the targets, select Deactivate.
- Page 143 ® Intellex Digital Video Management System Installation and Operating Instructions Perimeter Protection Live Filter Configuration Use the Perimeter Protection screen to configure the target area for the perimeter protection filter. Once configured, the filter is triggered whenever an object crosses into or out of the target area.
- Page 144 ® Intellex Digital Video Management System Installation and Operating Instructions Live Filter Configuration filter to ensure its proper activation. More lighting in the area will allow higher sensitivity settings to be safely used. NOTE: You can only configure one perimeter protection target area at a time.
-
Page 145: Alarm Connectors
® Intellex Digital Video Management System Installation and Operating Instructions ALARM CONNECTORS Alarm Connectors The alarm connectors accept up to 16 alarm inputs and 16 alarm outputs. Use the information in this appendix to install your alarm devices to the back of the unit. NOTE: The polarity of all alarm inputs is programmable (see Alarm Setup). - Page 146 Input 6 Ground Input 7 Ground Input 8 Ground Time sync signal Ground Export signal Ground Table 1 — Alarm Connector Pin Assignments for DV8000 Alarm Connectors ALARMS OUT PIN NO. ASSIGNMENT Output 1 Ground Output 2 Ground Output 3...
- Page 147 ® Intellex Digital Video Management System Installation and Operating Instructions INTELLEX RECORD The following factors affect Intellex record capacity: CAPACITY Record Rate — At higher record rates, the unit records more images and uses more storage space, but the video segments are more complete.
- Page 148 ® Intellex Digital Video Management System Installation and Operating Instructions Intellex Record Capacity estimates do not include alarm activity. The following charts show the relationship between activity type, record capacity and image quality. They identify the minimum and maximum hours per gigabyte for each type of activity and quality setting.
- Page 149 ® Intellex Digital Video Management System Installation and Operating Instructions Intellex Record Capacity Identify the general type of activity at your installation (minimal, casual, moderate or intense). Use the following table to identify the maximum hours per gigabyte. 60 HZ RECORDING DURATION YPE OF CTIVITY Hours per Gigabyte (estimated)
- Page 150 ® Intellex Digital Video Management System Installation and Operating Instructions Intellex Record Capacity 50 HZ RECORDING DURATION YPE OF UPER CTIVITY Hours per Gigabyte (estimated) Intense .21 – .31 Moderate .57 – .71 Casual 1.68 – 2.33 Minimal 3.89 – 5.59 Basic (single disk) Capacity in Hours (estimated) Intense Moderate...
- Page 151 ® Intellex Digital Video Management System Installation and Operating Instructions Activity Levels Minimal — A quiet room or hallway with an occasional occupant or traffic. No motion due to wind, camera motion, or camera noise. Casual — A room or hallway with a couple of occupants or frequent traffic.
-
Page 152: Technical Specifications
® Intellex Digital Video Management System Installation and Operating Instructions TECHNICAL SPECIFICATIONS Programmable Settings Technical Specifications The following specifications only apply to the Intellex unit. The manufacturer reserves the right to revise and improve its products. All specifications are therefore subject to change without notice. - Page 153 ® Intellex Digital Video Management System Installation and Operating Instructions Video Format Video Level Alarm Display Technical Specifications Color (input and output) B&W (input and output) Camera Inputs 1.0 V p-p, 75 ohms Camera Outputs 1.0 V p-p, 75 ohms Analog Output 1.0 V p-p, 75 ohms Alarm Inputs...
- Page 154 Alarm connector block with screw terminals. Keyboard Standard PS/2-style connector. Mouse Input device with standard PS/2-style connector. Reserved for future use. Monitor DB15-S. Live display SVGA monitor output. Com1 DB9-P. Dome controller (Sensormatic VM16 or American Dynamics ADTT16) input. MORE>>>...
- Page 155 ® Intellex Digital Video Management System Installation and Operating Instructions Components Power Supply Physical Characteristics Environmental Requirements Technical Specifications Network RJ-45. Category 3 or Category 5 twisted- pair Ethernet (CAT 3 TPE or CAT 5 TPE) connector. Video Out BNC. Composite video output. Main Monitor SVGA noninterlaced, 60–70 Hz refresh rate.
Need help?
Do you have a question about the Intellex DV8000 and is the answer not in the manual?
Questions and answers