Table of Contents
Advertisement
Quick Links
Advertisement
Table of Contents

Subscribe to Our Youtube Channel
Related Manuals for Aktakom AMM-1008


Summary of Contents for Aktakom AMM-1008
-
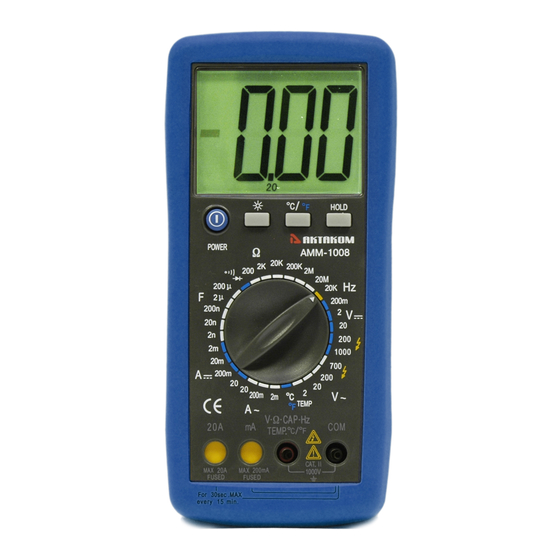
Page 2: Controls And Jacks
Input Limits This symbol adjacent to one or more terminals identifies them as being associated with ranges Function Maximum Input that may, in normal use, be subjected to V DC or V AC 1000V DC, 700V AC particularly hazardous voltages. For maximum mA DC/AC 200mA DC/AC A DC/AC... -
Page 3: Specifications
Weight: Approx.: 380g. V, ,CAP, Hz, TEMP. input jack Accuracy is given at 18 o C to 28 o C (65 o F to 83 o F), less mA input jack for mA DC or AC measurements than 70 % RH 20A (positive) input jack for 20A DC or DC Voltage AC measurements. -
Page 4: Operation
Overload Protection: 0.2A / 250V and 20A / 250V Fuse. Input Protection: 250V dc or 250V ac rms. Maximum Input: 200mA dc or 200mA ac rms on mA ranges, Frequency 20A dc or ac rms on 20A range. Range Resolution Accuracy AC Current 20.00kHz... -
Page 5: Back Light Button
not connected to a device, the display may show a random, the display). changing reading. This is normal and is caused by the high-input 2. Insert the black test lead banana plug into the negative (COM) sensitivity. The reading will stabilize and give a proper measurement jack and the red test lead banana plug into the positive (V) jack. -
Page 6: Dc Current Measurements
DC CURRENT MEASUREMENTS 2. For current measurements up to 200mA AC, set the function switch to the mA range and insert the red test lead banana plug CAUTION: Do not make current measurements on the 20A into the (mA) jack. scale for longer than 30 seconds. -
Page 7: Frequency Measurement
FREQUENCY MEASUREMENT CONTINUITY CHECK 1. Set the function switch to the 20KHz position. WARNING: To avoid electric shock, never measure continuity on 2. Insert the black test lead banana plug into the negative (-) jack circuits or wires that have voltage on them. (COM) and the red test lead banana plug into the positive (+) Set the function switch to the position. -
Page 8: Replacing The Battery
polarity. 3. Touch the Temperature Probe head to the part whose temperature Put the battery door back in place. Secure with the one screw. you wish to measure. Keep the probe touching the part under test WARNING: To avoid electric shock, do not operate the meter until the reading stabilizes (about 30 seconds).
Need help?
Do you have a question about the AMM-1008 and is the answer not in the manual?
Questions and answers