Table of Contents
Advertisement
Advertisement
Table of Contents

Related Manuals for A.MENARINI GLUCOFIX TECH


Summary of Contents for A.MENARINI GLUCOFIX TECH
- Page 2 CUSTOMER SERVICE Tel: (UK) 0800 243667 (Republic of Ireland) 1800 709903 (Northern Ireland) 0800 7837286 This number is not for emergency or medical information. E-mail: myglucomen@menarinidiag.co.uk Web site: www.glucomen.co.uk Date of Issue: January 2019 GLUCOFIX TECH - 51415 - 02/20 ®...
- Page 3 INTRODUCTION Thank you for choosing the GLUCOFIX TECH meter. ® We have designed this compact blood glucose meter for faster and easier testing of your blood glucose and we hope it will be of great help in the management of your diabetes. This manual explains how to use your new meter.
- Page 4 IMPORTANT INFORMATION! Notes, Cautions and Warnings: Notes: provide helpful operating information. Cautions: provide information that is important for meter protection. Warnings: provide information that is important for user protection or about risk of inaccurate results. GLUCOFIX TECH - 51415 - 02/20 ®...
-
Page 5: Table Of Contents
CONTENTS 1. INTENDED USE 2. SYSTEM OVERVIEW GLUCOFIX TECH Meter ® Test strip 3. BEFORE TESTING Caution when using the Meter Caution when using the Test Strips 4. MEASURING YOUR BLOOD GLUCOSE LEVELS Blood sampling 4.1.1 Alternative site testing (AST) Testing your Blood Glucose Control Test Marking Test Results... - Page 6 CONTENTS 6. METER SETUP 6.1 Date/Time setup 6.2 Alarm setup 6.3 Beeper setup 6.4 Hypo/hyper alarms setup 6.5 NFC setup 7. METER CARE 7.1 Storing your meter 7.2 Cleaning your meter 7.3 Changing the batteries 8. TROUBLESHOOTING 8.1 HI and LO messages 8.2 Error messages 8.3 Unexpected test results 9.
-
Page 7: Intended Use
1. INTENDED USE Your GLUCOFIX TECH meter and GLUCOFIX TECH Sensor are in vitro diagnostic medical devices ® ® to quantitatively measure the glucose level in fresh capillary whole blood. They are intended for self testing to monitor and control blood glucose levels by people with diabetes mellitus;... -
Page 8: System Overview
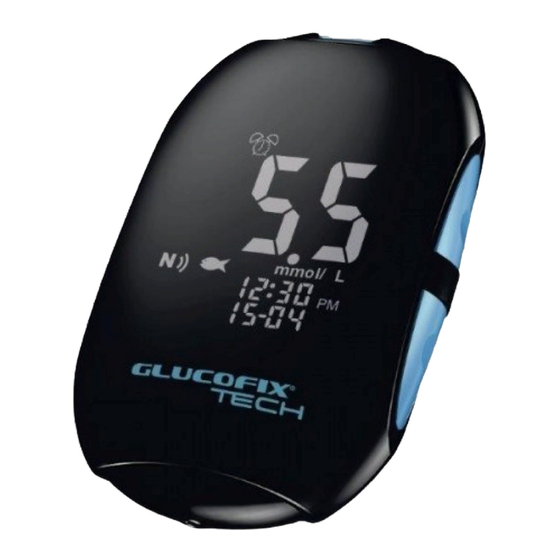
2. SYSTEM OVERVIEW 2.1 GLUCOFIX TECH Meter ® FRONT BACK TEST STRIP PORT RELEASE BUTTON ENTER UP/DOWN BUTTON ANTENNA BUTTONS BATTERY HOLDER DATA TRANSFER PORT GLUCOFIX TECH - 51415 - 02/20 ®... - Page 9 2. SYSTEM OVERVIEW TEST STRIP PORT Test strip should be inserted here. ENTER ( ) BUTTON Press and hold for 2 seconds to access meter memory (§5.1) or simultaneously press for 2 seconds to enter setup menu while not testing (§6). UP/DOWN ( / ) BUTTONS Press to scroll through different options and/or values.
- Page 10 2. SYSTEM OVERVIEW METER SCREEN HYPO/HYPER ICONS CLOCK/ALARM ICON DROP ICON MEMORY ICON MAIN DISPLAY AREA CTL ICON UNIT OF MEASUREMENT NFC ICON TIME LOW BATTERY ICON AVERAGE WRONG TEMPERATURE ICON MARKERS DATE ICONS GLUCOFIX TECH - 51415 - 02/20 ®...
- Page 11 2. SYSTEM OVERVIEW MEMORY ICON: Indicates that you are using the memory (§5). CLOCK/ALARM ICON: “Clock” appears while setting the time (§6.1); “alarm” appears while setting the acoustic reminder(s), and will be displayed if any alarm is on (§6.2). HYPO/HYPER ICONS: Appear while setting the hypoglycaemic and hyperglycaemic thresholds and if your test results are below or above these values (§6.4).
-
Page 12: Test Strip
2. SYSTEM OVERVIEW Before meal marker. After meal marker. Exercise marker. Check marker. WRONG TEMPERATURE ICON: Appears while testing outside the allowed temperature range. LOW BATTERY ICON: Appears when the battery needs to be replaced (§7.3). NFC ICON: Displayed while setting the NFC (Near Field Communication) function (§6.5) and when this function is enabled;... -
Page 13: Before Testing
3. BEFORE TESTING 3.1 Caution when using the Meter Time and date are pre-set in the meter. Please make sure that time and date settings are correct before first use, and adjust them if needed. Always check the settings after changing the battery (§7.3). - Page 14 3. BEFORE TESTING ● Do not connect the data cable to the data transfer port during testing. The meter may be damaged, leading to inaccurate test results. ● Do not apply blood directly to the test strip port on the meter. ●...
-
Page 15: Caution When Using The Test Strips
3. BEFORE TESTING 3.2 Caution when using the Test Strips CAUTION ● For testing with GLUCOFIX TECH meter use GLUCOFIX TECH Sensor only. Do not use other ® ® test strips, it causes inaccurate test results. ● Do not use test strips after their expiry date. The expiry date is written on the test strip vial next to symbol ●... -
Page 16: Measuring Your Blood Glucose Levels
4. MEASURING YOUR BLOOD GLUCOSE LEVELS 4.1 Blood sampling For information on how to use the lancing device, read the relevant instructions for use. CAUTION ● Wash the puncture site with soap and water and dry the site thoroughly before sampling blood. ●... -
Page 17: Testing Your Blood Glucose
4. MEASURING YOUR BLOOD GLUCOSE LEVELS Use blood from: If you are going to test: Fingertip, palm, forearm ● Before meals. ● Two hours or more after meals. ● Two hours or more after exercise. Fingertip ● When there is the possibility of your blood glucose levels changing rapidly (e.g. - Page 18 4. MEASURING YOUR BLOOD GLUCOSE LEVELS NOTE ● For accurate test results, apply the drop of blood to the tip of the test strip within 20 seconds after puncturing. ● Do not test blood that runs or spreads out from the puncture site. ●...
-
Page 19: Control Test
4. MEASURING YOUR BLOOD GLUCOSE LEVELS ● Do not ignore test results. Do not alter your blood glucose management or treatment without first consulting your doctor or healthcare professional. d. Press the release button to remove the test strip. The meter will switch off. CAUTION ●... - Page 20 4. MEASURING YOUR BLOOD GLUCOSE LEVELS NOTE To test your meter and test strips only ever use the GLUCOFIX TECH Control control solutions ® (provided separately). CAUTION ● Do not use control solutions after their expiry date. The expiry date is indicated on the control solution vial next to symbol.
- Page 21 4. MEASURING YOUR BLOOD GLUCOSE LEVELS WARNING ● If the CTL mode has not been enabled before performing the control solution test, the result will be stored as a blood test and used for calculating averages. ● Always enabled the CTL mode before conducting a control solution test or the results may fall outside the acceptable range.
- Page 22 4. MEASURING YOUR BLOOD GLUCOSE LEVELS e. Check that your test result is within the acceptable range indicated on the label of the test strip vial. If out of range, repeat the control solution test. CAUTION ● If you still have test results that fall outside the acceptable range, stop using the system, and contact the A.
-
Page 23: Marking Test Results
4. MEASURING YOUR BLOOD GLUCOSE LEVELS 4.4 Marking Test Results After a blood (not control) glucose test is performed with a valid result, you can mark the result as follows: a. Start from point c of the glucose testing procedure (result displayed on the screen, §4.2). Press until the markers icons start blinking. -
Page 24: Managing Your Test Results
5. MANAGING YOUR TEST RESULTS 5.1 Reviewing past results You can review past results stored in the memory. Your meter stores up to 730 test results with dates, times and markers. WARNING Please make sure that the time and date are correct before the first use, and adjust them if needed (§6.1). -
Page 25: Viewing Results Averages
5. MANAGING YOUR TEST RESULTS 5.2 Viewing results averages You can view the result averages over the set intervals (1, 7, 14, 30, 60 or 90 days). a. Follow steps a and b in §5.1. b. Press to enter the average mode (the “AVG” icon appears on the screen). c. -
Page 26: Nfc Transmission
5. MANAGING YOUR TEST RESULTS NOTE ● GlucoLog software and apps, data cable, and Bluetooth dongles are supplied separately. See ® relevant user manuals for instructions on how to download data. 5.3.1 NFC Transmission For data transmission by means of NFC the NFC function must be enabled on the GLUCOFIX ®... - Page 27 5. MANAGING YOUR TEST RESULTS a. Make sure the meter is off (to turn the meter off press for 3 seconds until the screen switches off). b. Simultaneously press for 2 seconds to enter the setup menu. c. Press to scroll through the setting menus (see pictures below) and press to enter each single menu.
-
Page 28: Meter Setup
6. METER SETUP NOTE ● At anytime during set up, you may either press to exit, or insert a test strip to perform a test. The changes made so far will be memorized by the meter. 6.1 Date/Time setup to select the correct value. Press to confirm and move on to the next step: year, month, day, time format (12H, 24H), hour, minutes. - Page 29 6. METER SETUP CAUTION ● Before setting the alarms please check that the time is properly set. a. The display will show the alarm clock and the “Glu” icons, both blinking. Press . to scroll between glucose (“Glu” icon blinking) and β-Ketone (“Ket” icon blinking) alarm section. Press to confirm the selection and move on to the next step.
-
Page 30: Beeper Setup
6. METER SETUP 6.3 Beeper setup The beeper on your GLUCOFIX TECH meter is preset to ON. You can adjust the beeper feature ® as follows. a. Press to turn the beeper ON or OFF. b. Press to confirm and return to the setting menus (step c §6). WARNING ●... -
Page 31: Nfc Setup
6. METER SETUP You can set up the hypo and hyper threshold values as follows: a. Press to turn the hypo alarm ON/OFF. b. Press to set the hypo alarm value (if ON). c. Press to select the desired value. Press and hold either to accelerate the numbering. -
Page 32: Meter Care
7. METER CARE 7.1 Storing your meter After use, tightly close the caps of the test strip vial and control solution bottle to maintain their quality. Pack your meter, test strips, control solutions and manuals into your carry case and store in a dry place. - Page 33 7. METER CARE Your meter uses two CR2032 3V lithium batteries. This type of battery is available in many stores. Keep spare batteries handy at all times. You do not need to set the date and time if you insert new batteries within 2 minutes after removing the old ones.
- Page 34 7. METER CARE CAUTION ● Improper use may cause explosion or leakage of flammable liquid. ● Do not expose the battery to extremely high temperatures. ● Do not expose the battery to extremely low air pressure. NOTE ● Correct closing of the battery compartment. GLUCOFIX TECH - 51415 - 02/20 ®...
-
Page 35: Troubleshooting
8. TROUBLESHOOTING 8.1 HI and LO messages If the test result is over 33.3 mmol/L the HI icon will appear on the display. If the test result is less than 1.1 mmol/L the LO icon will appear on the display. WARNING ●... -
Page 36: Error Messages
8. TROUBLESHOOTING 8.2 Error messages System Hardware Error. Remove and reinsert the batteries to restart the meter, and repeat the test with a new strip. If the problem persists, please contact the A. Menarini Diagnostics customer service. The test strip is damaged or has already been used or the blood sample was applied before the drop icon started to blink on the display. - Page 37 8. TROUBLESHOOTING The strip was removed or disturbed during the countdown. Repeat the test with a new test strip. Low battery. Change the batteries according to the instructions (§7.3). The temperature was not within the recommended range. Repeat the measurement after at least 30 minutes, when the operating temperature has been restored.
-
Page 38: Unexpected Test Results
8. TROUBLESHOOTING 8.3 Unexpected test results If the test result is unusual compared to your previous test results: a. Repeat the measurement using a new test strip (§4.2). b. Perform a control measurement using the GLUCOFIX TECH Control control solution (§4.3). ®... -
Page 39: Technical Specifications
9. TECHNICAL SPECIFICATIONS Product: GLUCOFIX TECH ® Manufacturer: A. Menarini Diagnostics S.r.l. Tested item: Blood Glucose level Unit of mmol/L measurement: Test Range: 1.1 – 33.3 mmol/L Haematocrit range: 10 – 70% (haematocrit compensated) Test strip: GLUCOFIX TECH Sensor ® Test strip coding: No coding required Sample:... - Page 40 9. TECHNICAL SPECIFICATIONS Calibration and The results are equivalent to the plasma glucose concentration (capillary traceability: plasma referenced). The GLUCOFIX TECH system is calibrated using ® capillary plasma values determined with a Yellow Springs 2300 analyser (YSI). The YSI analyser is calibrated (as a secondary reference measurement procedure) using a series of YSI standards (primary calibrators) which are taken from the NIST (National Institute of Standards and Technology, USA) Temperature...
- Page 41 9. TECHNICAL SPECIFICATIONS Automatic turn off: - After 90 seconds of inactivity before the test (sensor strip inserted into the meter, drop icon flashing). - After 60 seconds of inactivity after the test and Error messages Er2, Er3, Er4, HI and LO. - After 5 seconds for Error messages Er1, Temperature icon and Battery icon.
- Page 42 9. TECHNICAL SPECIFICATIONS Operating The meter complies with applicable electromagnetic emission requirements environment: (EMC) Operading radio 13.56 MHz frequency band(s): Maximum 0.0042 mW radiofrequency power transmitted in the operating frequency band(s): EU directive/ 98/79/EC / Annex II, List B classification: Device Standard: EN ISO 15197:2015 GLUCOFIX...
-
Page 43: Warranty
10. WARRANTY Your GLUCOFIX TECH meter is guaranteed to be free of material and workmanship defects for 2 ® years from the date of purchase (except as noted below). If at any time during the first 2 years after purchase, your GLUCOFIX TECH meter does not work for any reason (other than as described ®... -
Page 44: Symbols And Abbreviations
11. SYMBOLS AND ABBREVIATIONS Consult instructions for use Serial number Caution, consult instructions Recyclable package for use Temperature limitation CE marking Contamination risk due to the Use by use of blood samples Manufacturer Blood glucose meter Significant additions Batch code or changes from previous user manual revision In vitro diagnostic medical... - Page 45 GLUCOFIX TECH - 51415 - 02/20 ®...
- Page 46 GLUCOFIX TECH - 51415 - 02/20 ®...
- Page 47 GLUCOFIX TECH - 51415 - 02/20 ®...
- Page 49 GLUCOFIX ® TECH - U.MANUAL - UK 51415 CMYK 02/20 PANTONE 877 C 150 x 102 INDICAZIONI STAMPA - USER MANUAL BOOKLET composto da: 40 pagine interne stampate ad 1 colore (k 100) in b/v + 4 pagine di coperta stampata a 5 colori in bianca e 1 colore in volta (k 100)
Need help?
Do you have a question about the GLUCOFIX TECH and is the answer not in the manual?
Questions and answers
I want to find out how to make the yellow powder, shut up the man still talking over the dr, but the recipe to make this mixture to drink each night???