Advertisement
MASTER
● Blood glucose
monitoring system
User manual
Thank you for choosing the GLUCOFIX® TECH meter.
We have designed this compact blood glucose meter for faster and
easier testing of your blood glucose and we hope it will be of great help
in the management of your diabetes. This manual explains how to use
your new meter. Before testing, carefully read through this manual and
the package inserts that come with it: GLUCOFIX® TECH Sensor and
GLUCOFIX® TECH Control. Pay particular attention to listed warnings and
cautions. Please keep this manual handy for future reference. If you have
any questions, please contact A. Menarini Diagnostics for assistance
(references at the end of this manual).
1. Intended use
Your GLUCOFIX® TECH meter and GLUCOFIX® TECH Sensor are in vitro
diagnostic medical devices to quantitatively measure the glucose level in
fresh capillary whole blood. They are intended for self testing to monitor
and control blood glucose levels by people with diabetes mellitus; they
can also be used in a clinical setting by healthcare professionals. They
are not intended for diagnosis or screening of diabetes or for neonatal
use. Do not alter your treatment on the basis of test results of this meter
without previously consulting your doctor or healthcare professional.
2. System overview
2.1 Meter
FRONT
ENTER (
) BUTTON
TEST STRIP PORT
Test strip should be inserted here.
ENTER (
) BUTTON
Press and hold
for 2 seconds to access meter memory (§5.1) or longer
(4 seconds) to enter setup mode while not testing (§6).
UP/DOWN ( / ) BUTTONS
Press
or
to scroll through different options and/or values.
RELEASE BUTTON
DATA TRANSFER PORT
RELEASE BUTTON
Press this button to remove used test strip.
BATTERY HOLDER
Houses two CR2032 3V lithium coin cell batteries.
DATA TRANSFER PORT
Connection port for PC data cable and Bluetooth device from A. Menarini
Diagnostics.
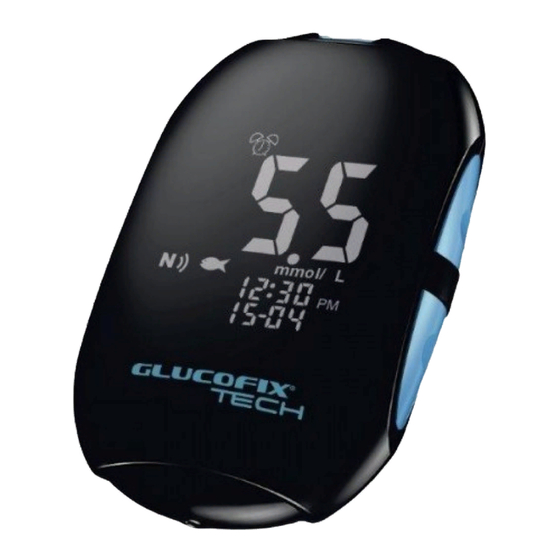
METER SCREEN
CLOCK/ALARM ICON
MEMORY ICON
CTL ICON
NFC ICON
LOW BATTERY ICON
WRONG TEMPERATURE ICON
MARKERS
ICONS
MEMORY ICON:
indicates that you are using the memory
(§5).
CLOCK/ALARM ICON:
"clock" appears while setting the time
(§6.1); "alarm" appears while setting
the acoustic reminder(s), and will be
displayed if any alarm is on (§6.2).
HYPO/HYPER ICONS:
appear while setting the hypoglycaemic
and hyperglycaemic thresholds and if
your test results are below or above these
values (§6.4).
TEST STRIP PORT
UP/DOWN (
/
)
BUTTONS
BACK
NFC ANTENNA
BATTERY HOLDER
HYPO/HYPER ICONS
DROP ICON
MAIN DISPLAY AREA
UNIT OF MEASUREMENT
TIME
AVERAGE
DATE
1
Advertisement
Table of Contents

Related Manuals for A.MENARINI GLUCOFIX TECH


Summary of Contents for A.MENARINI GLUCOFIX TECH
-
Page 1: Blood Glucose
2. System overview MASTER 2.1 Meter FRONT TEST STRIP PORT ● Blood glucose ENTER ( ) BUTTON monitoring system UP/DOWN ( BUTTONS TEST STRIP PORT Test strip should be inserted here. ENTER ( ) BUTTON Press and hold for 2 seconds to access meter memory (§5.1) or longer (4 seconds) to enter setup mode while not testing (§6). -
Page 2: Before Testing
DROP ICON: blinks to indicate that the meter is ready 3.2 Caution when using the Test Strips for blood or control solution testing (§4.2, 4.3). CAUTION MAIN DISPLAY AREA: displays test results, stored test values, result averages and messages. ● For testing with GLUCOFIX® TECH meter use GLUCOFIX® TECH UNIT OF MEASUREMENT: shows the unit of measurement of your Sensor only. - Page 3 To perform a control solution test, proceed as follows: NOTE 1. Insert a new test strip into the test strip port. The drop icon starts ● For accurate test results, apply the drop of blood to the tip of the blinking on the screen.
-
Page 4: Meter Setup
5. Managing your Test Results NOTE ● Data will be transmitted even when the meter is switched off or in 5.1. Reviewing past results memory recall mode. You can review past results stored in the memory. Your meter stores up to 730 test results with dates, times and markers. -
Page 5: Troubleshooting
7.2 Cleaning your meter NOTE Your meter does not need special cleaning. If your meter gets dirty, wipe ● The alarm will have the same format (12H, 24H) as when the time it with a soft cloth moistened with mild detergent. To disinfect your set. -
Page 6: Technical Specifications
Blood sample error. The blood sample did Calibration and The results are equivalent to the plasma glucose not fill the sample area of the strip during the traceability: concentration (capillary plasma referenced). measurement because the sample was not The GLUCOFIX® TECH system is calibrated using applied correctly or the volume was insufficient. - Page 7 10. Warranty 11. Symbols and abbreviations Your GLUCOFIX® TECH meter is guaranteed to be free of material and Consult instructions for use workmanship defects for 2 years from the date of purchase (except as noted below). If at any time during the first 2 years after purchase, your GLUCOFIX®...
- Page 8 A. Menarini Diagnostics S.r.l. Via Sette Santi, 3 50131 Firenze Italy Distributed by: XXXXXXXXXXXXXXXXXXXXX XXXXXXXXXXXXXXX XXXXXXXXXXXXXXX XXXXXXXXXXXXXXX XXXXXXXXXXXXXXX XXXXXXXXXXXXXXX Date of Issue: July 2016 GLUCOFIX® TECH Made in Taiwan GLUCOFIX® TECH Sensor and GLUCOFIX® TECH Control See relevant instructions for use.
- Page 9 GLUCOFIX TECH - User Manual - MASTER ® 46685 I - BLACK C 07/16 210 (w) x 300 (h) ADDENDUM: figures for mmol/L version Pag. 5 Pag. 4 Pag. 5...
Need help?
Do you have a question about the GLUCOFIX TECH and is the answer not in the manual?
Questions and answers