Sign In
Upload
Download
Table of Contents
Contents
Add to my manuals
Delete from my manuals
Share
URL of this page:
HTML Link:
Bookmark this page
Add
Manual will be automatically added to "My Manuals"
Print this page
×
Bookmark added
×
Added to my manuals
Manuals
Brands
Draminski Manuals
Measuring Instruments
GRAIN MASTER
Instruction manual
Draminski GRAIN MASTER Instruction Manual
Grain moisture meter
Hide thumbs
Also See for GRAIN MASTER
:
User manual
(232 pages)
1
Table Of Contents
2
3
4
5
6
7
8
9
10
11
12
13
14
15
16
17
18
19
20
21
22
23
24
25
26
27
28
29
30
31
32
33
34
35
36
37
38
39
40
41
42
43
44
45
46
47
48
page
of
48
Go
/
48
Contents
Table of Contents
Bookmarks
Table of Contents
Table of Contents
Introduction
Components
Product Description
Keyboard Functions
Device Operation
Instructions for Measurements
Measurements
List of Available Species
And Adding New Types of Grain
Updating Via Usb
Modification of Moisture Indications
Settings
Battery Replacement
Final Notes
Technical Data
Advertisement
Quick Links
Download this manual
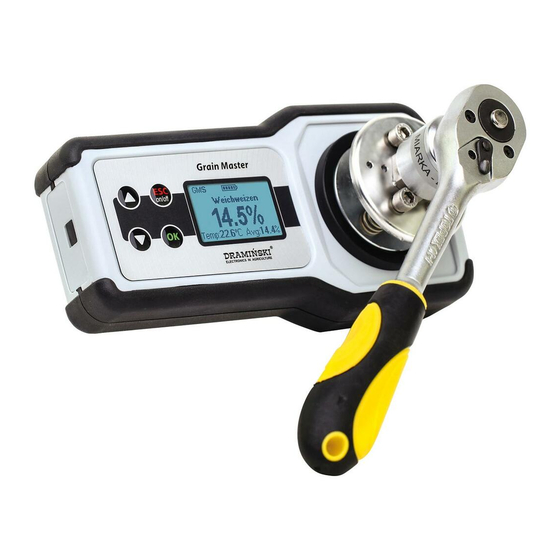
GRAIN MOISTURE METER
DRAMIŃSKI GRAIN MASTER
(GMS)
www.draminski.com
EN
Instruction manual
ISO 9001
Table of
Contents
Previous
Page
Next
Page
1
2
3
4
5
Advertisement
Table of Contents
Need help?
Do you have a question about the GRAIN MASTER and is the answer not in the manual?
Ask a question
Questions and answers
Related Manuals for Draminski GRAIN MASTER
Measuring Instruments Draminski GRAIN MASTER User Manual
Grain moisture meter (232 pages)
Measuring Instruments Draminski GMM mini Manual
(48 pages)
Measuring Instruments DRAMINSKI GMM mini User Manual
Grain moisture meter (242 pages)
Measuring Instruments DRAMINSKI GMM Instruction Manual
Grain moisture meter (122 pages)
Measuring Instruments Draminski GMS Instruction Manual
Grain moisture meter (48 pages)
Measuring Instruments Draminski GRAIN MOISTURE METER Instruction Manual
(163 pages)
Measuring Instruments Draminski GRAIN MOISTURE AND DENSITY METER Operating Manual
With the built-in scales (102 pages)
Measuring Instruments DRAMINSKI TwistGrain Instruction Manual
Grain moisture meter with sample compressor (160 pages)
Measuring Instruments Draminski Twist Grain pro User Manual
Smart moisture meter with sample compression (292 pages)
Measuring Instruments DRAMINSKI Twist Grain pro Instruction Manual
Grain moisture meter with sample compressor (60 pages)
Measuring Instruments Draminski 29356 Manual
Moisture meter (23 pages)
Measuring Instruments Draminski TG pro coffee Manual
Smart moisture meter with sample compression for coffee beans and cocoa (60 pages)
Measuring Instruments Draminski HMM Manual
Hay moisture meter (162 pages)
Measuring Instruments Draminski HMM Instruction Manual
Hay moisture meter (132 pages)
Measuring Instruments DRAMINSKI TwistGrain Manual
Grain moisture meter with sample compressor (180 pages)
This manual is also suitable for:
Gms
Table of Contents
Print
Rename the bookmark
Delete bookmark?
Delete from my manuals?
Login
Sign In
OR
Sign in with Facebook
Sign in with Google
Upload manual
Upload from disk
Upload from URL


Need help?
Do you have a question about the GRAIN MASTER and is the answer not in the manual?
Questions and answers