Table of Contents
Advertisement
Available languages
Available languages
Advertisement
Chapters
Table of Contents

Related Manuals for Pulsar PG6580E


Summary of Contents for Pulsar PG6580E
- Page 1 Model: PG6580E Generator OPERATOR’S MANUAL www.pulsar-products.com...
-
Page 2: Table Of Contents
TABLE OF CONTENTS Introduction....................................Product Specifications..............................Parts Ordering / Customer Service..........................Safety Rules..................................... Safety Symbols................................Safety Instructions ..............................Features....................................Assembly....................................Unpacking ..................................Packing List ................................. Attaching Wheels................................Attaching Battery Cable..............................Adding Oil..................................Adding Fuel.................................. Connecting Generator to an Electrical System......................Operation.................................... -
Page 3: Introduction
INTRODUCTION Thank you for purchasing this superior quality portable generator from Pulsar Products Inc. When operating and maintaining this product as instructed in this manual, your generator will give you many years of reliable service. Product Specifications: This generator is an engine-driven, revolving field, alternating current (AC) portable generator. It is designed to supply electrical power to operate tools, appliances, camping equipment, lighting, or serve as a back up power source during power outages. -
Page 4: Safety Rules
SAFETY RULES Safety Symbols Indicates a potentially hazardous situation which could result in serious injury or death if not WARNING! avoided. Indicates a potentially hazardous situation which could result in damage to equipment or CAUTION! property. Toxic Fumes Risk of fire Risk of explosion Risk of electric shock Hot surface... - Page 5 SAFETY RULES Never exceed generator’s wattage / amperage capacity. This could damage the generator WARNING! and / or connected electrical devices. Check operating voltage and frequency requirements of all electrical devices prior to plugging them into the generator. • Never start or stop engine with electrical devices plugged in to the receptacles. Failure to do WARNING! so could damage the generator and / or connected electrical devices.
- Page 6 Never transport or make adjustments to this unit while it is running. • Never insert objects through cooling slots. Never operate this unit if there are any broken or missing parts and only use Pulsar WARNING! replacement parts specifically designed for this unit.
-
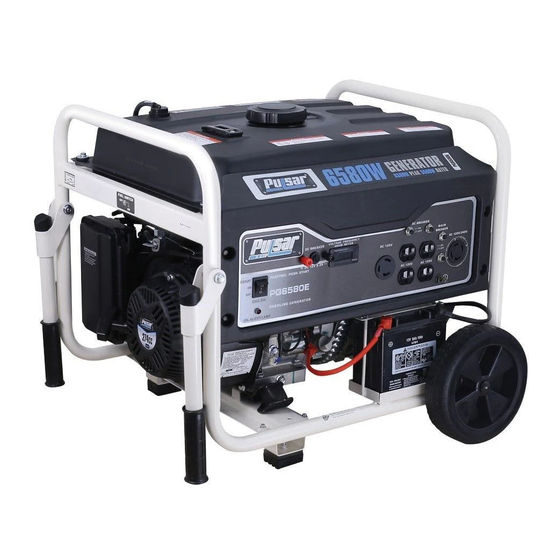
Page 7: Features
FEATURES F - Grounding Connection A - ON/OFF/Start Switch G - 4-120V Receptacles B - 3 IN 1 Meter H - 12V DC Output C -120 Volt 30Amp twist lock(L5-30R) I - Oil Alert Lamp D - Circuit Protectors E - 120V / 240V 30 Amp Twist Lock (L14-30) - Page 8 FEATURES P - Recoil Pull Starter J - Fuel Tank K - Fuel Tank Vapor Vent Q - Handle R - Support Foot L - Frame M- Choke Lever S - Oil Fill and Dipstick N -Fuel Valve (ON/OFF) T - Battery U - No Flat Tires O - Air Filter...
-
Page 9: Assembly
ASSEMBLY Unpacking 1. Place box on a level surface. 2. Remove all items from box except the generator. Make sure all items listed on the packing list are included and not damaged. 3. Cut down the sides of the box being careful to avoid hitting the generator. 4. -
Page 10: Attaching Wheels
ASSEMBLY Attaching Wheels (See fig 1) • Parts needed - 2 wheels, 2 axles, 2 hair pins, and 2 washers. • Raise or tilt generator so you can slide the wheel axle pin into the wheel, the washer, the wheel mounting hole located on the side of the frame. -
Page 11: Attaching Battery Cable
ASSEMBLY Attaching Battery Cable (See fig 3) • Parts needed - Black and Red battery cable • The Red (+) Connector should be attached to the battery first. • Remove the screw from the battery terminal. • Place the screw through the eyelet and tighten the screw and make sure the terminal will not touch any part of the frame. •... - Page 12 ASSEMBLY Antidotes for battery acid CONTACT TREATMENT External Flush with water. Internal Drink large quantities of milk or water, followed by milk of magnesia, vegetable oil or beaten eggs. Get immediate medical attention. Eyes Flush with water. Get immediate medical attention. Adding / Checking Engine Oil (See fig 4) •...
-
Page 13: Adding Fuel
ASSEMBLY Adding Fuel (See fig 5) • Set generator outdoors that is well ventilated. • Remove fuel cap. • Insert a funnel into the fuel tank and carefully pour gasoline into the tank until fuel level reaches 1 ½ inches below the top of the neck. -
Page 14: Operation
OPERATION Grounding the Generator (See fig 6) The ground terminal located on the front panel of the generator may be used for additional grounding, or when connected to a structure. Connect the ground terminal to an earthen ground rod, driven six feet into the ground. with a No 8 AWG (American Wire Gauge) copper wire. - Page 15 OPERATION CHOKE CHOKE LEVER Fig 7 Fig 8 SKIP THIS IF THE ENGINE IS WARM OR HOT START START Fig 9 Electric Start Fig 10 Recoil Start WAIT 5sec CHOKE CHOKE LEVER Fig 11 Battery Charger (Not Included) for Electric Starter Keep the generator battery fully charged and ready to use to avoid the need to use the recoil starter to start the generator manually.
-
Page 16: How To Stop Engine
OPERATION How to Stop Engine (See fig 12-14) All loads MUST be disconnected from the generator. Never start or stop the engine with electrical devices plugged in to • the receptacles. • Turn the engine START/ON/OFF switch to the “OFF” position. •... -
Page 17: Don't Overload Generator
OPERATION Extension Cord Selection Refer to the below table to ensure the extension cord used has the capacity to carry the required load. If the size of the cable is inadequate it can cause a voltage drop, which can damage the electrical device and cord. Current Load (Watts) Maximum Cord Length... -
Page 18: Wattage Reference Guide
OPERATION Operating voltage and frequency requirement of all electronic equipment should be checked prior to plugging them into this generator. Damage may result if the equipment is not designed to operate within a +/- 10% voltage variation, and +/- 3 Hz frequency variation from the generator name plate ratings. -
Page 19: Charging A 12 Volt Battery
OPERATION Hour Meter (See Fig 15) The digital hour meter operates whenever the engine is running and keeps track of how many hours the unit has been used. Use this meter along with the manual to determine when and what type of service on the unit is needed. The display will show the word “P25”... -
Page 20: Maintenance
Every 2 years (Replace if necessary) (2) * Replace the paper filter element only. Service more frequently when used in dusty areas. These items should be serviced by your PULSAR servicing dealer. Failure to follow this maintenance schedule could result in non-warrantable failures. -
Page 21: Changing Oil
MAINTENANCE Changing Oil (See Fig 17) • Run the generator until the engine is warm. • Place generator on a level surface. • Remove the dipstick. • Place an oil pan underneath the oil drain bolt to collect used oil. •... - Page 22 The carburetor is low emission and is equipped with a non-adjustable idle mixture valve. If adjustment is needed contact an authorized dealer. Replacing Fuel Filter (See Fig 21 If Applicable) Occasionally the fuel filter may become clogged and need replacing. To purchase a replacement fuel filter contact PULSAR customer service or your local small engine repair shop. •...
- Page 23 MAINTENANCE Draining the fuel tank • Turn the engine OFF. • Turn the fuel valve to the OFF position. • Remove the entire air cleaner housing and set it aside for clear access. • If needed, install a fuel hose that will extend to a suitable fuel container large enough to catch the fuel being drained from the tank.
-
Page 24: Troubleshooting
TROUBLESHOOTING Problem Cause Solution Engine is running, but AC output is not 1. Open circuit breaker 1. Reset circuit breaker available 2. Poor connection 2. Check and repair 3. Defective cord set 3. Check and repair 4. Connected device is faulty 4. -
Page 25: Diagrams
DIAGRAMS... - Page 26 Modelo: PG6580E Generador MANUAL DEL USUARIO www.pulsar-products.com...
- Page 27 CONTENIDO Introducción Introducción Especificaciones del producto Pedido de piezas / Servicio de atención al cliente Reglas de seguridad Símbolos de seguridad Instrucciones de seguridad Montaje Desempacar Lista de empaque Montaje de ruedas Conexión del cable de la batería Agregar/comprobar el aceite Conectar el generador a un sistema eléctrico Funcionamiento Cómo arrancar el motor...
-
Page 28: Introducción
INTRODUCCIÓN Gracias por comprar este generador portátil de calidad superior de Pulsar Products Inc. Al usar y mantener este producto como se indica en este manual, el generador le ofrecerá muchos años de servicio confiable. Especificaciones del producto Este generador es un generador portátil impulsado por motor. Está diseñado para suministrar energía eléctrica para operar herramientas, electrodomésticos, equipos de acampada y sistemas de iluminación, o para servir como fuente... -
Page 29: Reglas De Seguridad
REGLAS DE SEGURIDAD Símbolos de seguridad Indica una situación potencialmente peligrosa que, si no se evita, podría causar lesiones ¡ADVERTENCIA! graves o la muerte. Indica una situación potencialmente peligrosa que, si no se evita, podría causar daños al ¡PRECAUCIÓN! equipo o daños materiales de otro tipo. Emanaciones tóxicas Riesgo de incendio Riesgo de explosión... - Page 30 REGLAS DE SEGURIDAD No supere nunca la potencia/amperaje nominales del generador. Esto podría dañar el ¡ADVERTENCIA! generador y/o los dispositivos eléctricos conectados. • Compruebe el voltaje de funcionamiento y los requisitos de frecuencia de todos los dispositivos eléctricos antes de enchufarlos al generador.
- Page 31 REGLAS DE SEGURIDAD }Este generador produce un voltaje muy alto, lo cual puede provocar quemaduras ¡ADVERTENCIA! o electrocución y causar lesiones graves o la muerte. • Nunca manipule el generador, dispositivos electrónicos o cables si está parado sobre agua, descalzo o con las manos o pies húmedos.
- Page 32 CARACTERÍSTICAS A - Interruptor de arranque E - 120V / 240V 30 amperios twist lock (L14-30) B - 3 en 1 Medidor de (Voltajes, Frequencia, F - Terminal de tierra Horas) G - 4-120V Enchufes C -120 voltios 30 amperios twist lock (L5-30R) H - Salida de 12V DC D - Protectores de circuito I - Alerta de aceite...
- Page 33 CARACTERISTICAS P - Sistema de arranque J - Depósito de combustible K - Respiradero Q - Asa R - Pie de apoyo L - Marco M- Palanca del estrangulador S - Llenado de aceite y varilla medidora N -Válvula de gasolina (ON/OFF) T - Batería U - Llantas O - Filtro de Aire...
-
Page 34: Montaje
MONTAJE Desempacar 1. Coloque la caja sobre una superficie plana. 2. Saque todos los artículos de la caja excepto el generador. Asegúrese de que todos los artículos que figuran en la lista de empaque están incluidos y no dañados. 3. Corte los lados de la caja con cuidado para evitar golpear el generador. 4. - Page 35 MONTAJE Colocación de las Ruedas (See fig 1) • Piezas necesarias: 2 ruedas, 2 ejes, 2 horquillas y 2 arandelas. • Eleve o incline el generador para que pueda deslizar el pasador del eje de la rueda en la rueda, la arandela y el orificio de montaje de la rueda ubicado en el costado del marco.
- Page 36 MONTAJE Conexión de los cables de la bacteria (See fig 3) • Piezas Necesarias - Cable de la batería Negro y Rojo • El conector Rojo (+) se debe conectar a la batería primero. • Retire el tornillo de la terminal de la batería. •...
- Page 37 MONTAJE Antídotos para el ácido de la batería CONTACTAR TRATAMIENTO Externol Enjuagar con agua Interior Beber gran cantidad de leche o agua, seguido leche de magnesia, aceite de vegetal o huevos batidos. Obtenga atención médica inmediata. Ojos Enjuague con agua. Obtenga atención médica inmediata. Agregando/Chequeado el aceite del motor (vea fig.
-
Page 38: Conectar El Generador A Un Sistema Eléctrico
MONTAJE Poniendo Gasolina (See fig 5) • Ajuste el generador en una superficie limpia y nivelada en una área bien ventilada. • Retire la tapa de la gasolina. • Insertar un embudo en el depósito de gasolina y llene el tanque de gasolina con cuidado hasta que los niveles de gasolina alcanza 1 1/2 pulgadas por debajo de la parte superior del cuello. -
Page 39: Funcionamiento
FUNCIONAMIENTO (See fig 6) Puesta a tierra del Generador El terminal de tierra situado en la parte posterior del marco del generador siempre debe ser utilizado para conectar el generador a una varilla de tierra impulsado. El terminal de tierra situado en la parte posterior del bastidor del generador siempre debe ser utilizado para conectar el generador a una varilla de tierra impulsado. - Page 40 FUNCIONAMIENTO CHOKE CHOKE LEVER Fig 7 Fig 8 NO HAGA ESTO SI EL MOTOR ESTÁ CALIENTE START START Fig 9 Arranque eléctrico Fig 10 Inicio de retroceso WAIT 5sec CHOKE CHOKE LEVER Fig 11 Cargador de Batería para motor de Arranque Eléctrico (NO INCLUIDO) Mantenga la batería del generador completamente cargada y lista para su uso para evitar la necesidad de utilizar el arrancador retráctil para arrancar el generador manualmente.
-
Page 41: Enchufes Y Cables De Extensión
FUNCIONAMIENTO Cómo Parar el motor (See fig 12-14) • Todas las cargas deben ser desconectadas del generador. Nunca arranque o detenga el motor con los dispositivoseléctricos enchufados en los receptáculos. • Gire el botón del motor ON/OFF a la posición "OFF". •... -
Page 42: No Sobrecargue El Generador
FUNCIONAMIENTO Selección del cable de extension Consulte la tabla siguiente para asegurar el cable de extensión utilizada tiene la capacidad de soportar la carga requerida. Si el tamaño del cable es inadecuada puede causar una caída de tensión, que puede dañar el dispositivo eléctrico y el cable. Corriente Carga (Vatios) Longitud Máxima del Cable... - Page 43 FUNCIONAMIENTO Voltaje de operación y frecuencia exigencia de todos los equipos electrónicos debe comprobarse antes de enchufarlos a este generador. Pueden ocurrir daños si el equipo no está diseñado para operar dentro de un + / - 10% arriation voltaje, y + / - 3 Hz variación de frecuencia a partir de los valores nominales que aparecen generador de placas.
-
Page 44: Funcionamiento En Clima Frío
FUNCIONAMIENTO Medidor de Hora (vea fig. 15) El contador de horas digital opera cada vez que el motor está en funcionamiento y mantiene la cuenta de cuántas horas se ha utilizado la unidad. Utilice este medidor, junto con el manual para determinar cuándo y qué tipo de servicio necesita la unidad. -
Page 45: Mantenimiento
Reemplace el elemento del filtro de papel solamente. Realice el servicio con más frecuencia cuando se use en áreas polvorientas Estos artículos deben ser reparados por su distribuidor de servicio PULSAR. El incumplimiento de este programa de mantenimiento podría ocasionar fallas no garantizadas. -
Page 46: Cambiar El Aceite
MANTENIMIENTO Cambiar el aceite (vea fig. 17) • Corra el generador hasta que el motor este caliente. • Colocar el generador en una superficie plana. • Saque la barilla del cárter. • Ponga un recipinte de aceite de bajo del perno del drenaje de aceite. •... - Page 47 • Inspeccionar el supresor de chispas de quiebraduras y agujeros. Reemplace si es necesario comprar reemplasante de supersor de chispas contacte al servicio a cliente de PULSAR. • Use un cepillo para remover depósito de carbon de la pantalla del supresor de chispas si es necesario.
- Page 48 MANTENIMIENTO Drenando el tanque de gasolina • Apague el motor • Voltear la valvula de gasolina ala posición “OFF”. • Retire toda la carcasa del filtro de aire y déjelo a un lado para tener un acceso despejado. • Si es necesario, instale una manguera de gasolina que se extiende a un contenedor de gasolina grande y adecuado. •...
-
Page 49: Solución De Problemas
SOLUCIÓN DE PROBLEMAS Problema Causa Solución El motor esta corriendo 1. Abre el cortacircuitos 1. Reajustar el cortacircuitos 2. Conexión pobre 2. Examine y Reparar pero la salida del aire 3. Juego de cables defectuosos 3. Examine y Reparar condicionado no esta 4. -
Page 50: Diagrama
DIAGRAMA...
Need help?
Do you have a question about the PG6580E and is the answer not in the manual?
Questions and answers