
Subscribe to Our Youtube Channel
Related Manuals for Miranda iMC-Panel-300


Summary of Contents for Miranda iMC-Panel-300
- Page 1 Master Control Panel Operator’s Guide (for Imagestore 750s) UG0055-01 7 Nov 2012...
- Page 2 The information and intellectual property contained herein is confidential between Miranda and the client and remains the exclusive property of Miranda. If you find any problems in the documentation, please report them to us in writing. Miranda does not warrant that this document is error-free.
- Page 3 Restriction on Hazardous Substances (RoHs) Miranda is in compliance with EU Directive RoHS 2002/95/EC governing the restricted use of certain hazardous substances and materials in products and in our manufacturing processes.
- Page 4 The fuse symbol indicates that the fuse referenced in the text must be replaced with one having the ratings indicated. The presence of this symbol in or on Miranda equipment means that it has been designed, tested and certified as complying with applicable Underwriter’s Labora- tory (USA) regulations and recommendations.
- Page 5 Operator’s Guide (for Imagestore 750s) General Cautions A caution indicates a possible hazard to equipment that could result in equipment damage. Observe the following cautions when operating or working on this equipment: • When installing this equipment, do not attach the power cord to building surfaces.
-
Page 7: Table Of Contents
Other Miranda Products ........ - Page 8 Table of Contents Aux/User Buttons ............... . . 31 Button Details.
- Page 9 NV5100MC Operator’s Guide (for Imagestore 750s) 4 Menus ..........45 About Menus .
- Page 10 Table of Contents A/B Mixer Menu................90 Adjust Profiles.
- Page 11 NV5100MC Operator’s Guide (for Imagestore 750s) Working with Audio Meters ..............129 Working with Audio Levels .
- Page 12 Table of Contents...
-
Page 13: Preface
Preface This is an operator’s guide that is intended for panel operators using the iMC-Panel-300 to control Imagestore 750s. Operators who control MCEs (or MCPMs) may refer to the iMC-Panel- 300 Operator’s Guide for MCEs and MCPMs. Chapter 1 provides an introduction to this guide. -
Page 14: Terms, Conventions And Abbreviations
Xbuilder and Xstudio are creative software applications under XMedia. • Oxtel is a division of Miranda. Its name is used to identify certain ports of the Intuition XG hardware. The Oxtel protocol is used by the Imagestore 750 in the master control system. -
Page 15: Options
Operator’s Guide (for Imagestore 750s) • Video monitors properly set. Ensure that your control room’s program and preview monitors are properly set, according to the requirements of your facility. • NV9000 requirements met. You are using a master control system in conjunction with an NV9000 router control system. - Page 16 Preface Options...
-
Page 17: Introduction
Introduction Chapter 2 is an introduction to the iMC-Panel-300 as it applies to controlling Imagestore 750s, LGK-3901s, DSK-3901s, and ISM-3901s. Note that this document uses the term Imagestore 750 to represent all four of these transition processors, which have similar behavior with respect to control panel functions. -
Page 18: Nv9000 Router Control System
Introduction Master Control System Overview Each Imagestore 750, MCE, or MCPM is considered a channel. Imagestore 750s, MCPMs, MCEs, and control panels communicate on an Ethernet LAN. When an operator presses control panel buttons (the ‘Transition’ button, for example), the control panel issues commands to the attached channel (Imagestore 750, MCPM, or MCE). -
Page 19: Control Panels
Miranda’s iMC master control system. In the context of the combined master control system, it operates in conjunction with an NV9000 router control system, that provides video and audio sources, and one or more master control panels, such as the iMC-Panel-300, that provide commands. -
Page 20: Other Transition Processors Like The Imagestore 750
Introduction Imagestore 750 Overview This is a system block diagram of the Imagestore 750: Program Out C (or Fill 3) Preview Out D (or Key 3) Video Out Video In Fill 1 Clean Out Key 1 Imagestore Monitor Out Fill 2 Key 2 GPIO, LTC, Metadata AES In, Out... -
Page 21: Imagestore 750 Conceptual Model
Operator’s Guide (for Imagestore 750s) Imagestore 750 Conceptual Model This diagram shows the Imagestore 750’s native conceptual model: (option) DVE 1 Video DVE2 DSK 1 DSK 2 DSK 3 DSK 4 Program Mixer Output (option) DVE 1 DVE2 DSK 1... -
Page 22: Imagestore 750 Detailed Model
Introduction Imagestore 750 Overview Imagestore 750 Detailed Model This diagram shows a more detailed view of the Imagestore 750’s video processing: Rectangular mask (8x) Embed Disembed Audio Audio Processing Audio test signals DVE1 (DVE2) test signals DSK1 DSK2 DSK3 DSK4 PGM Out test signals test signals... -
Page 23: Lgk-3901, Dsk-3901, And Ism-3901
Downstream Keyer”) that can operate as a stand-alone unit with or without automation, or as part of Miranda’s iMC master control system. Like the Imagestore 750, it operates in conjunction with an NV9000 router control system, that provides video and audio sources, and one or more master control panels, such as the iMC-Panel-200, that provide commands. -
Page 24: Conceptual Model
Introduction LGK-3901, DSK-3901, and ISM-3901 There are also 2 COM ports and 1 Ethernet port. This drawing shows the general location of the LGK-3901’s connectors: A / PGM In PGM Out Ethernet Fill 1 In COM 1 Key 1 In B / Fill 2 In GPIO, LTC, AES In Key 2 In... -
Page 25: Detailed Model
Operator’s Guide (for Imagestore 750s) After audio is disembedded, the audio processing path includes an A/B mixer and two voice- over processors. Audio is re-embedded in program and preview audio after processing. (See the detailed model, following.) Voice-overs are either stored EasyPlay clips or from external AES input. -
Page 26: Dsk-3901
Introduction LGK-3901, DSK-3901, and ISM-3901 The DSK uses the same backplane connector module as the LGK-3901 (although the part number of the backplane module might be different.) Internally, however, it is different. Conceptual Model Figure 2-6 shows the DSK-3901’s conceptual model in the iMC master control system: Video DSK 1 DSK 2... -
Page 27: Detailed Model
Operator’s Guide (for Imagestore 750s) Detailed Model This diagram shows a more detailed view of the DSK-3901’s video processing: Embed Disembed Audio Audio Processing Audio Rectangular mask (8x) test signals DSK1 DSK2 PGM Out test signals DSK1 DSK2 Key2... -
Page 28: Control Panel Features
Introduction Control Panel Features Control Panel Features The iMC-Panel-300 offers the following features. (In many cases, the features are those of the Imagestore 750 under control.) • Configurable function buttons. All master control panels have a set of buttons whose functions can vary according to the needs of the facility and the operator. - Page 29 750 allows the definition of multiple source groups. Each of those source groups can be mapped to the main source buttons of the iMC-Panel-300. The sources in a group are selected from the sources defined in the NV9000 system. Thus, all NV9000 sources are potentially accessible.
- Page 30 Introduction Control Panel Features...
-
Page 31: Control Panel
Control Panel Chapter 3 describes the structure and functioning of the iMC-Panel-300 as it applies to the Imagestore 750. Topics Panel Summary ................19 Functional Sections of the Panel . -
Page 32: Panel Buttons
The aux port is reserved for future development. It has nothing to do with the aux buttons. The USB port is reserved for use by Miranda technicians. The ‘SD/HD Input’ connector (BNC) is the panel’s audio metering input. The metering input is not used for the Imagestore 750. -
Page 33: Panel Knobs
Operator’s Guide (for Imagestore 750s) condition. Blue is associated with video effects and violet with voice-overs and audio breakaway. Source selection buttons can be assigned specific colors (green, red, yellow, or white). High-tally indicates the button function is selected or active; low-tally indicates that the button function is not selected or is inactive. -
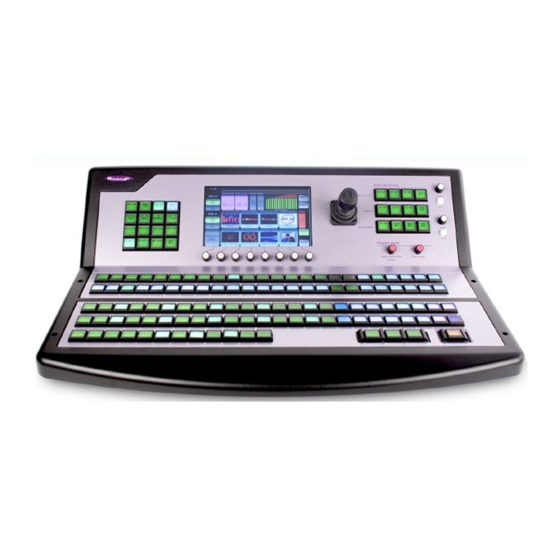
Page 34: Functional Sections Of The Panel
Control Panel Functional Sections of the Panel Functional Sections of the Panel Figure 3-3 shows the location of the iMC-Panel-300’s touchscreen, function buttons, and controls. Fig. 3-3: Sections of the iMC-Panel-300 Program buttons Preset buttons Preview/user buttons Aux/user buttons Configurable buttons... - Page 35 Operator’s Guide (for Imagestore 750s) The preset buttons also includes main source buttons and layer buttons. The function assigned to a program button is also assigned to the preset button directly in front of it. Whatever main source, video effects, and voice-overs are selected on the preset bus form the preset output of the Imagestore 750 that is currently controlled by the panel.
- Page 36 Control Panel Functional Sections of the Panel 7 Joystick The joystick helps you make certain parameter adjustments such as changes to the size or position of DSKs. See Joystick on page 28 for detail. 8 Audio monitor/meter section The panel has two rotary knobs in the ‘Audio Monitoring’ section labeled “Gain. ” These are associated with the rows labeled: •...
-
Page 37: Touchscreen
Operator’s Guide (for Imagestore 750s) 13 Transition button The transition button displays the transition type (as a graphic) and the transition rate (in text). ‘Cut’ transitions involve no rate and for cut transitions, the button displays no rate text. -
Page 38: Configurable Button Section
Imagestore 750s). You, the operator, will find a variety of these button types in the configurable button section of the iMC-Panel-300 you are using. These buttons provide two distinct sets of buttons: one set when the panel is controlling an Imagestore 750 and another set when the panel is controlling an MCE or MCPM. -
Page 39: Audio Levels
Operator’s Guide (for Imagestore 750s) Audio Levels Figure 3-6 shows the ‘Program Audio’ section in which there are 2 knobs: Fig. 3-6: Program Audio Section The section affects only program audio. The panel has two audio level knobs in this section, labeled: •... -
Page 40: Joystick
Control Panel Functional Sections of the Panel Joystick Figure 3-7 shows the joystick: Left button can be used to make an audio crosspoint connection, for example. Right button unused Knurled “Z-axis” not used for Imagestore 750 Fig. 3-7: Joystick The joystick has 3 axes. Movements up, left, down, and right are considered the X- and Y-axes. The third axis is controlled by turning a knurled ring on the joystick. -
Page 41: Preset And Program Buttons
Operator’s Guide (for Imagestore 750s) The Audio Monitoring section of the panel supports the control of MCEs and MCPMs as well as Imagestore 750s. When the panel is controlling an Imagestore 750, the buttons are customer- configurable buttons (and generally have nothing to do with audio) and the ‘Dim’ buttons are disabled. -
Page 42: Preview/User Buttons
The panel’s configurer will have made trade-offs in this regard. Your iMC-Panel-300 might be configured with one or more “group select” button. If it has group select button(s), you can switch between several groups of main sources. When you switch groups, the source mnemonics of the selected group appear on the physical buttons. -
Page 43: Aux/User Buttons
Operator’s Guide (for Imagestore 750s) Aux/User Buttons The aux/user buttons (just above or behind the preview bus) are divided into two parts: 1 Main source buttons. The leftmost buttons represent sources only. They are the same sources as on the program and preset buttons. -
Page 44: Button Details
Control Panel Functional Sections of the Panel Button Details Main Source Button Characteristics The main source buttons display an 8-character source name on the button: The main source buttons use the following color scheme: Dark Button is not in use. Low Green Not selected. - Page 45 Operator’s Guide (for Imagestore 750s) Please note: the order of effects and the number of effects assigned to the buttons do not affect the order in which the Imagestore 750 applies the effects. (Also, the main source is always upstream of any effect.)
-
Page 46: Voice-Overs
Control Panel Functional Sections of the Panel Voice-Overs Like video effect buttons, the 2 voice-over button pairs on the program and preset bus are not mutually exclusive. When an over is selected on the program button row, its audio contributes to program audio. -
Page 47: Transition Button
Buttons in the preview/user row, the aux/user row, the configurable button section, the transi- tion control section, and the system control section of the iMC-Panel-300 can be defined during panel configuration and redefined in later panel configurations. These are the button function... -
Page 48: Channel Select
Note to configurers: only one channel selection button may be assigned to a channel. No Channels A ‘No Channel’ button quickly disconnects the iMC-Panel-300 from all channels. (To restore operation, select any channel.) These are the ‘No Channel’ button colors: •... -
Page 49: Gang Channels
You cannot use the channel menu to add or remove follower channels. Salvo An iMC-Panel-300 might have one or more salvo buttons. Pressing a salvo button causes an NV9000 salvo to execute. (This button requires a connected NV9000 router control system.) A channel change can also execute a salvo. -
Page 50: Fade To Black
An ‘Audio Lock’ button is a toggle that enables or disables the two program audio level knobs on the iMC-Panel-300. (This feature helps prevent accidental changes to the audio levels) The button is amber when the audio level knobs are locked. -
Page 51: Fire Macro
Operator’s Guide (for Imagestore 750s) Fire Macro A ‘Fire Macro’ button executes an Imagestore 750 macro immediately. PGM DVE Enable A ‘PGM DVE Enable’ button enables the use of DVE buttons on the program button row. PST DVE Enable A ‘PST DVE Enable’... -
Page 52: Transition Type
Control Panel Definable Button Functions Transition Type There are 8 ‘Transition Type’ button functions: V-fade (or fade-fade) V-fade preset 1 Fade/cut Cross fade (or X-fade) V-fade preset 2 Cut/fade U-fade Transition type buttons are mutually exclusive. Press one to select the transition type the Imag- estore 750 will use subsequently to execute transitions. -
Page 53: Take
GPI input port receives a signal from an external device. The iMC-Panel-300 has a GPI/Alarm connector at the rear that provides 2 relay outputs (with NO, NC, and COM terminals) and 2 optically isolated TTL-level inputs. The 2 relays can control external devices. -
Page 54: Gpi Input And Output
Control Panel Connectors Consult with your system administrator to determine which options apply to the GPI input buttons in your iMC-Panel-300 configuration. GPI Input and Output A combined GPI input and output button performs 2 functions. • The illumination of the button represents the state of a GPI input as for the GPI input but- tons. -
Page 55: Ethernet
Operator’s Guide (for Imagestore 750s) Ethernet The iMC-Panel-300 has one RJ-45 Ethernet connector. Connect the panel to the switch on the master control network using Cat5 cable or better. It is on this network that the panel communicates with Imagestore 750s and with your configu- ration software. -
Page 56: Aux
The USB port is reserved for future development: SD/HD Input The iMC-Panel-300 has an SD/HD input port: The input drives the panel’s “live levels” display when the panel is controlling an MCE or an MCPM. The input can be either SD or HD video with up to 16 channels of audio embedded. -
Page 57: Menus
Menus Chapter 4 describes the menus of the iMC-Panel-300 and their buttons. Topics About Menus ................45 Main Menu . -
Page 58: Menu Components
Menus About Menus Menu Components Figure 4-1 illustrates the basic menu components: Fig. 4-1: Menu Parts Menu name Selection buttons Toggle buttons Error bar Scroll bar Momentary buttons Message bar Navigation buttons Rotary knobs Following are descriptions of each menu area: 1 Menu name The current menu name is always present in the top left corner. - Page 59 Operator’s Guide (for Imagestore 750s) 3 Message bar The message bar is a second rectangular area at the top of the menu that displays confirma- tion messages when certain actions are in progress (e.g., “Changing Channels”) or have com- pleted (e.g., “NV9000 Salvo Successful”).
- Page 60 Menus About Menus Figure 4-2 illustrates other menu components: Fig. 4-2: Menu Parts Functional area Toggle button Navigation buttons Keypad Buttons Following are descriptions of each menu area: 1 Functional area The function area is the menu’s working area for all selections, adjustments, and modifica- tions.
-
Page 61: Menu Button Conventions
4 Keypad Buttons The keypad buttons appear when a menu has a parameter that you can set with a numeric value. When you touch a keypad button, the iMC-Panel-300 displays the keypad. Menu Button Conventions The following concepts apply to menu buttons in the iMC-Panel-300’s touchscreen: A momentary button executes the selected function, changes to bright green for an instant, then returns to dark green. -
Page 62: Keypads
Menus About Menus Keypads Figure 4-3 shows the keypad, used in menus for numeric entry and parameter adjustment: Fig. 4-3: Keypad (Sample) Please note: • The box with large numbers is the “entry register” that shows your numeric entry in progress. - Page 63 Operator’s Guide (for Imagestore 750s) Figure 4-4 shows a sample: Up Arrow Vacant Area Control Vacant Area Down Arrow Fig. 4-4: Example of a Settings List with Scrollbar Touch any item in the list to select the item. Use the scroll bar when the item you want is off- screen.
-
Page 64: Main Menu
Menus Main Menu Main Menu Figure 4-5 shows the iMC-Panel-300’s main menu: Voice-Over Controls Misc. Audio Meters Misc. Audio Input Section Video Input Section Intuition XG Control DSK Controls XG Layers Layer Groups Fig. 4-5: Main Menu Following are brief descriptions regarding the main menu elements: •... - Page 65 Operator’s Guide (for Imagestore 750s) • Voice over control The two buttons in this section access the voice-over 1 and voice-over 2 menus. See Voice- Over Menus on page 82. • Audio Meters The meters in this portion of the screen show the audio levels of the designated audio source which can be selected in the audio meters menu.
-
Page 66: Audio Monitor Menu
Menus Audio Monitor Menu Audio Monitor Menu Figure 4-7 shows the panel’s ‘Audio Monitor’ menu: Fig. 4-6: Audio Preview Menu This menu allows you to select the source for the audio that is directed to the Imagestore 750’s preview output. There are 11 source choices illustrated here: PGM Input PGM Input Post... -
Page 67: Audio Meters Menu
Operator’s Guide (for Imagestore 750s) Audio Meters Menu Figure 4-7 shows the iMC-Panel-300’s audio meters menu: Fig. 4-7: Audio Meters Menu The audio meters menu displays 16 audio meters. The meters show the audio channels for the selected source. Press ‘Meters Source Select’ to get the ‘Meters Source Select’ menu where you can select the source for the meters. - Page 68 Menus Audio Meters Menu This is the ‘Meters Source Select’ menu: Press any source button to change the metering source. There are 11 source choices illustrated here: PGM Input PGM Input Post PGM Easyplay PGM Post Voice-Over PST Input PST Input Post PST Easyplay PST Post Voice-Over PGM Copy...
-
Page 69: Audio Preview Menu
Operator’s Guide (for Imagestore 750s) Audio Preview Menu Figure 4-7 shows the panel’s ‘Audio Preview’ menu: Fig. 4-8: Audio Preview Menu This menu allows you to select the source for the audio that is directed to the Imagestore 750’s preview output. -
Page 70: Automation Menu
Menus Automation Menu Automation Menu Figure 4-9 shows the panel’s automation menu: Fig. 4-9: Automation Menu The automation menu provides an alternative to dedicated function buttons. Buttons These buttons allow you to manipulate the automation playout to a limited extent. The meanings of the terms ‘Cue Next’... -
Page 71: Channel Select Menu
Press any channel button to select that channel. The channel selection is immediate, although it take about one second for the channel to be acquired. If your iMC-Panel-300 is under “automatic gang mode” and you choose the default channel, all channels in the automatic channel gang are selected and gang selection is enabled. -
Page 72: Preemption
Menus Channel Select Menu If your panel is configured for sharing, it is possible for you to share a channel with other panels, unless some other channel that is not configured for sharing controls that channel. Preemption When your panel is not configured for sharing, if the channel (or one of the ganged channels) you want to control is in use, you will see either a permission message or a denial of access message: If you see a permission message, and you wish to preempt the other panel, press ‘OK’... -
Page 73: Edit/More
Operator’s Guide (for Imagestore 750s) Edit/More Press ‘Edit/More’ to access the Channel Details Sub-Menu, which lets you view a channel’s parameters and the channel’s log. Note You cannot specifically gang channels with the ‘Channel Select’ menu although you can select the default channel which might be part of a channel gang under automatic gang mode. -
Page 74: Version Info Sub-Menu
Menus DSK Menus Version Info Sub-Menu The ‘Version Info’ sub-menu lists the software and firmware versions of the attached Imagestore 750. Refer to this menu, as required, for channel-related trouble-shooting: Fig. 4-12: Version Info Menu (Sample) DSK Menus Figure 4-13 shows the panel’s ‘DSK 1 Browser’ menu: List Buttons Scroll... -
Page 75: Options Buttons
Operator’s Guide (for Imagestore 750s) The DSK 2, DSK 3, and DSK 4 browser menus are just like the DSK 1 browser menu. The LGK-3901 and ISM-3901 support 5 DSKs. For these units, the panel has 5 DSK menus. The DSK-3901 has only 2 DSKs. -
Page 76: Rates, Cgt, Keying
Menus DSK Menus Rates, CGT, Keying This is the ‘Rates, CGT, Keying’ sub-menu: Keypad Green Asterisk In this menu, you can make adjustments to the currently selected DSK. The ‘Adjust CGT’ button causes the clip, gain, and transparency controls to appear (as shown above). - Page 77 Operator’s Guide (for Imagestore 750s) Rate Adjustment When you touch the ‘Adjust Rate’ button, the menu presents rate controls at the bottom: There are 3 numerical controls for the 3 rates (slow, medium, and fast). To adjust any of those parameters, either turn the knob associated with the green asterisk in the control box, or touch the keypad icon to access a large keypad with which to enter a number.
-
Page 78: Position, Size, Crop
Menus DSK Menus Position, Size, Crop This is the ‘Position, Size, Crop’ sub-menu. When you touch ‘Adjust Position’ , two position controls appear at the bottom: When you touch ‘Adjust Crop’ , four boundary controls appear at the bottom: To adjust any of those parameters, either turn the knob associated with the green asterisk in the control box, or touch the keypad icon to access a large keypad with which to enter a number. -
Page 79: Options Saving
Operator’s Guide (for Imagestore 750s) The ‘Zero Position’ button sets the ‘X Position’ and ‘Y Position’ parameters to 0. The ‘Clear Crop’ button sets the ‘Top’ , ‘Bottom’ , ‘Left’ , and ‘Right’ parameters to 0. Position and crop values are independent. Changing one does not change the other. However, the position controls affect the placement of the uncropped boundary of the DSK. -
Page 80: Easyplay" Menus
Menus “EasyPlay” Menus “EasyPlay” Menus Figure 4-13 shows the panel’s EasyPlay 1 browser menu: List Buttons Scroll Clip Icons Fig. 4-14: DSK 1 Menu The EasyPlay 1 browser menu corresponds to voice-over 1. The EasyPlay 2 browser menu corre- sponds to voice-over 2. These menus are functionally identical. “Easyplay”... -
Page 81: Macro Menu
Operator’s Guide (for Imagestore 750s) Macro Menu Figure 4-15 shows the panel’s macro menu: Fig. 4-15: Macro Menu This menu can arm macros or execute Imagestore 750 macros immediately. The upper row of buttons are “fire” buttons and execute the macros immediately. The lower row of buttons are “arming”... -
Page 82: Program Input Audio Menu
Menus Program Input Audio Menu Program Input Audio Menu Figure 4-16 shows the panel’s ‘Program Input Audio’ menu: Fig. 4-16: Program Input Audio Menu The ‘Program Input Audio’ menu and the ‘Preset Input Audio’ menu control the Imagestore 750’s audio input. The control at the bottom of the menu adjusts the master audio level of program input. -
Page 83: Presets
Operator’s Guide (for Imagestore 750s) Presets A shuffle preset is a predefined configuration of the shuffle matrix such as you might define using the ‘Shuffles’ submenu. A “gain preset” is a predefined set of 16 gain settings such as you might define using the ‘Gains and Mutes’... -
Page 84: Phase Inverts
Menus Program Input Audio Menu “Phase Inverts” This is the ‘Phase Inverts’ sub-menu: When the audio channel is inverted, its PCM values are multiplied by –1. The term phase is a misnomer. Phase has nothing to do with signal inversion. Pressing an invert button either inverts or un-inverts the audio samples. -
Page 85: Audio Channel Shuffle
Operator’s Guide (for Imagestore 750s) Audio Channel Shuffle This is the ‘Audio Channel Shuffle’ sub-menu: Shuffling Audio Channels on page 134. Press the ‘Back’ button to return to the ‘Program Input Audio’ menu. Press the ‘Main menu’ button to return to the main menu. -
Page 86: Program Output Audio Menu
Menus Program Output Audio Menu Program Output Audio Menu Figure 4-17 shows the panel’s ‘Program Output Audio’ menu: Fig. 4-17: Program Output Audio Menu The ‘Program Output Audio’ menu controls the Imagestore 750’s audio output. The control at the bottom of the screen adjusts the master audio level of program output. (The levels of all individual channels are affected by the master level.) To adjust this parameter, either click the knob associated with the green asterisk in the control box, and use the slider that appears, or click the keypad icon to access a keypad with which to enter a number. -
Page 87: Gains And Mutes
Operator’s Guide (for Imagestore 750s) These presets are defined in the Imagestore 750 Configurator. Shuffle Presets and Gain Presets on page 86. Gains and Mutes This is the ‘Gains and Mutes’ sub-menu: Each of the 16 audio channels has a mute button. Touch the mute button to mute or un-mute the channel. -
Page 88: Phase Inverts
Menus Program Output Audio Menu “Phase Inverts” This is the ‘Phase Inverts’ sub-menu: When the audio channel is inverted, its PCM values are multiplied by –1. The term phase is a misnomer. Phase has nothing to do with signal inversion. Pressing an invert button either inverts or un-inverts the audio samples. -
Page 89: Audio Channel Shuffle
Operator’s Guide (for Imagestore 750s) Audio Channel Shuffle This is the ‘Audio Channel Shuffle’ sub-menu: Shuffling Audio Channels on page 124. Press the ‘Back’ button to return to the ‘Program Input Audio’ menu. Press the ‘Main Menu’ button to return to the main menu. -
Page 90: Preset Input Audio Menu
Menus Preset Input Audio Menu Preset Input Audio Menu Figure 4-18 shows the panel’s ‘Preset Input Audio’ menu: Fig. 4-18: PST Input Audio Menu The ‘Program Input Audio’ menu and the ‘Preset Input Audio’ menu control the Imagestore 750’s audio input. The control at the bottom of the screen adjusts the main overall audio level of program output. -
Page 91: Presets
Operator’s Guide (for Imagestore 750s) Presets A shuffle preset is a predefined configuration of the shuffle matrix such as you might define using the ‘Shuffles’ submenu. A “gain preset” is a predefined set of 16 gain settings such as you might define using the ‘Gains and Mutes’... -
Page 92: Phase Inverts
Menus Preset Input Audio Menu “Phase Inverts” This is the ‘Phase Inverts’ sub-menu: When the audio channel is inverted, its PCM values are multiplied by -1. The term phase is a misnomer. Phase has nothing to do with signal inversion. Pressing an invert button either inverts or un-inverts the audio samples. -
Page 93: Audio Channel Shuffle
Operator’s Guide (for Imagestore 750s) Audio Channel Shuffle This is the ‘Audio Channel Shuffle’ sub-menu: Shuffling Audio Channels on page 134. Press the ‘Back’ button to return to the ‘Preset Input Audio’ menu. Press the ‘Main menu’ button to return to the main menu. -
Page 94: Voice-Over Menus
Menus Voice-Over Menus Voice-Over Menus Figure 4-19 shows the panel’s ‘Voice-Over 1’ menu: Fig. 4-19: Voice-Over 1 Menu There are two voice-over menus: ‘Voice-Over 2’ is just like ‘Voice-Over 1’ . The controls at the bottom of the screen adjusts the “duck” level and the voice-over level of program output. -
Page 95: Gains And Mutes
Operator’s Guide (for Imagestore 750s) These presets are defined in the Imagestore 750 Configurator. Shuffle Presets and Gain Presets on page 86. Gains and Mutes This is the ‘Gains and Mutes’ sub-menu: Each of the 16 audio channels has a mute button. Touch the mute button to mute or un-mute the channel. -
Page 96: Phase Inverts
Menus Voice-Over Menus “Phase Inverts” This is the ‘Phase Inverts’ sub-menu: When the audio channel is inverted, its PCM values are multiplied by -1. The term phase is a misnomer. Phase has nothing to do with signal inversion. Pressing an invert button either inverts or un-inverts the audio samples. When the button is amber, the samples are inverted. -
Page 97: Audio Channel Shuffle
Operator’s Guide (for Imagestore 750s) Audio Channel Shuffle This is the ‘Audio Channel Shuffle’ sub-menu: Shuffling Audio Channels on page 134. Press the ‘Back’ button to return to the voice-over menu. Press the ‘Main menu’ button to return to the main menu. -
Page 98: Shuffle Presets And Gain Presets
Menus Shuffle Presets and Gain Presets Shuffle Presets and Gain Presets A “shuffle preset” is a predefined configuration of the shuffle matrix such as you might define using one of the ‘Shuffles’ submenus. A “gain preset” is a predefined set of 16 gain settings such as you might define using one of the ‘Gains Mutes’... -
Page 99: Gain Presets
Operator’s Guide (for Imagestore 750s) Gain Presets This is the ‘Gain Presets’ sub-menu (as applicable to a voice-over menu): To choose a gain preset, click the blue button representing the desired preset. Scroll if necessary to locate the preset you want. -
Page 100: Xg Keyer Layers Menu
Menus XG Keyer Layers Menu XG Keyer Layers Menu This is the panel’s XG keyer layers menu: The ‘Main Menu’ button returns you to the main menu. (The large ‘Intuition XG Layer Control’ button in the main menu takes you to this menu.) The buttons in the upper row —... -
Page 101: Xg Layer Menus
Operator’s Guide (for Imagestore 750s) XG Layer Menus Press any of the eight XG layer “menu” buttons (in the ‘XG Keyer Layers’ menu) to get an XG browser for that layer. This is an example for XG layer 1: The ‘Show Selection’... -
Page 102: A/B Mixer Menu
Menus A/B Mixer Menu A/B Mixer Menu Figure 4-20 shows the panel’s ‘A/B Mixer’ menu: Fig. 4-20: A/B Mixer (Rates Sub-Menu Shown) This menu displays the characteristics of the transition types defined in the Imagestore 750 under control. The ‘Adjust Rates’ button selects a sub-menu that lets you adjust the slow, medium, and fast rates of the A/B mixer. -
Page 103: Adjust Profiles
Operator’s Guide (for Imagestore 750s) Adjust Profiles Figure 4-21 shows the A/B mixer’s ‘Profiles’ sub-menu: Option Buttons Fig. 4-21: A/B Mixer (Profiles Sub-Menu Shown) In this menu, you can adjust the down time, mid time, and up time (or rise time) of individual transition types. -
Page 104: Sources Menu
Menus Sources Menu For example, the values for a fade-cut (79, 13, 15) for a slow transition (150 frames) are: Sum = 79 + 13 + 15 = 107 ′ D = 79 / 107 = 150 × 79 / 107 = 110.747 = 111 frames ′... -
Page 105: Adding A Source To A Group
Operator’s Guide (for Imagestore 750s) Adding a Source to a Group Follow these steps: 1 Select the source group to which you want to add a source. 2 Press any grey source button: A dialog appears in which you can choose any router source available: Press a source button to choose a source. -
Page 106: Changing A Source Within A Group
Menus Sources Menu Changing a Source within a Group Follow these steps: 1 Press any blue source button. In this example, the first source (VTR6Don) was pressed: A dialog appears in which you can choose any router source available: Press a source button to choose a source. Scroll, if necessary, to find the source. Press ‘Cancel’... -
Page 107: Removing A Source From A Group
Operator’s Guide (for Imagestore 750s) Removing a Source from a Group Follow these steps: 1 Press any blue source button. In this example, the first source (VTR6Don) was pressed: Again, a dialog appears: Press ‘Clear Slot’ to remove the source. -
Page 108: Panel Menu
Menus Panel Menu Panel Menu From the main menu, press the ‘Panel Settings’ button to access the ‘Panel Info’ menu: Fig. 4-23: Panel Info Menu The ‘Panel Info’ menu has 5 buttons that let you do the following: • Setup. Change the panel’s IP address and mask. •... -
Page 109: Ip Setup
The ‘IP Setup’ menu allows you to enable, disable, or change the LAN1 address pertaining to the iMC-Panel-300. LAN1 is for communication with the Imagestore 750 and its IP address should be 192.168.aaa.bbb, where bbb is different for each control panel in use and aaa depends on the subnet you’ve chosen. -
Page 110: Manage Log
Menus Panel Menu Manage Log From the ‘Panel Info’ menu, press the ‘Manage Log’ button to display the ‘Manage Log’ sub- menu: Fig. 4-25: Manage Log Sub-Menu The ‘Manage Log’ sub-menu allows you to view and to clear the system log. Press ‘View Log’... -
Page 111: Set Date Time
Operator’s Guide (for Imagestore 750s) Set Date Time From the ‘Panel Info’ menu, press the ‘Set Date Time’ button to display the ‘Date and Time’ menu. Fig. 4-26: Date/Time Sub-Menu This menu has 3 fields for date and 4 fields for time. Touch the left or right arrow buttons to select the field you want to modify. -
Page 112: Version Info
Menus Panel Menu Version Info From the ‘Panel Info’ menu, press the ‘Version Info’ button to display the ‘Version Info’ menu. Fig. 4-27: Version Info Menu The ‘Version Info’ sub-menu allows you to view software and firmware revisions. Panel Status From the ‘Panel Info’... - Page 113 Operator’s Guide (for Imagestore 750s) The ‘Panel Status’ sub-menu allows you to restart the panel, adjust the LCD brightness, update the panel configuration, and perform tests. Turn the menu knob for LCD brightness to adjust brightness visually or use the keypad to enter a numerical value (from 40 to 255).
-
Page 114: Panel Test Sub-Menu
Menus Panel Menu Panel Test Sub-Menu From the ‘Panel Status’ menu, press the ‘Test Panel’ button to display the ‘Panel Test’ sub-menu: These are the functions of the ‘Panel Test’ sub-menu: • View alarm status and temperature information. • Turn (all) button LCDs on and off, verifying that they work. •... -
Page 115: Operation
General Information About Colors The physical buttons of the iMC-Panel-300 are large having LCD legends in several colors. Each button has 3 line of text, up to 8 characters per line. Although not physical, menu buttons also show 3 lines of 8 characters. -
Page 116: Colors On Lcd Buttons
Operation General Information Colors on LCD Buttons The colors you are viewing here are approximate only. Red buttons have the following warning functions: SD SD On the program and preset buses, red indicates that the selected source is LOS or non-sync. The error line of the menu displays the current error condition. Note that the system will put a non-sync source on air if you want it. - Page 117 Operator’s Guide (for Imagestore 750s) Video effect buttons are blue, and high-tally when selected. DSK 3 F1+K1 F1+K1 DSK 3 F1+K1 F1+K1 Menu selection buttons are normally grey. When you press a menu selection AUDIO AUDIO button to select a menu, the button turns aqua. (Aqua is a shade of blue not very...
-
Page 118: Menu Button Color
Operation General Information Menu Button Color The menu buttons use color to represent different types of functions and give you visual feedback: Some gray buttons are navigation buttons. (The ‘Main Menu’ button, for example, always takes you to the main menu. Most other navigation buttons take you to sub-menus. -
Page 119: About Error Messages
Always check the menu display to obtain information about current errors. About the Button Rows The iMC-Panel-300 has four button rows each comprising 24 buttons. The preset and program rows have exactly the same button functions. The aux/user has the same main source buttons as the preset and program rows. Buttons in the aux row that are not main source buttons are configurable buttons. -
Page 120: About Configurable Buttons
Operation General Information About Configurable Buttons When your panel is controlling an Imagestore 750, there are 4 sets of buttons that provide customer-configurable buttons: • The 4×4 array of buttons on the upper left part of the panel. • The 3×4 array of buttons in the “Audio Monitoring” section at the upper right. •... -
Page 121: Using The Keypad
The Entry register automatically clears. Performing Transitions The iMC-Panel-300 is a master control panel that sets up and initiates program transitions in an Imagestore 750. The Imagestore 750 executes the transitions. Setting up a transition is the primary task of the panel operator. Automation can also set up and initiate transitions but that is of little concern to panel operators, except that operators may inhibit or enable automation and must generally avoid interfering with automated transitions. -
Page 122: Basic Transition
Operation Transition Options Basic Transition Follow these steps to perform a basic transition: 1 Select the desired source on preset. 2 (Optionally) select or deselect the desired video effects and voice-overs on preset. 3 Use the menus to choose, and possibly modify, video effect settings. 4 (Optional) Select the desired transition type: cut, V-fade, cross-fade, PB cut-fade, or another. - Page 123 Operator’s Guide (for Imagestore 750s) It is possible, although not likely, for the Imagestore 750 to be configured to present pro- gram output, the program A/B mixer output, the program DVE output, or the outputs of DSKs 1, 2, or 3 as the preset output.
-
Page 124: Working With Transition Type And Rate
Operation Working with Transition Type and Rate Working with Transition Type and Rate It is the Imagestore 750 that stores the transition type and rate. It supports 8 transition types: cut, V-fade, cut-fade, cross-fade (or X-fade), fade-cut, U-fade, V-fade preset 1, and V-fade preset 2. -
Page 125: Working With Dsks
Operator’s Guide (for Imagestore 750s) Working with DSKs All Imagestore 750s provide 4 DSKs (downstream keyers). A key is a video effect that usually consists of two video sources, fill and key. The keyer mixes the fill, masked by the key, with upstream program video. -
Page 126: Changing Key Settings
Operation Working with DSKs Changing Key Settings Go to the ‘DSK Browser’ menu. A list of keys appears (with scroll bars if the list includes more than 12 keys). Press a list entry to select the key of your choice. The setting now appears high- lighted (in blue) in the list and the setting name appears on the DSK buttons in the program and preset button rows. -
Page 127: Rates, Cgt, Keying
Operator’s Guide (for Imagestore 750s) Rates, CGT, Keying Press ‘Rates CGT Keying’ to access a menu in which to change the DSK rate, the clip, gain, trans- parency parameters, or key options. The ‘DSK Rates, CGT, Keying’ sub-menu appears: Fig. -
Page 128: Position, Size, And Crop
Operation Working with DSKs Key Options The top 3 buttons are toggles: • Key source — toggles between ‘Key’ and ‘Self’ . Self-keys do not use a separate key input. The key values are derived from the chroma values of the fill source. •... - Page 129 Operator’s Guide (for Imagestore 750s) The large red outline represents the screen boundary. The darker gray rectangle represents the DSK. Crop Either (1) press ‘Adjust Crop’ modify the crop values of the DSK, (2) press ‘Clear Crop’ to reset its 4 crop values 0, or use the four controls at the bottom of the window to enter values.
-
Page 130: Saving Dsk Settings
Operation Working with DVEs Saving DSK Settings Press ‘Options Saving’ to access a sub-menu in which to save settings for the specific DSK: rate, the clip, gain, transparency parameters, or key options. The ‘Options, Saving’ sub-menu appears: Fig. 5-3: DSK Options Saving Page Then press ‘Save DSK Settings’... -
Page 131: Working With Xg Layers
Operator’s Guide (for Imagestore 750s) Working with XG Layers There are up to 8 XG layer accessible at your panel. Your panel can have some number of XG layer buttons. You can choose XG clips in the XG layer sub-menu. You can also turn the layers on and off in that menu. -
Page 132: Working With Voice-Overs
Operation Working with Voice-Overs Working with Voice-Overs Imagestore 750s have two voice-over mixers: Over 1 and Over 2. The “layer” section of the program and preset button rows can include 0, 1, or 2 voice-over buttons. There are two parameters that govern the use of voice-overs: the “duck” level and the over level: Main Source Audio Over Level Duck Level... -
Page 133: Voice-Over Menu
Operator’s Guide (for Imagestore 750s) Voice-Over Menu You can exercise detailed control of an over’s audio levels in the voice-over menu. Choose the menu for voice-over 1 or voice-over 2 from the main menu or press a voice-over menu button. -
Page 134: Gains And Mutes
Operation Working with Voice-Overs Gains and Mutes This is the ‘Gains and Mutes’ sub-menu: Each of the 16 audio channels has a mute button. Touch the mute button to mute or un-mute the channel. When the channel is muted, the button is amber. Each of the 16 audio channels has a keypad icon. -
Page 135: Phase Inverts
Operator’s Guide (for Imagestore 750s) “Phase Inverts” This is the ‘Phase Inverts’ sub-menu: When the audio channel is inverted, its PCM values are multiplied by –1. The term phase is a misnomer. Phase has nothing to do with signal inversion. -
Page 136: Audio Channel Shuffle
Operation Working with Voice-Overs Audio Channel Shuffle This is the ‘Audio Channel Shuffle’ sub-menu: Shuffling Audio Channels on page 134. Press the ‘Back’ button to return to the voice-over menu. Press the ‘Main Menu’ button to return to the main menu. Performing Over Transitions Follow these steps to transition a voice-over to program output. -
Page 137: Shuffle Presets
Operator’s Guide (for Imagestore 750s) You cannot change the over source. There is one source for each VO and it is pre-configured. Shuffle Presets This is the ‘Gain Presets’ sub-menu (of the Voice-Over menu: A shuffle preset is a predefined configuration of the shuffle matrix such as you might define using the ‘Shuffles’... -
Page 138: Gain Presets
Operation Working with Audio Monitors Gain Presets This is the ‘Gain Presets’ sub-menu (of the Voice-Over menu: A “gain preset” is a predefined set of 16 gain settings, such as you might define using the ‘Gains and Mutes’ submenu. These presets are defined in the Imagestore 750 Configurator. To choose a gain preset, click the blue button representing the desired preset. -
Page 139: Audio Monitor Menu
Operator’s Guide (for Imagestore 750s) The monitor levels section of the iMC-Panel-300 has two knobs: You can adjust the gain of the CLN audio output simply by turning the upper knob. You can adjust the gain of the MON audio output simply by turning the lower knob. -
Page 140: Audio Preview Menu
Operation Working with Audio Monitors This menu allows you to select the source for the audio that is directed to the Imagestore 750’s monitor output. Audio Preview Menu Figure 5-5 shows the panel’s ‘Audio Preview’ menu: Fig. 5-5: Audio Preview Menu This menu allows you to select the source for the audio that is directed to the Imagestore 750’s preview output. -
Page 141: Working With Audio Meters
Operator’s Guide (for Imagestore 750s) Working with Audio Meters The iMC-Panel-300 provides an audio metering display. It shows the 16 levels of the selected audio metering source in real time: The name of the selected audio source is displayed at the upper right. -
Page 142: Working With Audio Levels
Operation Working with Audio Levels There are 11 sources illustrated here. The number of sources and the names of the sources are determined by the person who configured the Imagestore 750. Consult your management if you need to know what the sources mean. Press the ‘Back’... - Page 143 Operator’s Guide (for Imagestore 750s) • Voice-over audio (1 and 2) — the Imagestore 750’s voice-over inputs. The menus all function the same way, although they affect different parts of the Imagestore 750. The program and preset audio inputs apply individually to main sources. You can save and restore audio settings for each source.
-
Page 144: Gains And Mutes
Operation Working with Audio Levels Gains and Mutes This is the ‘Gains and Mutes’ sub-menu: Each of the 16 audio channels has a mute button. Touch the mute button to mute or un-mute the channel. When the channel is muted, the button is amber. Each of the 16 audio channels has a keypad icon. -
Page 145: Phase Inverts
Operator’s Guide (for Imagestore 750s) “Phase Inverts” This is the ‘Phase Inverts’ sub-menu: When the audio channel is inverted, its PCM values are multiplied by –1. The term phase is a misnomer. Phase has nothing to do with signal inversion. -
Page 146: Audio Channel Shuffle
Operation Shuffling Audio Channels Audio Channel Shuffle This is the ‘Audio Channel Shuffle’ sub-menu: Shuffling Audio Channels, next, for information. Press the ‘Back’ button to return to the audio menu. Touch the ‘Main Menu’ button to return to the main menu. Shuffling Audio Channels There is an ‘Audio Channel Shuffle’... - Page 147 Operator’s Guide (for Imagestore 750s) Position the reticle on the crosspoint you want. In this illustration, the reticle is on the column for output 5 and will change the input for that column from 5 to 3. A faint circle appears at the new location: Now press the red ‘Take’...
-
Page 148: Working With Multiple Channels
Working with Multiple Channels You will probably find one or more channel buttons in the configurable button sections of your iMC-Panel-300. (A channel is an Imagestore 750, LGK-3901, DSK-3901, ISM-3901, or an MCE or an MCPM.) There are 3 types of channel buttons: •... -
Page 149: No Channel Selection
Operator’s Guide (for Imagestore 750s) When you perform a channel change, the new channel button flashes red for an moment, indi- cating that the system has acknowledged the change request. If the channel you select is the default channel under automatic gang mode, the panel selects all the channels in the automatic channel gang. -
Page 150: Sharing
Operation Working with a Monitor Wall If someone preempts you, your panel will immediately appear to “go dead. ” What actually happens is the same thing that would happen if you pressed a ‘No Channel’ button. You will have to wait for the channel to become available again or switch to another channel. A panel can preempt another panel if it has been configured with a higher priority or in some cases, with the same or higher priority. -
Page 151: Working With The Aux Buttons
Operator’s Guide (for Imagestore 750s) Working with the Aux Buttons The aux/user button row comprises a number of main source buttons and some number of configurable function buttons. The main source buttons are exactly identical to the sources of the preset and program button rows. -
Page 152: Panel Status
Operation Using the Panel Menu • Change the IP address, subnet mask, and gateway address. • View or clear the panel’s log file. • Set the date and time. • Display the versions of internal software and firmware. • Perform panel tests. •... -
Page 153: Ip Address
Operator’s Guide (for Imagestore 750s) IP Address Follow these steps to change the panel’s IP address: 1 From the main menu, press ‘Panel’ to display the ‘Panel Info’ menu. Then press ‘IP Setup’ . 2 Press ‘Change IP’ to display the ‘IP address’ sub-menu. Use the keypads to enter or change the IP address. -
Page 154: View Version Information
Operation Using the Panel Menu View Version Information From the main menu, press ‘Panel Settings’ to display the ‘Panel Info’ menu. Then press ‘Version Info’ . View or Clear the Panel’s Log File From the main menu, press ‘Panel Settings’ to display the ‘Panel Info’ menu. Then press ‘Manage Log’... -
Page 155: Set Time And Date
Operator’s Guide (for Imagestore 750s) You (or your system administrator) can read the log file contents into a file in your configuration PC’s file system using the MCS Panel Configuration Editor. This is a sample of the log file display: Set Time and Date From the main menu, press ‘Panel’... -
Page 156: Fade To Black
When the Imagestore 750 has faded to silence, the FTS button of the main menu is high- lighted in red. Updating Configuration Settings You (or your system administrator) can create new iMC-Panel-300 configurations and then update the iMC-Panel-300 accordingly. The configuration software is MCS Panel Configuration Editor. -
Page 157: Panel Startup And Shutdown
Operator’s Guide (for Imagestore 750s) Panel Startup and Shutdown To shutdown or restart the panel, press ‘Panel’ in the main menu to go to the ‘Panel Info menu. Then go to the ‘Panel Status’ sub-menu: Choose ‘Shut Down Panel’ to perform a clean shut down. You must later cycle power to restart the panel. - Page 158 Operation Panel Startup and Shutdown...
-
Page 159: Misc. Topics
................148 Notes Alarms The iMC-Panel-300 produces two levels of alarm output: • Major alarm: A failure of any circuit board. -
Page 160: Control Inputs And Outputs
Misc. Topics Drawings Control Inputs and Outputs Ethernet Ports: 10/100baseT, NV5100MC network. DB15 (CP AUX) connector for the optional Transition lever Arm. DB25 (GPI/Alarm): GPI inputs: 2, optically isolated, level-sensitive TTL. GPI and alarm outputs: 2 (relays), 3 terminals: COM, NC, and NO. Power applied to the inputs can be from 5 to 24 VDC, and less than 30 mA. - Page 161 Operator’s Guide (for Imagestore 750s) Fig. 6-1: iMC-Panel-300, Top View...
- Page 162 Misc. Topics Drawings Fig. 6-2: iMC-Panel-300, Rear View...
- Page 163 Operator’s Guide (for Imagestore 750s) Fig. 6-3: iMC-Panel-300, Right-Side View...
- Page 164 Misc. Topics Drawings...
-
Page 165: Glossary
Definition 1: A single Imagestore 750, MCE or MCPM (and, specifically, its program output). Definition 2: One of 16 audio channels. General-purpose interface. The iMC-Panel-300 has 2 GPI inputs and 2 GPI outputs. You can assign a panel-specific GPI output to a configurable control panel button. (GUIs do not have panel-specific GPIs.) - Page 166 Glossary...
-
Page 167: Index
Index Audio preview (dialog) ......54, 57 Audio preview (menu) ......127–128 Automatic gang mode . - Page 168 Index fade-cut ......... 40 GPI input and output .
- Page 169 DSK-3901 ..........13 Contact Miranda ........163 DSKs .
- Page 170 ....... . 124 Features, iMC-Panel-300 ......16 start up and shut down .
- Page 171 NV5100MC Operator’s Guide (for Imagestore 750s) Kaleido-X layout ........138 Macro (menu) .
- Page 172 Middle East, contact ....... . 163 Miranda, contact ........163 Momentary buttons .
- Page 173 Restarting the panel ......97, 101, 140 iMC-Panel-300 ....... . . 147 Restrictions .
- Page 174 ......... . 34 iMC-Panel-300, top ......149 type .
-
Page 175: Contact Us
Contact Us Miranda Technical Support For technical assistance, please contact the Miranda Technical Support center nearest you: Americas Asia Office hours: 9:00 a.m. – 9:00 p.m. (EST) Office hours: 9:00 a.m. – 5:00 p.m. (GMT+8) Telephone: +1-800-224-7882 Telephone: +852-2539-6987 Fax:...
Need help?
Do you have a question about the iMC-Panel-300 and is the answer not in the manual?
Questions and answers