Table of Contents
Advertisement
Quick Links
Advertisement
Table of Contents

Related Manuals for SDT SDT270 TankTest


Summary of Contents for SDT SDT270 TankTest
- Page 1 SDT International sa-nv • Bd de l’Humanité 415 • B-1190 Brussels (Belgium) • Tel: +32(0)2 332 32 25 • email: hearmore@sdtultrasound.com SDT North America • 1532 Ontario Street, Cobourg, ON • Phone: 1-800-667-5325 | 1-905-377-1313 • email: info@sdtultrasound.com www.sdtultrasound.com...
- Page 2 CHARGE IN A NON–HAZARDOUS AREA WARNING: NO USER SERVICEABLE PARTS INSIDE – REFER SERVICING TO QUALIFIED PERSONNEL WARNING: SUBSTITUTION OF COMPONENTS MAY IMPAIR INTRINSIC SAFETY You can download the latest version of this manual by visiting the SDT International website: sdtultrasound.com ...
- Page 3 MAN.TTB.EN--03--SDT270-Tanktest-User-Manual-Eng.Docx Table of Contents 3/17...
- Page 4 II 1 G Ex ia IIC T3/T2 Ga. SDT Sensors for SDT270 ATEX version The SDT270 is working with all SDT Sensors, but only the Flexible sensor ATEX and the TTS1 and TTS2 TankTest sensors can be used in hazardous areas.
-
Page 5: Charging The Battery
Battery charge of the SDT270 ATEX must exclusively be performed outside potentially explosive environments. Only use the charger provided by SDT. When the battery is charging, the green Led of the charger flashes evenly. The charging time will typically be 6 hours. When the green Led of the charger is continuously lit, the SDT270 battery is completely charged. -
Page 6: Turn On & Turn Off The Sdt270
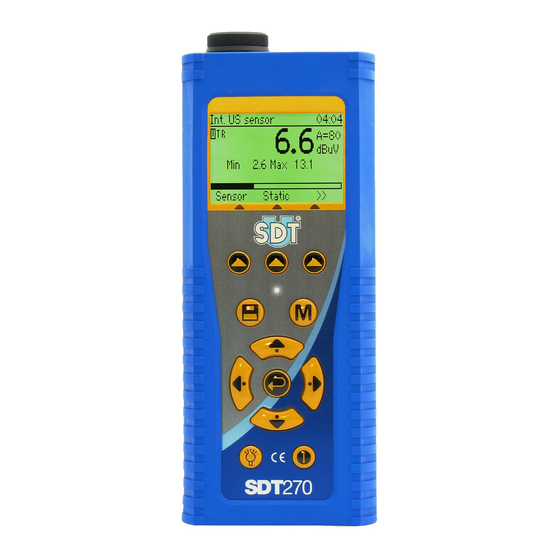
MAN.TTB.EN--03--SDT270-Tanktest-User-Manual-Eng.Docx Turn on & turn off the SDT270 Turn on To turn on the SDT270, press the Power button on the bottom right of the keypad. The status LED shines bright blue and then seconds later you will see on the screen the message “System boot up”. If you do not see this display your battery might be flat. -
Page 7: Keyboard Functions When Taking A Measurement
MAN.TTB.EN--03--SDT270-Tanktest-User-Manual-Eng.Docx To unplug a LEMO connector: Move up, towards the cable, the ring located on the bottom of the plug. Only pull the connector without any rotation. Please, never pull on the cable itself. Keyboard functions when taking a measurement ... - Page 8 MAN.TTB.EN--03--SDT270-Tanktest-User-Manual-Eng.Docx Measurement and acquisition modes Reference mode In this mode the SDT270 continuously displays the measured value from the selected sensor. The value is updated four times per second. This mode also allows you to record the background noise of the system at atmospheric pressure during a time-lapse defined by the operator.
- Page 9 MAN.TTB.EN--03--SDT270-Tanktest-User-Manual-Eng.Docx 6.1.5 Taking and storing the reference value Press the M button. The device acquires the measured values at a rate of one measurement per second. At the end of the acquisition time, the device displays a summary of the calculated values. Press the Store button to store the reference value (or F1 to get back to the main screen).
- Page 10 MAN.TTB.EN--03--SDT270-Tanktest-User-Manual-Eng.Docx acquisition duration, the number of recorded values and the maximum value reached during the acquisition time. Press the Store button to store the measurements (or F1 to get back to the main screen). Choose a memory location by pressing the up and down arrow keys, then press the Enter button. The selected location is highlighted.
- Page 11 MAN.TTB.EN--03--SDT270-Tanktest-User-Manual-Eng.Docx Viewing stored measurements and playing back audio files Press the Enter button and highlight the Tree icon: Press Enter. Select the desired node and expand it using the right arrow button: Choose Ref or Test and open it by pressing the right arrow button: Then you can select a measurement (Ref or Test) or an audio file (Wave) taking using the black sensor (TTB1 or TTB2) or the red sensor (TTR1 or TTR2).
- Page 12 MAN.TTB.EN--03--SDT270-Tanktest-User-Manual-Eng.Docx Settings To access the Main menu from the measurement screen, press Enter: Use the arrow buttons to highlight the Settings icon: Press Enter to access the Settings menu: Use the arrow buttons to select the desired menu and Enter to access it.
-
Page 13: Keyboard Functions When Navigating Inside The Menus
MAN.TTB.EN--03--SDT270-Tanktest-User-Manual-Eng.Docx Switch between icon and text To access the Main menu from the measurement screen, press Enter. Use the arrow buttons to highlight the Settings icon. Press Enter to access the Settings menu. Then highlight the LCD menu and press Enter. Select the last field using the left arrow key and switch between icon and text interfaces using the up or down arrow keys. -
Page 14: System Info
MAN.TTB.EN--03--SDT270-Tanktest-User-Manual-Eng.Docx 11 System info From the Measurement screen press Enter. Press the Down Arrow to highlight the System Info Menu icon. Press the Enter Button to access to it. The first screen provides: The SDT270 Version. Eventually if your device is temporary upgrade to a higher Evaluation Version. -
Page 15: Network Settings
6 months, or 2 years calibration interval: by evidence, local legally applicable regulations supersede SDT rules. For these reasons, SDT Calibration Certificates do no more mention a “calibration due date”, but simply the “last calibration date”. -
Page 16: Declaration Of Conformity
The Manager. 15 Waranty SDT International guarantees the SDT270 unit against manufacturing faults for a period of 2 (two) years, with the exception of the battery and accessories (charger, headphones, sensors, etc.) these are guaranteed for a period of 6 (six) months. The warranty covers all material supplied and implies the free replacement of all parts that contain a manufacturing fault. - Page 17 No one is permitted to reproduce or duplicate, in any form, the whole or part of this document without the written permission of SDT International n.v. s.a. The information herein is believed to be accurate to the best of our knowledge.
Need help?
Do you have a question about the SDT270 TankTest and is the answer not in the manual?
Questions and answers