Table of Contents
Advertisement
Quick Links
Advertisement
Table of Contents

Related Manuals for OHAUS VXHDDG


Summary of Contents for OHAUS VXHDDG
- Page 1 Instruction Manual Vortex Mixer, Heavy Duty, VXHDDG Vortex Mixer, Heavy Duty, VXHDAL Vortex Mixer, Microplate, VXMPDG Vortex Mixer, Microplate, VXMPAL Revision 10 2/14/2020 GlobalTestSupply www. .com Find Quality Products Online at: sales@GlobalTestSupply.com...
-
Page 2: Table Of Contents
If the troubleshooting section does not resolve or describe your problem, contact your authorized OHAUS service agent. For service assistance or technical support in the United States call toll-free between 8:00 AM and 5:00 PM EST. An OHAUS product service specialist will be available to provide assistance. Outside the USA, please visit our web site to locate the Ohaus office nearest you. -
Page 3: Installation
NVIRONMENTAL ONDITIONS NSTALLATION Upon receiving the Ohaus Vortex Mixer, check to ensure that no damage has Operating Conditions: Indoor use only. Temperature: 4 to 40°C (39 to 104°F) occurred during shipment. It is important that any damage that occurred in... -
Page 4: Safety Instructions
Operation of this equipment in a residential area is likely to cause harmful interference in which case the user will be required to correct the interference at his own expense. Changes or modifications not expressly approved by Ohaus Corporation could void the user’s authority to operate the equipment. -
Page 5: Specifications
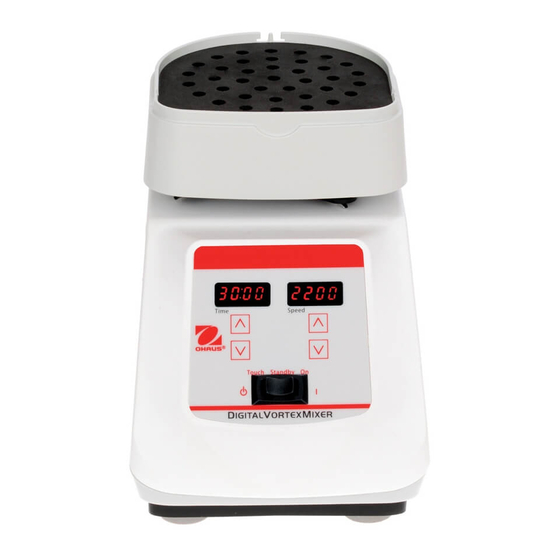
EAVY ORTEX IXER PECIFICATIONS NALOG ORTEX IXER ONTROL ANEL Overall dimensions (L x W x H): 9.5 x 6.6 x 6.3” (24.1 x 16.8 x 16.5cm) Electrical (50/60 Hz): 120 volts: 0.25 amps, 30 watts 230 volts: 0.13 amps, 30 watts Fuses: 5mm x 20mm, 5 amp 250 volt quick acting Speed range:... - Page 6 IGITAL ORTEX IXER ONTROL ANEL The front panel of the Digital Vortex Mixer contains all the switches, controls and displays needed to operate the unit. A. 3-way rocker switch: touch/standby/on rocker switch starts/stops the vortexing function. B. Time display: Displays accumulated time (continuous mode) or how much time is remaining (timed mode).
-
Page 7: Introduction
ORTEX IXER NTRODUCTION NALOG ORTEX IXER PERATING NSTRUCTIONS Your Vortex Mixer is ready for most one-handed applications. The Vortex Mixer 1. Make sure the 3-way rocker switch is in the center, off position. Plug the power operates by mixing samples just prior to testing. cord into a properly grounded outlet. - Page 8 IGITAL ORTEX IXER PERATING NSTRUCTIONS 1. Make sure the 3-way rocker switch is in the center, standby position. Plug 4. When finished with either continuous or intermittent/touch mode, return rocker the power cord into a properly grounded outlet. The unit is now on and in a switch to the center, standby position.
-
Page 9: Head/Accessory Installation Instructions
CCESSORY NSTALLATION NSTRUCTIONS NITS CCESSORY NSTALLATION NSTRUCTIONS EAVY ORTEX IXER Installing the cup head, microplate trays, universal holder or other head Installing the vessel holders: attachments: 1. Attach the Universal Holder to the vortex mixer. 1. Move the 3-way rocker switch to the center, off/standby position. 2. -
Page 10: Troubleshooting
2. Check to verify the load has not been exceeded Digital Models E3 Error 3. Check and clear any possible obstructions of the head mount 4. If the unit still does not work, please contact your Ohaus representative GlobalTestSupply www. .com Find Quality Products Online at: sales@GlobalTestSupply.com... - Page 11 2. Controllare che non sia stato superato il carico massimo Errore E3 3. Controllare ed eliminare qualsiasi ostacolo alla testa del dis- positivo. 4. Se l’unità continua a non funzionare contattare il rappresent- ante Ohaus GlobalTestSupply www. .com Find Quality Products Online at:...
Need help?
Do you have a question about the VXHDDG and is the answer not in the manual?
Questions and answers