Table of Contents
Advertisement
Quick Links
Advertisement
Table of Contents

Related Manuals for Data Harvest EASYSENSE Vu+


Summary of Contents for Data Harvest EASYSENSE Vu+
- Page 1 EASYSENSE Vu+ Reference Manual...
-
Page 2: Table Of Contents
Licensee's premises. Data Harvest's policy is to continually improve products and services, so we reserve the right to make changes without notice. It is acknowledged that there may be errors or omissions in this publication for which responsibility cannot be assumed. -
Page 3: What's Supplied
A battery charging symbol will be displayed on Vu+’s screen while the logger is charging. *Your computer must be turned on and not in sleep or standby mode; otherwise, the battery may drain instead of charge. Data Harvest Group Ltd. -
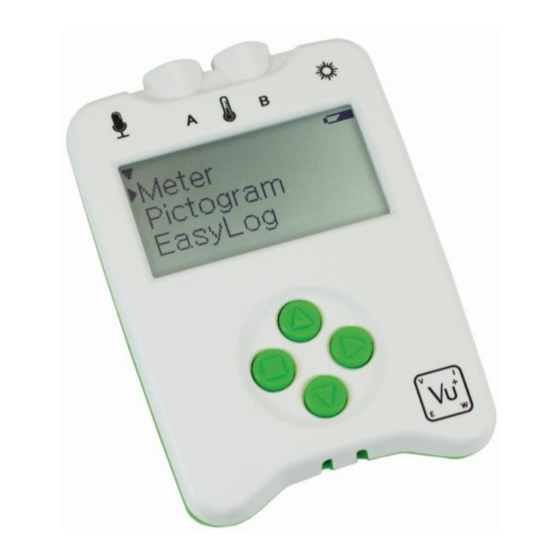
Page 4: The Easysense Vu+ Data Logger
The square STOP button is used to stop data being recorded or return to the previous screen The SCROLL buttons are used to scroll through menus on the LCD screen or to browse measurements during data logging. To operate EASYSENSE Vu+, press any of these buttons. Data Harvest Group Ltd. -
Page 5: Sensors
The Vu+ logger can only be used in an environment of 0 to 40C, 0 to 95%RH (non-condensing). The speed of reaction of the built-in temperature sensor to any change in external temperature will be delayed by Vu+’s plastic case. Data Harvest Group Ltd. -
Page 6: The Plug-In Sensors
Vu+ is used to display, collect and store data while disconnected from the computer. I.e. a. Display readings on its LCD screen (but not stored) using Meter or Stopwatch mode. b. Displayed, collected and stored using Vu+’s logging menu options e.g. Pictogram, EasyLog, Snapshot, Timing and Counting. Data Harvest Group Ltd. -
Page 7: Using Vu+ Standalone (Without A Computer)
Connect any plug-in sensors if required. If the display is turned off, press any button to wake up Vu+. ▲▼ While in the main menu use the up or down buttons to scroll until the cursor is pointing at Meter. Press the enter button ►to select. Data Harvest Group Ltd. -
Page 8: Pictogram
▲▼ set and press enter to select. Use the buttons to scroll through individual readings. Downloaded to a computer by selecting Retrieve Remote from the Home screen in the EasySense software (see page 23). Data Harvest Group Ltd. -
Page 9: Easylog
► ▲▼ set, press enter to select. Use the buttons to scroll through individual readings. Downloaded to a computer by selecting Retrieve Remote from the Home screen in the EasySense software (see page 23). Data Harvest Group Ltd. -
Page 10: Snapshot
Stop Recording? 48.8 EasyLog ► to stop ►Snapshot █ to go back Timing 24.0 ˚C ▲ Samples taken 8 Samples taken 2 Press stop when you’ve Press enter to take a sample taken enough samples Data Harvest Group Ltd. -
Page 11: Timing
Time For Speed at A select the width of the single interrupt card that will pass through the Light gate connected to input A. Speed at A = Length of single interrupt card Time Data Harvest Group Ltd. - Page 12 For Speed at A select the width of the single interrupt card (from 10 to 120 mm). For Speed from A to B select the distance from the sensor connected to A to the sensor connected at B (from 0.10 to 6.0 metres). Data Harvest Group Ltd.
- Page 13 Time A to A (stopwatch) The time will start to be measured when the signal at input A changes (ON) and will continue until the signal at A changes again (ON) i.e. like a stopwatch. Data Harvest Group Ltd.
-
Page 14: Stopwatch
Vu+. ▲▼ While in the main menu use the up or down buttons to scroll until the cursor is pointing at ► Counting. Press the enter button to select. Data Harvest Group Ltd. -
Page 15: Review
4. Press the stop button to return to the list of data sets then again to return to the main menu. Bluetooth Use to turn Bluetooth On. See page 19 for connecting via Bluetooth to a computer. Data Harvest Group Ltd. -
Page 16: System
Turning a built-in sensor ON or OFF the display Light With the cursor pointing at Turn Off or On press enter ►. Set range ►Turn Off Press the stop button to return to Meters. ▲ Data Harvest Group Ltd. -
Page 17: Delete Data
The cursor will indicate the current selection. If you wish to alter the choice use the ▲▼ buttons to ► scroll the cursor until it is pointing at the preferred style and press the enter button to select. Data Harvest Group Ltd. -
Page 18: Decimals
(The version number can be verified with Windows from About in the Help menu, or with Mac OSX from About EasySense in the EasySense menu). Step 2: Connect Vu+ to the computer’s USB port using the USB cable supplied, it will automatically be detected as a new device and the drivers will install Data Harvest Group Ltd. -
Page 19: Using Vu+ After The Initial Setup
Note: When first selected you may need to change Windows firewall settings to allow network access for this app. Select the connection status text top right of the EasySense window. Select the Vu+’s name (as displayed on its screen) from the list. Data Harvest Group Ltd. -
Page 20: When Connecting To A Ipad Or Android Device
* If auto install fails, download and unzip the drivers for the Bluetooth USB adaptor (Product 2070 or 2071) from the Data Harvest website. Open Device Manager, right click on the entry for the dongle (typically listed under Other devices) and select Update drivers. Select to ‘Browse my computer’ (install manually), locate and select the BLED112 directory. - Page 21 1. A logging wizard will open, deselect the tick next to any sensors from which readings are not required and click on Finish. 2. Select the Timebase (from panel on the right). The fastest interval between readings for Vu+ is 20 ms (roll mode). Data Harvest Group Ltd.
- Page 22 4. When the selection has been made, click on Finish. The settings will be downloaded to Vu+ and a message on the computer will inform ‘The logger is now set up for remote logging’. Click on OK. Data Harvest Group Ltd.
-
Page 23: Retrieve Remote
EASYSENSE Vu+ will not work with an unpowered hub (EASYSENSE Vu+ requires an output current of 500 mA). An extension cable must be of a single direct port extension type. While Vu+ is accepting power from the USB port it will not operate auto switch off. Data Harvest Group Ltd. -
Page 24: Batteries
When this happens, contact Data Harvest and request a battery replacement pack for EASYSENSE Vu+ – Product No. 5007. -
Page 25: Fitting The Lanyard
Scroll ▲▼the menu to System, press enter ► to select. Scroll down▼ to Full Reset. Press the ► enter button to select. ► Select enter to confirm this selection. ► Select enter to return to the System menu. Data Harvest Group Ltd. -
Page 26: Specifications
Do not store Vu+ with its battery fully discharged. Ideally Vu+ should be stored at least 40% or more state-of-charge. See page Updating EASYSENSE Vu+’s Firmware Occasionally Data Harvest may release updated firmware which will contain improvements or new features. Updates will be made available from the Data Harvest website. To update the firmware of your EASYSENSE Vu+ logger: Step 1. -
Page 27: Practical Information For Vu+'S Plug-In Temperature Sensor
Boiling Point of Water vs. Pressure Pressure in kPA Pressure in mBar Temperature in ºC 101.3 1013 100.0 99.5 99.5 97.8 99.0 96.0 98.5 94.4 98.0 92.7 97.5 Data Harvest Group Ltd. -
Page 28: Limited Warranty
3 mol dm 5 minutes Limited warranty For information about the terms of the product warranty, see the Data Harvest website at: https://data- harvest.co.uk/warranty. Note: Data Harvest products are designed for educational use and are not intended for use in industrial, medical or commercial applications.
Need help?
Do you have a question about the EASYSENSE Vu+ and is the answer not in the manual?
Questions and answers