Advertisement
Quick Links
1301I AND 1301P PROXIMITY READERS
Installation Sheet
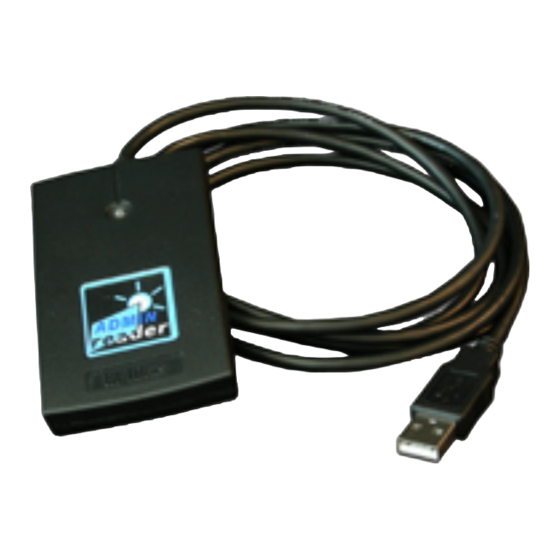
Figure 1: 1301 Series
Prox Reader
DESCRIPTION
Greatly reduce the time
needed to add multiple user
codes with the 1301 Series
Proximity Readers. Using
Remote Link, System Link or
Entré, simply scan the user
proximity device instead of
manually typing the user
code. The reader comes with
configurable flash memory
to handle all formats and
user-selectable features.
The reader draws power
from the computer USB
port, no additional power is
necessary.
1301P Proximity Reader:
Compatible with DMP
proximity credentials
1301I Proximity Reader:
Compatible with all I-Class
Series proximity credentials
Compatibility
• Remote Link
• System Link
• Entré
1
INSTALL THE READER
1.
Connect the reader to a
USB port on a computer.
Windows™ recognizes the
new hardware and initiates
the driver and hardware
installation processes.
2.
Follow the Windows
instructions to load the driver.
The Red LED on the reader
turns on when the unit is
installed and receives power.
If the driver does not automatically
install:
1.
Go to:
https://www.rfideas.com/support/product-support/pcprox-
AK0VirtualCOM
2.
Download and unzip the zip file.
3.
Follow the USB Virtual COM Quick Start User Guide included
in the zip file to install the reader.
2
CONFIGURE REMOTE/SYSTEM LINK
1.
Open System > Configure > Remote/System Link. Select the
Other Tab.
2.
Enter the following information to setup the software
program to work with the reader.
•
COM Port: Select the port to which the reader is
connected. The COM port number can be seen using the
Windows Device Manager.
•
Baud Rate: This is the speed at which Remote Link or
System Link communicates with the reader. The reader
operates at the default Baud Rate of 9600.
•
Max Code Length: Select 5 or 6 character length.
•
Reader Model: Select USB 6081 as the reader model.
•
Test: Click the Test button to test the COM Port and
Baud Rate.
3
CONFIGURE ENTRÉ
1.
Open Edit > Preferences and select the Card Reader Tab on
the left side of the window.
Select Add on the top of the window to add the card reader
2.
to Entré.
3.
Enter the following information to set up the software
program to work with the reader.
•
Enabled: Select to enable the card reader.
•
Name: Type in a name for the card reader.
•
Model: Select PCProx USB Proximity Reader from the
drop-down menu.
•
COM Port: Select the Port to which the reader is
connected. The COM port number can be seen using the
Windows XP Device Manager.
Wiegand card number start bit: Leave defaulted value 1.
•
•
Wiegand card number end bit: Leave defaulted value 64.
Figure 2: USB Connection
Advertisement

Related Manuals for DMP Electronics 1301I


Summary of Contents for DMP Electronics 1301I
- Page 1 1301I AND 1301P PROXIMITY READERS Installation Sheet INSTALL THE READER Connect the reader to a USB port on a computer. Windows™ recognizes the new hardware and initiates the driver and hardware installation processes. Follow the Windows instructions to load the driver.
- Page 2 From the drop down menu, select Generate from card number. The User Code displays in the User Code field. Select Save and Close near the top of the window. 1301 SERIES Ordering Information 1301I Proximity Reader for I-Class Series PROXIMITY READERS proximity credentials 1301P...
Need help?
Do you have a question about the 1301I and is the answer not in the manual?
Questions and answers