Table of Contents
Advertisement
Quick Links
Advertisement
Table of Contents

Summary of Contents for ION ion4i
- Page 1 This document helps you to understand the product features, configuration, login and logout process of Thin and Thick Access Point. This manual guides you through the installa tio n process and the entire software user set. Revision: A0-00 Jan 2020...
- Page 2 2x2 Indoor & Outdoor Access Points Revision: A0-00 Copyright Notice This document is copyright of HFCL Limited, All Rights Reserved. No part of this document, in whole or in part, may be used, reproduced, stored in a retrieval system or transmitted, in any form, or by any means, electronic or otherwise, including photocopying, reprinting, or recording, for any purpose, without the express written permission of HFCL Limited.
- Page 3 2x2 Indoor & Outdoor Access Points Revision: A0-00 Revision History Date Rev No. Description 08-01-2020 A0-00 Initial Draft Himankush CONFIDENTIA L...
-
Page 4: Table Of Contents
OINT HARDWARE SETUP ........................20 ......................20 YSTEM EQUIREMENTS – F ........21 ACKAGING ONTENT OR ION E VARIANTS OF THIS PRODUCT GETTING TO KNOW THE IO ACCESS POINT ................22 2:2 I .................. 22 NDOOR CCESS OINT 5.1.1 Back / Side View ......................22 2:2 O ................ - Page 5 2x2 Indoor & Outdoor Access Points Revision: A0-00 LOGOUT........................... 44 CONNECT TO THE THICK ACCESS POINT AND LOG IN ..............45 13.1 GUI ......................45 OGIN THROUGH STATUS OVERVIEW SCREEN...................... 46 14.1 ........................ 46 YSTEM SUMMARY 14.2 ....................... 47 YSTEM SOFTWARE 14.3 ......................
- Page 6 2x2 Indoor & Outdoor Access Points Revision: A0-00 SWITCH AP MODE ........................93 LOGOUT........................... 93 INSTALLATION SETUP ....................... 94 21.1 2:2 I ) ........94 OUNTING OF NDOOR CCESS OINT ALL AND EILING 21.2 2:2 O ) ........98 OUNTING OF UTDOOR CCESS OINT...
- Page 7 2x2 Indoor & Outdoor Access Points Revision: A0-00 List of Figures Figure 1: Dual Band 2x2:2 Indoor Access Point - Specifications & Highlights-1........16 Figure 2: Dual Band 2x2:2 Indoor Access Point - Specifications & Highlights-2........17 Figure 3: Dual Band 2x2:2 Outdoor Access Point - Specifications & Highlights-1 ........ 18 Figure 4: Dual Band 2x2:2 Outdoor Access Point - Specifications &...
- Page 8 2x2 Indoor & Outdoor Access Points Revision: A0-00 Figure 48: Basic overview of the screen to configure general SSID parameters ........73 Figure 49: Basic overview of the screen to configure wireless security parameters of SSID ....75 Figure 50: Basic overview of the screen to configure the MAC filter for SSID configuration ....76 Figure 51: Basic overview of the screen to configure the advanced parameters of SSID configuration..
- Page 9 2x2 Indoor & Outdoor Access Points Revision: A0-00 List of Tables Table 1: List of information displayed in side view of the indoor AP............ 22 Table 2: List of information displayed in front/side view of the outdoor AP.......... 24 Table 3: List of information displayed in back view of the outdoor AP..........25 Table 4: List of actions to login through GUI..................
- Page 10 2x2 Indoor & Outdoor Access Points Revision: A0-00 Table 49: List of actions to view the kernel log ................... 88 Table 50: List of actions to view real-time traffic graphs ..............89 Table 51: List of actions to check the connection status ............... 90 Table 52: List of actions to check the route of established connection ..........
-
Page 11: About This Document
2x2 Indoor & Outdoor Access Points Revision: A0-00 About this Document Purpose This document helps you to understand IO products and provides information to familiarize you with the product features. It also guides you through the installation process and the entire software user set. Intended Audience The intended audiences for this document are: Network Administrators... -
Page 12: Terms And Abbreviations
2x2 Indoor & Outdoor Access Points Revision: A0-00 Terms and Abbreviations The different terms and abbreviations used in this document are explained in the following table: Terms and Abbreviations Terms/Abbrevi ati on Expansion Access Point Bluetooth Low Energy Command-Line Interface Class Of Service Central Processing Unit DHCP... - Page 13 2x2 Indoor & Outdoor Access Points Revision: A0-00 LMAC Lower Media Access Control Media Access Control MBPS Megabits Per Second Modulation And Coding Scheme MIMO Multiple-Input And Multiple-Output MPEG Moving Picture Experts Group Maximum Transmission Unit Network Time Protocol On Screen Display P2MP Point-To-Multipoint Point-To-Point...
- Page 14 2x2 Indoor & Outdoor Access Points Revision: A0-00 User Id Unshielded Twisted Pair Virtual Access Point Video Graphic Adapter VLAN Virtual Local Area Network Wide Area Network Wireless Distribution System WIDS Wireless Intrusion Detection System Wireless Lan Controller Wi-Fi Protected Access CONFIDENTIA L...
-
Page 15: Product Overview
Thank you for choosing the IO Access Point (AP). IO Access Points are oriented to next generation high-speed wireless access. The Access Point Configuration is controlled through GUI and WLC. Following are the variants of IO product family: Dual Band 2x2:2 Indoor Access Point (ion4i). Dual Band 2x2:2 Outdoor Access Point (ion4/ion4e). Federal Communication Commission Certified These equipment are tested and found to comply with the limits for a Class B digital device, pursuant to Part 15 of the FCC Rules. -
Page 16: Dual Band 2 X 2:2 Indoor Access Point
2x2 Indoor & Outdoor Access Points Revision: A0-00 Dual Band 2x2:2 Indoor Access Point Technical specifications of this variant are given below: Figure 1: Dual Band 2x2:2 Indoor Access Point - Specifications & Highlights-1 CONFIDENTIA L... -
Page 17: Figure 2: Dual Band 2X2:2 Indoor Access Point - Specifications & Highlights-2
2x2 Indoor & Outdoor Access Points Revision: A0-00 Figure 2: Dual Band 2x2:2 Indoor Access Point - Specifications & Highlights-2 CONFIDENTIA L... -
Page 18: Dual Band 2 X 2:2 Outdoor Access Point ( Ion 4/ Ion 4 E )
2x2 Indoor & Outdoor Access Points Revision: A0-00 Dual Band 2x2:2 Outdoor Access Point (ion4/ion4e) The Dual Band 2x2:2 outdoor Access Point has two factory fitted variants: one with integrated antennas (ion4) and the other with connectors for external antennas (ion4e). Technical specifications are given below: Figure 3: Dual Band 2x2:2 Outdoor Access Point - Specifications &... -
Page 19: Figure 4: Dual Band 2X2:2 Outdoor Access Point - Specifications & Highlights-2
2x2 Indoor & Outdoor Access Points Revision: A0-00 Figure 4: Dual Band 2x2:2 Outdoor Access Point - Specifications & Highlights-2 CONFIDENTIA L... -
Page 20: Hardware Setup
2x2 Indoor & Outdoor Access Points Revision: A0-00 Hardware Setup System Requirements Before installing the access point, make sure that your system includes the following: 10/100/1000 Mbps local area network device such as a hub or switch. The Category 5 UTP straight-through Ethernet cable with RJ-45 connector included in the package, or one like it. -
Page 21: Packaging Content - For Ion4I/Ion4/Ion4E Variants Of This Product
2x2 Indoor & Outdoor Access Points Revision: A0-00 Packaging Content – For ion4i/ion4/ion4e variants of this product Your box contains the following items: User can choose any of the Access Point model mentioned below: Dual Band 2x2:2 Indoor Access Point (ion4i). -
Page 22: Getting To Know The Io Access Point
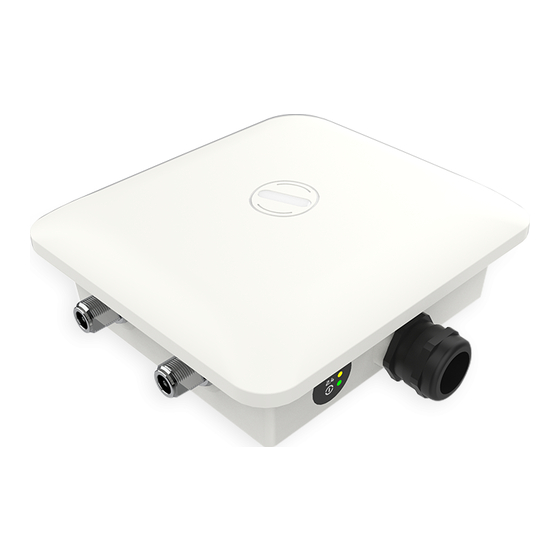
2x2 Indoor & Outdoor Access Points Revision: A0-00 Getting to Know the IO Access Point Dual Band 2x2:2 Indoor Access Point 5.1.1 Back / Side View A basic overview of the back/side view of the indoor AP is given below: Figure 5: Side view of the indoor AP Information displayed in the above figure is detailed in the table below: Table 1: List of information displayed in side view of the indoor AP... - Page 23 2x2 Indoor & Outdoor Access Points Revision: A0-00 Used for powering up the device via PoE adaptor. The same LAN + PoE Port port carries the data Vent Transfers the heat in the ambient CONFIDENTIA L...
-
Page 24: Front / Side View
2x2 Indoor & Outdoor Access Points Revision: A0-00 Dual Band 2x2:2 Outdoor Access Point 5.2.1 Front / Side View A basic overview of the front/side view of the outdoor AP is given below: Figure 6: Front/side view of the outdoor AP Information displayed in the above figure is detailed in the table below: Table 2: List of information displayed in front/side view of the outdoor AP Callout... -
Page 25: Back View
2x2 Indoor & Outdoor Access Points Revision: A0-00 Back View Back side overview of the outdoor AP is given below: Figure 7: Back view of the outdoor AP Information displayed in the above figure is detailed in the table below: Table 3: List of information displayed in back view of the outdoor AP Callout Name... - Page 26 2x2 Indoor & Outdoor Access Points Revision: A0-00 This helps in the attachment of mounting bracket and outdoor Screws for Mounting bracket AP in case of pole and wall mounting Grounding point The outdoor AP is grounded at this point Thermal Plate (Heat...
-
Page 27: Initial Setup
2x2 Indoor & Outdoor Access Points Revision: A0-00 Initial Setup Observe the following safety precautions and avoid damage to the access point: Do not power the device during installation. Do not subject the device to high temperatures. Keep away from high voltage cables. Disconnect the device before cleaning it. -
Page 28: Dual Band
2x2 Indoor & Outdoor Access Points Revision: A0-00 Dual Band 2x2:2 Indoor Access Point Power up the device using PoE Adaptor as shown below: Figure 8: Power up the device using PoE adaptor CONFIDENTIA L... -
Page 29: Connect To The Indoor Access Point
2x2 Indoor & Outdoor Access Points Revision: A0-00 6.1.1 Connect to the Indoor Access Point Follow the steps mentioned below and connect to the indoor AP through GUI: Configure a computer with a 1-domain static IP address e.g. 192.168.1.1 and a subnet mask of 255.255.25 5. 0. For help configuring a static IP address on your computer, check the instructions or online help that came with that computer.\ Connect the Ethernet cable to the computer. -
Page 30: Dual Band
2x2 Indoor & Outdoor Access Points Revision: A0-00 Dual Band 2x2:2 Outdoor Access Point Power up the device using PoE Adaptor as shown below: Figure 10: Power up the device using PoE adaptor CONFIDENTIA L... -
Page 31: Connect To The Outdoor Access Point
2x2 Indoor & Outdoor Access Points Revision: A0-00 6.2.1 Connect to the Outdoor Access Point Follow the steps mentioned below and connect to the outdoor AP through GUI: Configure a computer with a 1-domain static IP address e.g. 192.168.1.1 and a subnet mask of 255.255.25 5. 0. For help configuring a static IP address on your computer, check the instructions or online help that came with that computer.\ Connect the Ethernet cable to the computer. -
Page 32: Connect To The Thin Mode Access Point And Log In
2x2 Indoor & Outdoor Access Points Revision: A0-00 Connect to the Thin Mode Access Point and Log In You can connect to the access point’s web management interface to view or change its LAN and wireless access settings. Refer the procedure mention in “Connect to the Indoor Access Point” and “Connect to the Outdoor Access Point”... -
Page 33: Status Overview Screen
2x2 Indoor & Outdoor Access Points Revision: A0-00 Status overview screen The screen provides the status overview of: System summary System feature Software Hardware System summary A basic layout of the system summary is given below: Figure 13: Basic layout of the system summary screen Follow the steps given below to view the system summary: Table 5: List of information displayed in the system summary Callout... -
Page 34: System Software
2x2 Indoor & Outdoor Access Points Revision: A0-00 Callout Name Description Displays the time duration since the respective AP board is System uptime up and successfully running without any shutdown Average Load Displays the average load on the device System software A basic layout of the system software is given below: Figure 14: Basic layout of the system software screen Follow the steps given below to view the system software information:... -
Page 35: System Hardware
2x2 Indoor & Outdoor Access Points Revision: A0-00 System hardware A basic layout of the system hardware is given below: Figure 15: Basic layout of the system hardware screen Follow the steps given below to view the system hardware information: Table 7: List of information displayed in the system hardware screen Callout Name... -
Page 36: Administration
2x2 Indoor & Outdoor Access Points Revision: A0-00 Administration The user can perform following admin activities for thin AP: Set AP Password This screen provides the user with options to change the default password. The default username is “root” and the default admin password is “root”. -
Page 37: Reboot Thin Ap
2x2 Indoor & Outdoor Access Points Revision: A0-00 Reboot Thin AP Reboot restarts the device from current partition (Primary or Secondary partition) with existing configuration. A basic overview of the Reboot screen is given below: Figure 17: Basic overview of the reboot screen Follow the steps given below and reboot the AP: Table 9: List of actions to reboot the AP Callout... -
Page 38: Thin Ap Configuration
2x2 Indoor & Outdoor Access Points Revision: A0-00 Thin AP Configuration The user can configure the network interface of the thin AP and the same is discussed in further section. 10.1 Interfaces A basic overview of the interface screen is given below: Figure 18: Basic overview of the interface configuration screen Follow the steps given below to view/edit the interface configuration: Table 10: List of actions to view/edit the network configuration... -
Page 39: General Network Interface Setup Configuration
2x2 Indoor & Outdoor Access Points Revision: A0-00 10.1.1 General Network interface setup configuration The default IP address of the access point is set to 192.168.1.1. The user can change the current static IP address of the device from this screen. DHCP client (DHCP client or DHCPv6 client) option is to get the dynamic IP address from reachable DHCP server in the network. -
Page 40: Figure 20: Basic Overview Of Static Address Parameters For General Network Interface Setup
2x2 Indoor & Outdoor Access Points Revision: A0-00 10.1.1.1 Static IP configuration The default IP address of the access point is set to 192.168.1.1. User can change the default IP address with an unused IP address. Refer Figure 19: Basic overview of the network interface setup configuration screen to switch protocol and set the protocol to static address. -
Page 41: Table 12: List Of Actions To Provide Static Address Parameters
2x2 Indoor & Outdoor Access Points Revision: A0-00 Follow the steps given below to provide static address parameters: Table 12: List of actions to provide static address parameters Callout Name Description The protocol is set to “Static address”. Enter the following Protocol parameters Enter the “IPv4 address”. -
Page 42: Figure 21: Basic Overview Of Dhcp Client Parameters For General Network Interface Setup
2x2 Indoor & Outdoor Access Points Revision: A0-00 10.1.1.2 DHCP client configuration If the protocol is set to DHCP client, the device will automatically get the IPv4 address from the DHCP server. Refer Figure 19: Basic overview of the network interface setup configuration screen to switch protocol and set the protocol to DHCP client. -
Page 43: Figure 22: Basic Overview Of Dhcpv6 Client Parameters For General Network Interface Setup
2x2 Indoor & Outdoor Access Points Revision: A0-00 10.1.1.3 DHCPv6 client configuration If the protocol is set to DHCPv6 client, the device will automatically get the IPv6 address from the DHCP server. Refer Figure 19: Basic overview of the network interface setup configuration screen to switch protocol and set the protocol to DHCPv6 client. -
Page 44: Switch Ap Mode
2x2 Indoor & Outdoor Access Points Revision: A0-00 Switch AP Mode A basic overview of the screen to switch mode from thin AP to thick AP is given below: Figure 23: Basic overview of the screen to switch mode from thin AP to thick AP Follow the steps given below to switch mode from thin AP to thick AP: Table 15: List of actions to switch mode from thin AP to thick AP Callout... -
Page 45: Figure 24: Basic Overview Of Login Screen
2x2 Indoor & Outdoor Access Points Revision: A0-00 Connect to the Thick Access Point and Log In You can connect to the access point’s web management interface to view or change its LAN and wireless access settings. Refer the procedure mention in “Connect to the Indoor Access Point” and “Connect to the Outdoor Access Point”... -
Page 46: Figure 25: Basic Layout Of The System Summary Screen
2x2 Indoor & Outdoor Access Points Revision: A0-00 Status overview screen The screen provides the status overview of: System summary Software Hardware Wireless Summary 14.1 System summary A basic layout of the system summary is given below: Figure 25: Basic layout of the system summary screen Follow the steps given below to view the system summary: Table 17: List of information displayed in the system summary Callout...
Need help?
Do you have a question about the ion4i and is the answer not in the manual?
Questions and answers