Advertisement
Quick Links
Advertisement

Subscribe to Our Youtube Channel
Related Manuals for FLOS SUPERLOON


Summary of Contents for FLOS SUPERLOON
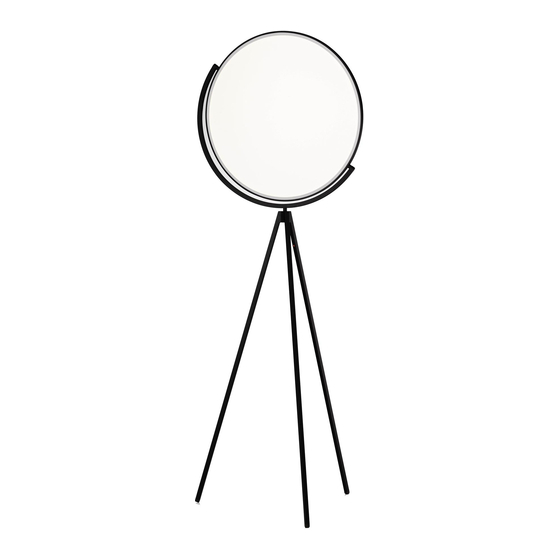
- Page 1 SUPERLOON DESIGN BY JASPER MORRISON...
- Page 2 - Se il cavo flessibile si danneggia, deve essere sostituito da be replaced by FLOS or by qualified personnel in order to unsachgemaess behandelte Produkte ab. - Si le cordon flexible externe est endommagé, il doit FLOS o da personale qualificato al fine di evitare pericoli.
-
Page 3: Технические Данные
- Si el cable externo se estropea, debe ser sustituido - Se o cabo flexível está danificado, deve ser substituído персоналом в целях предотвращения опасности. 器具は光生物学上の光害リスクはありま por FLOS o por personal cualificado con el fin de evitar pela FLOS ou por pessoal qualificado para evitar qualquer Устройство не... - Page 4 不得以任何方式更改或擅自拆卸灯具,任 何更改都可能危害到安全,并引发危险。如因 ميكن أن ينتج عن أي تعديل تعريض السالمة للخطر وقد يصبح 修改导致产品出现问题,FLOS拒绝承担任何责 أيFLOS الجهاز خط ري ا ً . ترفض فلوس 任。 .مسؤولية تجاه املنتجات التي يتم تعديلها - 如果外部拖线电缆损坏,必须要由FLOS人员 - يف حالة إصابة الكابل الخارجي برضر، يجب أن تستبدله فلوس...
- Page 5 <IT> Fig.1 Inserire le due gambe (A) nei perni (B) del corpo base (C) avendo cura di rispettare il corretto orientamento dei piedini (D) come indicato nel dettaglio in Fig. 1A. <EN> Pic.1 Insert the two legs (A) in the pins (B) of the base element (C) paying attention to the correct orientation of the feet (D) as indicated in the detail in pic.
- Page 6 <IT> Fig.2 Montare la testa diffusore (E) inserendo il perno (F) nel foro del corpo base (C). <EN> Pic.2 Mount the diffuser head (E) inserting the pin (F) in the hole of the base element (C). <DE> Abb.2 Den Kopf des Diffusors (E) montieren, indem der Stift (F) in das Loch der Basis des Körpers (C) eingefügt wird.
- Page 7 <PT> Fig.3 Colocar o pino (G) no alimentador (H) utilizando as guias apropriadas até sentir o engate de acoplamento (utilizar o tipo de pino correcto para a região na qual se instala o aparelho); conectar o pino (I) no alimentador bloqueando com uma rotação de 90°...
- Page 8 <IT> Fig.4 Per l’accensione/spegnimento dell’apparecchio sfiorare il sensore (L); un contatto prolungato del sensore provoca l’incremento progressivo dell’intensità luminosa dal 10% fino al 100% e contemporaneamente un aumento della temperatura colore da 2200K a 2800K. Al raggiungimento dell’intensità desiderata, interrompere il contatto con il pulsante.
- Page 9 de la temperatura del color de 2200K a 2800K; una vez alcanzada la intensidad deseada, interrumpa el contacto con el botón. Un posterior contacto prolongado del sensor, provocará su reducción progresiva. NOTA: Gracias a la memoria de la tarjeta, cuando el dispositivo se enciende a través del interruptor de pared, se vuelve a encender en el mismo nivel de luminosidad configurado en el momento del apagado.
- Page 10 的记忆功能,使用壁式开关开启时,装置将自动跳转到关闭前所设置的灯光亮度。LED 灯带启动并工作15秒钟后,灯光亮度的设置(温度及颜色)可进行自动调节(无需其 他操作)。 )؛ الضغط لفرتة طويلة عىل املستشعر يتسبب يف زيادةL( للتبديل إيقاف / تشغيل املس املستشعر .4 شكل <SA> 2200K تدريجية لشدة الضوء من ٪01 لتصل إىل ٪001، ويف الوقت نفسه زيادة يف درجة ح ر ارة اللون من 0082.
- Page 11 <IT> Fig.5 La direzione del fascio luminoso può essere regolata ruotando la testa (E) nella posizione desiderata. <EN> Pic.5 The light beam’s direction can be adjusted by rotating the head (E) into the desired position. <DE> Abb.5 Die Richtung des Lichtbündels kann durch Drehen des Kopfs (E) in die gewünschte Position eingestellt 360°...
- Page 13 www.flos.com...
Need help?
Do you have a question about the SUPERLOON and is the answer not in the manual?
Questions and answers