Table of Contents
Advertisement
Quick Links
ADMINISTRATOR GUIDE
7.1.0 | July 2020 | 3725-49216-002A
VVX D230 DECT IP Phone
GETTING HELP
For more information about installing, configuring, and
administering Poly/Polycom products or services, go to
Polycom Support.
Plantronics, Inc. (Poly – formerly Plantronics and Polycom)
345 Encinal Street
Santa Cruz, California
95060
© 2020 Plantronics, Inc. All rights reserved. Poly, the
propeller design, and the Poly logo are trademarks of
Plantronics, Inc. All other trademarks are the property of
their respective owners.
Advertisement
Table of Contents

Related Manuals for Poly VVX D23


Summary of Contents for Poly VVX D23
- Page 1 Plantronics, Inc. (Poly – formerly Plantronics and Polycom) 345 Encinal Street Santa Cruz, California 95060 © 2020 Plantronics, Inc. All rights reserved. Poly, the propeller design, and the Poly logo are trademarks of Plantronics, Inc. All other trademarks are the property of their respective owners.
-
Page 2: Table Of Contents
Related Poly and Partner Resources ........ - Page 3 System Settings ........... 27 Codec Profile Features .
- Page 4 Conference Calls ........... 41 Local Mixing or Bridging .
- Page 5 Extract PCAP Capture Result ..........55 System Logs .
-
Page 6: Before You Begin
Create an account to access Poly support personnel and participate in developer and support forums. You can find the latest information on hardware, software, and partner solutions topics, share ideas, and solve problems with your colleagues. -
Page 7: Canonical Fashion
Before You Begin Both notational conventions point to the same parameters, but their appearances are different. The canonical fashion simplifies locating parameters on your device’s system web interface, the PDMS-SP service, or in the Polycom Obihai Data Model, which is a collective list of configuration parameters, syntaxes, and valid values for VVX D230. -
Page 8: Multiple Choice Values
Before You Begin but the only valid Boolean parameter values to use in a phone configuration file is either true/false or True/False (case-sensitive). This is equivalent to selecting or clearing the check box on the configuration web pages. Multiple Choice Values You must provision parameters that take one of several valid options from a drop-down menu on the configuration message with string values that match exactly one of those choices. -
Page 9: Getting Started
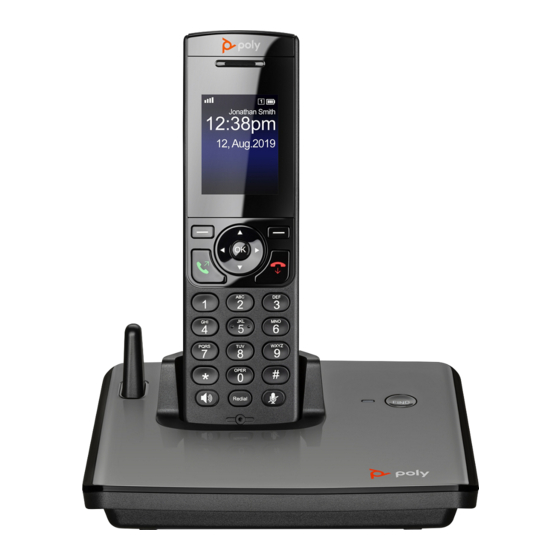
Getting Started The VVX D230 DECT IP phones are standalone IP-based wireless phone systems that enable you to manage your calls when you’re away from your desk. The system consists of a base station with support for up to 10 handsets. This section includes overview information on using the VVX D230 system. VVX D230 DECT IP Phone Overview VVX D230 phones support Polycom HD Voice technology. -
Page 10: Power The Base Station On And Off
Getting Started VVX D230 LED Status Indicators Component Indicator Status Base Station Solid red Powering on Idle Blinking red Waiting for network availability—on for 1 second and off for 1 second Locating a handset—on for 1 second and off for 1 second Registering a handset—on for 2 seconds and off for 1 second Handset Blinking red... -
Page 11: Pair Handsets To Base Stations
Getting Started To connect to Ethernet and a PC: 1 Plug an Ethernet cable into the Ethernet port on the base station. If the base station powers on, you have PoE, and the base station automatically obtains an IP address via DHCP. If the base station doesn’t power on, connect its 5V power adapter. - Page 12 Getting Started To configure the primary line: 1 Contact your service provider to get the values for these parameters: SP Configuration Parameters Service Provider Parameter D230 Parameter Name Notes Proxy server Proxy server for your service provider ProxyServer Registrar server Registrar server for your service provider RegistrarServer SIP account number...
-
Page 13: Configuration And Management
Configuration and Management Your VVX D230 system provides the following options to configure and manage your system: ● System web interface ● Interactive voice response (IVR) system ● Remote provisioning Configure Your D230 With the System Web Interface You can access the D230’s system web interface from a PC using a web browser. Although all popular browsers are tested for compatibility with the system web interface, some inconsistencies may arise from time to time. -
Page 14: Configuring Vvx D230 With The Setup Wizard
Configuration and Management To make changes with the system web interface: 1 Access the system web interface. 2 Go to the page containing the parameter you want to change. 3 Enter your changes in the system web interface. Always click the Submit button to save your changes before going to another page. A message displays when a system reboot is required. -
Page 15: Configure The Base Station With The Setup Wizard
Configuration and Management Setup Wizard Parameters (continued) Parameter Description SPn X_ServProvProfile (ITSP Selects a Service Provider profile for this service. Choices are A, B, C, D, E, F, G, Profile) or H. SPn AuthUserName User name used to authenticate the connection to the server. SPn AuthPassword Password used to authenticate the connection to the server. - Page 16 Configuration and Management To configure basic settings with IVR: 1 Dial *** from the handset. 2 Enter the number for the configuration menu you want to access. Integrated Voice Response Operations Menu Selection Setting Description Basic Network Status System IP address and DHCP status. Advanced Network Status Information on the primary and back-up DNS server and primary and back-up NTP server.
-
Page 17: Configure System Settings With Ivr
Configuration and Management Integrated Voice Response Operations (continued) Menu Selection Setting Description Reboot Reboots the system. • Press 1 to confirm system reboot. • Press # to return to the main configuration menu. • Press # # or hang up to exit the IVR system. -
Page 18: Configure Network Settings With Ivr
Configuration and Management System Settings Submenus (continued) Menu Selection Setting Description Syslog Server IP Address Current syslog server IP address. • Press 0 to repeat the information. • Press 1 to enter a new value. • Press 2 to set the default value. •... -
Page 19: Configure Sip Service Provider Settings With Ivr
Configuration and Management WAN Settings Options (continued) Menu Selection Setting Description Default Gateway Current default internet gateway. • Press 0 to repeat the information. • Press 1 to enter a new value. • Press 2 to set the default value. •... - Page 20 Configuration and Management To configure SIP service provider settings with IVR: 1 Dial ***0 from the handset. 2 Enter the number for the configuration menu you want to access, followed by the # key. SP1 Configuration Settings Menu Selection Setting Description Enable Service Provider One (SP1) Current SP1 value.
- Page 21 Configuration and Management SP1 Configuration Settings (continued) Menu Selection Setting Description SP1 Call Forward on Busy – Enable / • Press 0 to repeat the information. Disable • Press 1 to enter a new value. • Press 2 to set the default value. •...
- Page 22 Configuration and Management SP2 Configuration Settings (continued) Menu Selection Setting Description SP2 Block Caller ID Enable • Press 0 to repeat the information. • Press 1 to enter a new value. • Press 2 to set the default value. • Press # to enter another configuration menu selection.
-
Page 23: Configure Obitalk Settings With Ivr
Configuration and Management Configure OBiTALK Settings With IVR You can configure OBiTALK options through the OBiTALK settings submenu. To configure OBiTALK settings with IVR: 1 Dial ***0 from the handset. 2 Enter the number for the configuration menu you want to access, followed by the # key. OBiTALK Service Options Menu Selection Setting... - Page 24 Configuration and Management OBiTALK Service Options (continued) Menu Selection Setting Description OBiTALK Call Forward on Busy – Enable / • Press 0 to repeat the information. Disable • Press 1 to enter a new value. • Press 2 to set the default value. •...
-
Page 25: Star Codes
30 star code script parameters known as Code1 to Code30. The default star codes in both Star Code Profiles match the standard telephone provider star codes. Find more information on star codes in the VVX D230 DECT IP Phone Technical Reference on the Poly Online Support Center. See a list of star code parameters in the VVX D230 Data Model. -
Page 26: Preprogrammed Star Codes
Star Codes 2 In the Default column, clear the check box for a Parameter Name with an empty value column. 3 In the Value column, enter a star code script in the following format: code, name, action1 For example, for Code30, the star code script is *01, Page Group 1 Talk, pg1tx. Using the star code *01 will send a page to Group 1. - Page 27 Star Codes Preprogrammed Star Codes (continued) Code Description Check Speed Dial Clear Speed Dial Block Anonymous Calls Do Not Disturb – Turn On Do Not Disturb – Disable Block Caller ID (Persistent Mode) Unblock Caller ID (Persistent Mode) Block Last Caller Unblock Anonymous Calls Barge In Blind Transfer...
-
Page 28: System Settings
System Settings You can control system codec features, handset tones, and ring tones on your D230 base station. You also can control how handsets dial calls using speed dial numbers and user-defined digit maps. Codec Profile Features Codecs define the digital process your system uses to encode and decode communications with other systems. -
Page 29: Select A Codec For A Page Group
System Settings To select a preferred codec on OBiTALK: 1 In the system web interface, go to Voice Services > OBiTALK Service. 2 In the Default column, uncheck the box for the CodecProfile parameter. 3 In the Value column for the CodecProfile parameter, choose the codec profile (A or B) you want to use for the service. -
Page 30: Tone Examples
System Settings To set a custom tone pattern: 1 In the system web interface, go to Tone Settings > Tone Profile A or Tone Profile B. 2 Choose a tone pattern. In its Default column, uncheck the box for its TonePattern parameter. 3 In the Value column for this TonePattern parameter, enter your new tone pattern. -
Page 31: Stutter Tone Example
System Settings The expiration time is 20 seconds. It has only one cadence segment, which includes four on-off sections. The segment has infinite repeating time: ● The first on-off section: generated by the first frequency component, and it has 0.38 tone second active time and 0 inactive time. -
Page 32: Preloaded Ringtones
System Settings RingName and RingType 4 In the Value column, enter your new ring pattern. 5 Click Submit. 6 Click Reboot to complete your changes. Preloaded Ringtones The handset can only play the following preloaded ringtones: ● Handset Default ●... -
Page 33: Enable Handset Group Page Auto Answer
System Settings Enable Handset Group Page Auto Answer You can configure handsets to automatically answer incoming group pages and intercom calls. You can configure the handset to auto answer up to 10 different page groups. Procedure 1 In the system web interface, go to DECT Wireless > Handsetn > Calling Features (where n is the handset you want to configure). - Page 34 System Settings Last - shows the last person who forwarded the call. First - shows the first person who forwarded the call. Off - doesn’t show the call forwarder. 4 Select Submit. 5 Reboot your phone.
-
Page 35: Network Settings
Network Settings You can control how your D230 base station accesses the web and the network. Control features include: ● Default DHCP Settings ● DNS NAPTR Support ● Enable Cisco Discovery Protocol (CDP) Default DHCP Settings When you initialize a network connection to a configuration server, your D230 extracts DHCP Option 160 from a DHCP offer by default. -
Page 36: Enable Naptr Lookup
Network Settings When more than one UDP, TCP, or TLS option is available and all are at the same order and preference, your system considers UDP the highest priority, then TCP, then TLS. With NAPTR enabled, your system can fail over and fall back among UDP/TCP/TLS transports or change to a different transport based on the result of each NAPTR lookup, which renews at half of the TTL value from the DNS server. -
Page 37: Call Features
Call Features You can configure call features in one of three ways: ● A system-level feature applies to all calls on the system, regardless which line a call is on. For example, call waiting is a system feature. ● A line-level feature applies only to calls on a specific line. For example, server-based Do Not Disturb (DND) and centralized conference are line-based features. -
Page 38: Set The Call Park Pickup Prefix
Call Features Set the Call Park Pickup Prefix After users park a call, they can use a retrieval code that includes a pickup prefix and the parking slot number to retrieve the call from the parking lot. For example, 7xx. The default pickup prefix is 7, but you can configure the prefix in the system web interface. -
Page 39: Enable Local Call Back
Call Features Enable Local Call Back This feature enables your system to call you back after a given time when you park a call, preventing you from leaving a call on hold indefinitely. You can configure the following Call Back options: ●... -
Page 40: Enable Music On Hold
Call Features c In the Value column for CallParkExtensions, enter the park extensions you want to monitor, separated by a comma. For example, 100, 101. 3 Select Submit. 4 Reboot your phone. Enable Music on Hold When enabled, this feature plays music to all callers currently on hold. The music is stored internally and isn’t user-configurable. -
Page 41: Configure Srtp Crypto Suite
Call Features 8 Select the SPn Service you just configured. Using the default value of Any tells your base station to use the first directory it finds, which may cause unpredictable results if you configure more than one directory. 9 Click Submit. Reboot your system when you complete your changes. Configure SRTP Crypto Suite You can configure SRTP encryption to enhance the security of your calls. -
Page 42: Conference Calls
Conference Calls A conference call is a conversation involving two or more remote parties. To start a conference, there must be at least two calls and with at least one of them in the Connected state and the other in the Holding state. Your system supports two methods to conference multiple parties: ●... -
Page 43: Add A Participant To The Conference Bridge
Conference Calls Add a Participant to the Conference Bridge You can add participants to the conference bridge with the conference parameter. To add a participant to the conference bridge: 1 From your handset, make a new call to the target number (or answer a new incoming call from another party, if applicable). -
Page 44: Third-Party Servers
Third-Party Servers This section provides information on configuring D230 systems and features with third-party servers. BroadSoft You can configure D230 systems with BroadSoft server options. BroadSoft AS-Feature-Event The AS-Feature is a collection of network-provided features available on a BroadSoft application server. You can view and change the settings from the system web interface. -
Page 45: Configure Call Forward All
Configure Call Forward All The functionality provided by Call Forward All is similar to that of the CallForwardUnconditional function provided natively by the handset (per line). Poly recommends that you disable the native version when using the network-provided version to avoid ambiguity. -
Page 46: Configure Do Not Disturb
Third-Party Servers To configure the Call Forward No Answer settings: » In the system web interface, enable the SPn Service > Network Provided Services::CallForwardNoAnswer option. This feature is similar to the CallForwardOnNoAnswer that is available natively on the D230 system. Configure Do Not Disturb You can enable DOD on your third-party provider. -
Page 47: Network Directories
Third-Party Servers Network Directories Network directories are directories hosted by a server somewhere in the network. With the BroadSoft BroadWorks platform, the D230 system supports the Enterprise Directory of a network. For more information on setting up and managing the directories on a BroadWorks server, refer to the BroadSoft documentation. - Page 48 Third-Party Servers 2 If checked, uncheck the boxes in the Default column for URL and DirectoryType. 3 Do one of the following: Enter the URL for the directory. In the DirectoryType parameter, choose the value for your directory. 4 Click Submit.
-
Page 49: Call Routing
Call routing rule configuration relies heavily on digit maps. If you aren’t familiar with how digit maps work, see the VVX D230 DECT IP Phone Technical Reference Guide on the Poly Online Support Center. Inbound Call Route Configuration Every trunk has a corresponding InboundCallRoute parameter in your system configuration. -
Page 50: Edit The Outbound Call Route Configuration
2 In the Default column, clear the check box for the parameters you want to edit. 3 In the Value columns for these parameters, enter your changes. Poly recommends keeping the default parameters. For more information on editing outbound call route configuration, see the VVX D230 DECT IP Phone Technical Reference Guide on the... - Page 51 Call Routing 2 Select the check boxes for the service provider (SP) lines and you want to assign to handsets to place outgoing calls. 3 Select a Primary Line for each handset. 4 (Optional) Assign a Handset Name to each handset.
-
Page 52: Troubleshooting
Troubleshooting Refer to the following topics to help you diagnose and fix issues with your system. Back Up and Restore Your Base Station Configuration You can back up your base station configuration, then restore it to any base station. When you back up the current configuration of your base station, the backup file is stored in XML format at a user-specified location. -
Page 53: Restore Your Base Station Configuration
Troubleshooting To back up your base station configuration: 1 In the system web interface, go to System Management > Device Update. 2 In Backup Configuration, choose your backup options. 3 Click Backup to back up your base station configuration. 4 Click Save. All passwords and PINs are excluded from the backup file. -
Page 54: Possible Error Messages On Firmware Update Failure
Troubleshooting To update the D230 base station firmware: 1 Select the System Management > Device Update menu on the side panel of the web page. 2 Click the Browse button in the Firmware Update section of the page. In a file browser window, select the firmware file. -
Page 55: Call History
Troubleshooting Reboot Reason Codes (continued) Reason Code Description Reboot from SIP Notify (Reserved). Reboot from telephone port (IVR). Reboot from webpage — no change in parameter values or firmware. Reboot during OBiTALK signup. Reboot after DHCP server offers IP, GW-IP, and/or netmask different from what your system is currently using. -
Page 56: Remove Calls From Parking Lot Status List
Troubleshooting Remove Calls From Parking Lot Status List You can end parked calls using the Parking Lot Status list in the web interface. To remove calls from the Parking Lot Status list: 1 In the web interface, go to Status > Call History. 2 In the Remove column, check the box for the call you want to remove. -
Page 57: System Logs
Troubleshooting System Logs You can capture system logs to help troubleshoot your D230 system. To capture syslog messages, you need to run a syslog server application at an IPv4 address that is reachable from your D230 system. Activate Syslog Messaging You can enable your D230 system to send syslog messages for troubleshooting. -
Page 58: Factory Resetting Your System
Troubleshooting SPn Service Status Error Messages The following table lists some of the SPn Service Status error messages encountered when a firmware upgrade fails. SPn Service Status Error Messages Error Message Description 400 Bad Request The server couldn’t understand the request. 401 Unauthorized The request needs to perform authentication. -
Page 59: Factory Reset Your D230 Handset
Troubleshooting Factory Reset Your D230 Handset You can reset your D230 handset to factory default values from the handset’s local interface. To factory reset your handset: 1 On the handset, go to Settings. 2 Select Factory Reset. 3 Press OK. After your handset restarts, reregister it with your base station.
Need help?
Do you have a question about the VVX D23 and is the answer not in the manual?
Questions and answers