Table of Contents
Advertisement
Quick Links
2GIG-DW10-345
THIN DOOR/WINDOW CONTACT
INSTALLATION INSTRUCTIONS
The Thin Door/Window Contact (2GIG‐DW10‐345) is designed for use
on doors, windows, and other objects that open and close. It
communicates with the control panel using the 345 MHz frequency.
When the magnet (which is mounted near the sensor) moves away
from or closer to the door contact's sensor, signals are transmitted to
the control panel. The door contact also has an external input that
accepts connections from Normally‐Closed (NC) dry contact devices.
For added protection, it is also equipped with a cover tamper.
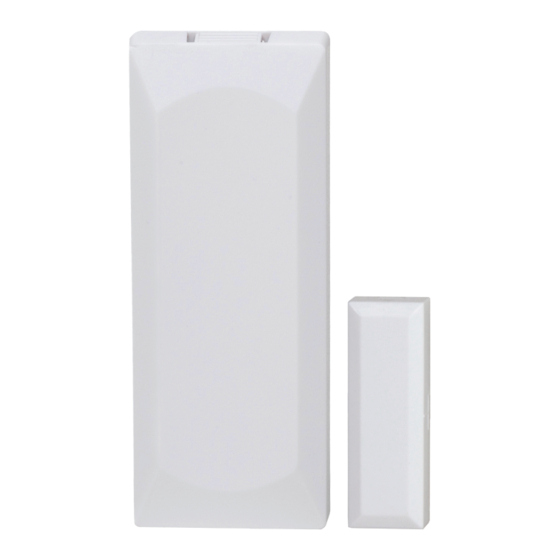
Figure 1
Thin Door/Window Contact—Sensor and Magnet
A
Thin Door/Window Contact Sensor
B
Thin Door/Window Contact Magnet
C
Alignment Marks on Sensor
D Alignment Arrow on Magnet
Box Contents
Verify that the package includes the following:
• 1—Thin Door/Window Contact
• 1—Rare Earth Magnet
• 2—Phillips Head Screws
• 2—Lithium Coin Batteries
• 2—Adhesive Foam Tape
• 1—12 in (30 cm) Wire Lead
Testing the Thin Door/Window Contact
Before mounting the door contact at the desired location, perform a
walk test to verify that it can establish good Radio Frequency (RF)
communications with the control panel.
NOTE:
To fully test the Thin Door/Window Contact, see the
control panel's Installation and Programming Guide.
Mounting Guidelines
Use these guidelines when installing the door contact for internal
switch usage:
• Mount Sensors within 100 ft (30 m) of the Control Panel.
Although the transmitter may have a range of 350 ft (106.7 m)
open air, the sensor location can have a significant effect on
range. In open/unobstructed situations, the transmitter range
may be greater. In adverse wireless conditions, changing the
sensor orientation may lead to improved range.
• Mount Sensors at Least 4.7 in (12 cm) Above the Floor.
Placing sensors slightly above floor level helps to minimize
possible sensor damage.
• Single vs. Double Door Installation. For single‐door
installation, mount the sensor on the door frame and the
magnet on the door. For double‐door installation, mount the
sensor on the least‐used door and the magnet on the most‐
used door.
• Do Not Expose Sensors to Moisture or Extreme Temperature.
It is best to mount sensors in a dry location where the
operating temperature do not exceed 32° to 120° F (0° to 49°
C).
• Keep Sensors and Magnets Away from Metal/Metallic
Surfaces. To keep sensors and magnets away from metal or
metallic surfaces (for example, foil wallpaper), it is
recommended that you use spacers (not included). You should
also avoid mounting sensors in areas where there is a large
quantity of metal or electrical wiring (for example, near a
furnace or in a utility room).
• Align Magnet with Sensor. Make sure the alignment arrow on
the magnet points to the center alignment mark on the sensor
(see Figure 1 Thin Door/Window Contact—Sensor and
Magnet).
Mounting the Thin Door/Window Contact
Use the figure below as a guideline when mounting the door contact.
In step 7 below, you have the option to mount the door contact with
an external input wire for an NC dry contact device.
Figure 2 Thin Door/Window Contact—Backplate and Battery Compartment
A
Access hole for external input wire (on backplate)
B
Top and bottom mounting holes (on backplate)
C
External input wire jack (on sensor)
D Tamper switch (on sensor)
E
3‐Volt (3V) lithium coin battery compartments (on sensor)
F
Metal clips for removing batteries (on sensor)
To mount the door contact:
At the top of the sensor, press down on the clip to unlock the
1
sensor's backplate. Then, gently pull down on the backplate to
remove it.
On the backplate, drill‐through top and bottom mounting holes if
2
needed (see Figure 2 Thin Door/Window Contact—Backplate and
Battery Compartment).
Holding the backplate location, place the bottom mounting hole
3
as follows:
• Single Door Installation. At the desired location on the door
frame.
• Double Door Installation. At the desired location on the least‐
used door.
Copyright © 2015 Nortek Security & Control LLC
1
Advertisement
Table of Contents

Related Manuals for Nortek 2GIG-DW10-345


Summary of Contents for Nortek 2GIG-DW10-345
- Page 1 Mounting Guidelines At the top of the sensor, press down on the clip to unlock the sensor’s backplate. Then, gently pull down on the backplate to Use these guidelines when installing the door contact for internal remove it. switch usage: On the backplate, drill‐through top and bottom mounting holes if • Mount Sensors within 100 ft (30 m) of the Control Panel. needed (see Figure 2 Thin Door/Window Contact—Backplate and Although the transmitter may have a range of 350 ft (106.7 m) Battery Compartment). open air, the sensor location can have a significant effect on range. In open/unobstructed situations, the transmitter range Holding the backplate location, place the bottom mounting hole may be greater. In adverse wireless conditions, changing the as follows: sensor orientation may lead to improved range. • Single Door Installation. At the desired location on the door • Mount Sensors at Least 4.7 in (12 cm) Above the Floor. frame. Placing sensors slightly above floor level helps to minimize • Double Door Installation. At the desired location on the least‐ possible sensor damage. used door. • Single vs. Double Door Installation. For single‐door installation, mount the sensor on the door frame and the Copyright © 2015 Nortek Security & Control LLC...
- Page 2 (+) sign of both batteries should be facing up and the minus (‐) instructions, may cause harmful interference to radio side facing down. communications. However, there is no guarantee that interference will not occur in a particular installation. If this equipment does WARNING: Failure to follow these warnings and instructions cause harmful interference to radio or television reception, which can lead to heat generation, rupture, leakage, explosion, can be determined by turning the equipment off and on, the user is fire, or other injury, or damage. Do not insert the battery encouraged to try to correct the interference by one or more of the into the compartment in the wrong direction. Always following measures: replace the battery with the same or equivalent type (see Specifications on page 2). Never recharge or disassemble • Reorient or relocate the receiving antenna. the battery. Never place the battery in fire or water. Always • Increase the separation between the equipment and keep batteries away from small children. If batteries are receiver. swallowed, promptly see a doctor. • Connect the equipment into an outlet on a circuit different from that to which the receiver is connected. • Consult the dealer or an experienced radio/TV technician for help. This product complies with FCC radiation exposure limits for an uncontrolled environment. Copyright © 2015 Nortek Security & Control LLC...
- Page 3 There are no obligations or liabilities on the part of Nortek Security & Control LLC for consequential damages arising out of or in connection Repairs to certified equipment should be made by an authorized with use or performance of this product or other indirect damages Canadian maintenance facility designated by the supplier. Any repairs with respect to loss of property, revenue, or profit, or cost of removal, or alterations made by the user to this equipment, or equipment installation, or reinstallation. All implied warranties for functionality, malfunctions, may give the telecommunications company cause to are valid only until the warranty expires. This Nortek Security & request the user to disconnect the equipment. Control LLC Warranty is in lieu of all other warranties expressed or Users should ensure for their own protection that the electrical implied. ground connections of the power utility, telephone lines and internal metallic water pipe system, if present, are connected together. This precaution may be particularly important in rural areas. Users should not attempt to make such connections themselves, but should contact the appropriate electric inspection authority, or electrician, as appropriate. Nortek Security & Control LLC 2GIG 1950 Camino Vida Roble, Suite 150 Carlsbad, CA 92008‐6517 USA For technical support in the USA and Canada: 855‐2GIG‐TECH (855‐244‐4832) Email: 2gigtechsupport@nortek.com Visit www.nortekcontrol.com for technical support hours of operation For technical support outside of the USA and Canada: Contact your regional distributor Visit dealer.2gig.com for a list of distributors in your region 77‐000015‐001 Rev. D Copyright © 2015 Nortek Security & Control LLC...
Need help?
Do you have a question about the 2GIG-DW10-345 and is the answer not in the manual?
Questions and answers