Table of Contents
Advertisement
Quick Links
Advertisement
Table of Contents

Related Manuals for Glowforge Compact Filter


Summary of Contents for Glowforge Compact Filter
- Page 1 Compact Filter User Manual DRAFT Version 0.6 1 Copyright Glowforge, Inc. 2018...
- Page 2 Introduction You already know about the incredible things you can do with a Glowforge 3D laser printer. With a Compact Filter, you can do those things a nywhere . But before you can do any of that, you’ll need to read the information in this manual. ...
-
Page 3: Before You Start
Electrical Safety To reduce the risk of electric shock or fire: ● Do not try to service, repair, or modify the Compact Filter in a manner not described in this manual. ● Do not open any sealed portion of the Compact Filter or try to access the wiring. Damage ... -
Page 4: General Safety
● Do not use the Compact Filter without a Filter Cartridge. ● Do not plug in the Compact Filter while the lid is open or the latches are not fully engaged. Doing so could cause electric shocks or physical harm from moving parts. ... - Page 5 ● Some laser-compatible materials, such as MDF or Proofgrade Draftboard, may cause the Filter Cartridge to need replacement more frequently. 5 Copyright Glowforge, Inc. 2018...
-
Page 6: Specifications
For more information or support, contact upport@glowforge.com Labeling This label appears on the back of every Compact Filter, with an appropriate serial number, in the spot indicated by the arrow in the diagram below. 6 Copyright Glowforge, Inc. 2018... -
Page 7: Getting Started
Locate your Compact Filter. Your Compact Filter must be on a flat surface, like the floor. It needs to be positioned so that the 8 foot exhaust hose can connect to the back of your Glowforge while making no ... - Page 8 Remove the Compact Filter. The Compact Filter is heavy, so have a friend help. Grasp the two handles on top of the Compact Filter through the clear plastic bag and lift the filter out of the box. Place it on the floor. 8 ...
- Page 9 Remove the bag. Lift the clear plastic bag over the top of the filter to remove it. Save the packaging material including the box, foam, and bags. 9 Copyright Glowforge, Inc. 2018...
- Page 10 If you need to move your Compact Filter, for example to ship it back for warranty service, you’ll need all the original packing materials. The Compact Filter cannot be shipped safely without the original packaging materials. ...
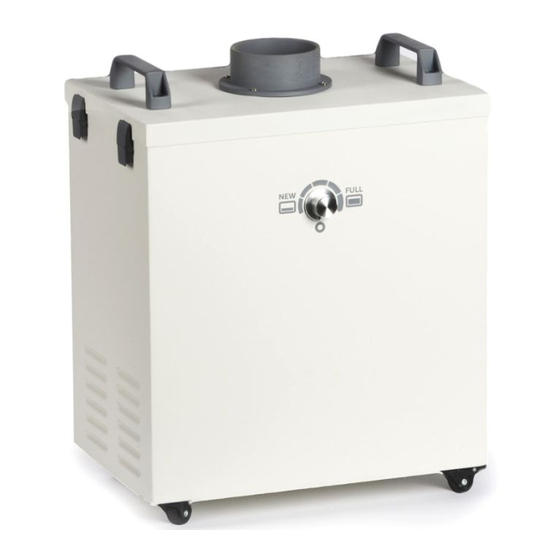
- Page 11 Compact filter back view, showing power switch, plug connection, and label Compact Filter top view with lid removed, showing Filter Cartridge. Filter Cartridge is pre-installed. 11 Copyright Glowforge, Inc. 2018...
- Page 12 Connect Compact Filter to Glowforge Printer with exhaust hose. Take the exhaust hose and two ring clamps that came with your Glowforge Printer. If you would like a new one, you can purchase a new one in the Glowforge shop: ...
- Page 13 Put the other clamp around the other end of the hose. Repeat the procedure above to attach the exhaust hose to the top of the Compact Filter with the ring clamp. Keep the hose as straight as you can, with no more than three turns of 90 degrees or less. ...
- Page 14 Verify that the power switch is “Off” (the 0 side depressed, as shown). Verify the filter is installed and the lid is firmly closed. Plug the power cord into the back of the Compact Filter, then plug the power cord into the electrical socket. A standard grounded household socket works well. ...
- Page 15 Turn your Compact Filter knob to the right setting. The knob on the Compact Filter controls the power to the fan. When it is too high or too low, your Compact Filter will not work properly. When you first use your Compact Filter, turn it to “New”. The fan will use its lowest power ...
- Page 16 Turn on your Compact Filter. Use the switch next to the power cord to turn your Compact Filter on before each print. Run your print. Ensure that you use laser-compatible materials, like Proofgrade hardwood, plywood, and ...
- Page 17 Unplug your Compact Filter off before cleaning, moving, changing the filter cartridge, or doing any other cleaning or maintenance. Change Filter Cartridge When you detect smells during printing even when the Compact Filter dial is set to “Full”, it’s time ...
- Page 18 Turn off and unplug your Compact Filter off before cleaning. Ensure that the Compact Filter is closed before cleaning; interior areas should not be cleaned. You can clean all exterior surfaces with a rag dampened with isopropyl alcohol. Do not spray liquids on the compact filter as they may get inside. ...
-
Page 19: Troubleshooting
After it is enabled, all users will have it enabled from that point forward. 4) Make sure that, when you turn on your Compact Filter, you turn it on to the right setting. If the fan is moving too slow or too fast, the filter will not work properly. ... - Page 20 Turn off and unplug your Compact Filter Remove and replace the fuse next to power switch We have included a free spare fuse with your Compact Filter. 20 Copyright Glowforge, Inc. 2018...
- Page 21 Service Other than the procedures shown above, the Compact Filter may not be serviced or repaired by the user. Should service or repair be required, it must be returned to the factory; contact support@glowforge.com for instructions. Finding Community & Support ...
- Page 22 ● The date and time of the issue ● The materials you were using ● At least one photo that shows your Compact Filter, exhaust hose, and Glowforge so we can see how they’re connected ● Additional photos or information that may help us understand the problem ...
Need help?
Do you have a question about the Compact Filter and is the answer not in the manual?
Questions and answers