Table of Contents
Advertisement
Quick Links
Advertisement
Table of Contents

Related Manuals for DNF Controls ST300-SSM

Summary of Contents for DNF Controls ST300-SSM
- Page 1 12843 Foothill Blvd. Suite C Sylmar, California 91342 V: 818.898.3380 F: 818.898.3360 sales@dnfcontrols.com Model No. ST300-SSM and ST300-SSM-T SLOW MOTION CONTROLLER WITH AUTOEDIT OPTION USER MANUAL ST300-S/SM- & ST300-S/SM-T-Autoedit, Slow Motion Controller...
-
Page 2: Table Of Contents
RECEIVE CUE LIST FUNCTION REFERENCE . . . SETUP MENU FUNCTION TABLE SPECIFICATIONS RS422 SERIAL CONNECTOR POWER CONNECTOR AUX PORT RS422 SERIAL CONNECTOR GPI IN/OUT CONNECTOR KEY LAYOUT DNF CONTROLS LIMITED WARRANTY Manual Version:..…………......…....1.21 051106 Document ID:..…..…..ST300-SSM-Autoedit_User_Manual.doc ST300-S/SM- & ST300-S/SM-T-Autoedit, Slow Motion Controller... -
Page 3: Revision History
REVISION HISTORY 111403 1.0 Original document. 060204 Rev. 1.1 Corrected T-bar size, SPECIFICATIONS. 011005 Rev. 1.2 Removed Search Speed menu option. Added 24P processing. 051106 Rev. 1.21 Added "save record mode" ST300-S/SM- & ST300-S/SM-T-Autoedit, Slow Motion Controller... -
Page 4: Getting Started
Getting Started . . . SYSTEM DESCRIPTION Slow Motion Controller that you can configure for the way you work. Controls up to 4 VTRs. T-BAR or detented Wheel for Fast and Easy slomo-ing: 0-200% or –100% to + 200% of Play speed. Quickly and easily store and recall 400 Cue Points - 100 per VTR. -
Page 5: Installation
INSTALLATION Plug one end of a 9-conductor, RS422 serial cable into the VTR1, VTR2, VTR3, OR VTR4 connector on the rear of the SLOW MOTION CONTROLLER. Plug the other end of the cable into the 9-pin REMOTE connector on the VTR. Connect the supplied POWER SUPPLY, APX#4108, into the POWER connector on the rear of the ST300. -
Page 6: Operation
OPERATION LCD DISPLAY During normal operation, the top row of the display shows the selected time mode and current time location of the selected VTR. For example: TM 01:12:09:23 Time Modes - TM= Tape Timer TC= LTC VT= VITC The currently selected SLO-MO speed is displayed on the far right side of the top row. -
Page 7: Cue Points
CUE POINTS Select a Cue Point Press [NEXT CUE] or [LAST CUE] to step through the Cue Points. Manually enter the desired Cue Point number using the numeric keypad. The current Cue Point number and its contents will be shown on the second line of the display. -
Page 8: Record Mode Selection
RECORD MODE SELECTION Press [MENU]. The MENU indicator will turn on. Turn the Wheel until “REC” is viewed on the top line of the display. The current Record mode is shown. Press [MENU] to select: Record Lockout, Assemble, Crash or Insert Record mode. INSERT ONLY - Press the desired Softkey to toggle Video, Audio1, Audio2, Audio3 or Audio4 record on/off. -
Page 9: Autoedit
AUTOEDIT TO SET AN IN (OUT) POINT Press [IN] ([OUT]) to set an AUTOEDIT IN (OUT) Point. The IN (OUT) key indicator on the ST300 will turn on. TO VIEW THE IN (OUT) POINT The IN (OUT) key indicator will be lit when and IN (OUT) point has been set. Press [IN] ([OUT]) to view the existing IN (OUT) point. -
Page 10: Advanced Features
Advanced Features . . . TRANSFER CUELIST TRANSMIT CUE LIST FUNCTION The TRANSMIT CUE LIST function allows you to transmit your list of Cue Points to a PC, using the provided utility software on the PC, or to another ST300. Transfer to a PC requires OpSuite 3.0 software, which runs on a Windows-based computer. -
Page 11: Receive Cue List Function
The RECEIVE CUE LIST function allows you to receive a list of Cue Points from a PC or from another ST300. Transfer to a PC requires OpSuite 3.0 software, which runs on a Windows-based computer. Contact DNF Controls for more information. To Receive Cue Points From Another ST300:... -
Page 12: Reference
Reference . . . SETUP MENU Press [MENU]. The MENU indicator will turn on. Turn the Wheel to select item to change. Use the Softkeys to change the desired mode for that option. Turn the Wheel at anytime to select another item. Press [ESC] at anytime to exit SETUP MENU. - Page 13 MENU MODES (Turning Wheel Clockwise) SLOMO with: TBAR ST300 display shows (T-Bar version): Wheel SpdRange Preset SLOMO with: WHEEL ST300 display shows (Non T-Bar version): SpdRange Preset Press Softkey [TBAR] (or [WHEEL]) to toggle between T-BAR and WHEEL. The T-BAR has two speed ranges: +200 with a detent at +100 % play speed +100 with a detent at +100% (Continued on next page)
- Page 14 MENU MODES (Turning Wheel Clockwise) GANG MODE Press Softkey to select PERMANENT GANG (described in the FUNCTION Table) or TEMPORARY GANG. In TEMPORARY mode, press and hold the VTR key that you want to read status from, then press the VTR#s of those VTRs that you want to include in the gang. Release the keys.
-
Page 15: Function Table
FUNCTION TABLE Function Key Press Description EE On/Off [EE] Toggle EE mode on/off. Status indicator is on when EE is on. EJECT TAPE [SHIFT] + [REWIND] Eject tape from VTR. ENTER TIME [ENTER TIME] To manually enter timecode number into the currently displayed Cue Point, enter the desired timecode number using the numeric keypad. - Page 16 Function Key Press Description PREROLL [PREROLL] Preroll the VTR to the contents of the currently displayed Cue Point. PREROLL [SHIFT] + [PREROLL] Enter desired Preroll Value. Press [ENTER] to save entry VALUE OR press [ESC] to exit without saving entry. RECORD [REC] or Places VTR in the Record mode selected by RECORD...
-
Page 17: Specifications
SPECIFICATIONS Power: 90 VAC to 265 VAC adapter supplied with IEC connector Size: (L” x W” x H”) 12” x 6” x 1.5” (front) 3.0” (rear) (T-Bar unit is 12.6” long) Weight: 4 lbs. Rear Panel Connectors: VTR1, VTR2, VTR3, VTR4 ……. (All DB9F) GPI ………………………………. -
Page 18: Gpi In/Out Connector
GPI IN/OUT CONNECTOR 15-Pin D-Type, Female (DB15F) Pin # Description Function Pin # Description Function GPI 1 Out PLAY tally out GPI 1 In PLAY GPI 2 Out STILL/STOP tally out GPI 2 In STOP GPI 3 Out RECORD tally out GPI 3 In RECORD GPI 4 Out... -
Page 19: 10. Key Layout
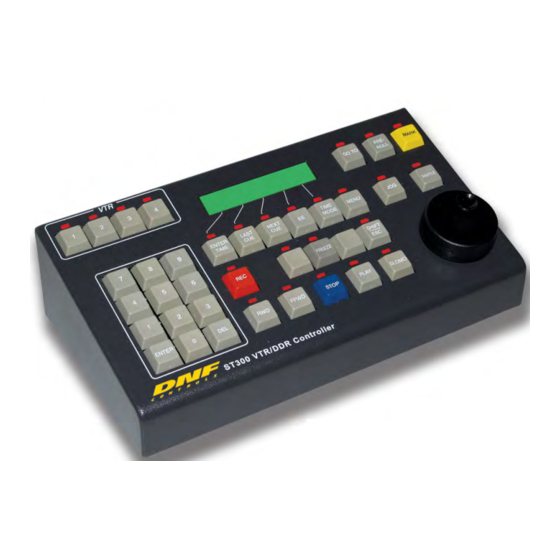
10. KEY LAYOUT ST300-S/SM- & ST300-S/SM-T-Autoedit, Slow Motion Controller... -
Page 20: 11. Dnf Controls Limited Warranty
11. DNF CONTROLS LIMITED WARRANTY DNF Controls warrants its product to be free from defects in material and workmanship for a period of one (1) year from the date of sale to the original purchaser from DNF Controls. In order to enforce the rights under this warranty, the customer must first contact DNF’s Customer Support Department to afford the opportunity of identifying and fixing the problem without sending the unit in for repair. - Page 21 ST300-S/SM- & ST300-S/SM-T-Autoedit, Slow Motion Controller...
Need help?
Do you have a question about the ST300-SSM and is the answer not in the manual?
Questions and answers