Table of Contents
Advertisement
Quick Links
Advertisement
Table of Contents

Subscribe to Our Youtube Channel
Related Manuals for 3Com NJ90 Network Jack


Summary of Contents for 3Com NJ90 Network Jack
- Page 1 NJ90 Network Jack User Guide 3CNJ90...
-
Page 3: Ethernet Switch
NJ90 Network Jack 3CNJ90 4-port 10/100 Mbps Unmanaged Ethernet Switch http://www.3com.com/ http://www.3com.com/productreg 150000038600A R01 Published February 2003 User Guide... - Page 4 LICENSE.TXT or !LICENSE.TXT. If you are unable to locate a copy, please contact 3Com and a copy will be provided to you.
-
Page 5: Table Of Contents
Fig.2 NJ90 Installation Fig.3 NJ90 Dimensions Fig.4 Wall Outlet (NEMA-WD6) Dimensions Fig.5 Using an Integrated Switch with Power over Ethernet Fig.6 Using a Multi-port Ethernet Power Supply Fig.7 Using a Single-port Ethernet Power Supply Fig.8 Using the 3Com Local Power Supply... -
Page 7: Nj90 Package Contents
NJ90: • NJ90 Unit • 6x32 screws (2 per NJ90) for mounting the NJ90 to the wall or office cubicle • RJ-45 Male-to-Male coupler cable (1 per NJ90) for connecting the NJ90 unit to the Network Ethernet cable (required only in... -
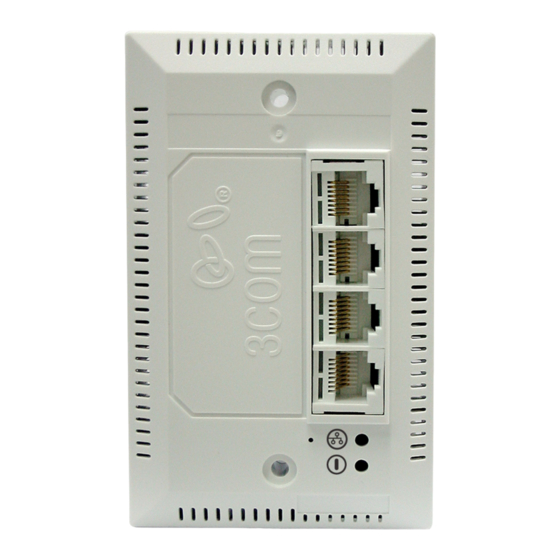
Page 8: Nj90 Description
Indicates NJ90 power status. Connects NJ90 to the Network cable Secure the Coupler Cable with a tie- wrap NJ90 can be powered from a local power supply (available for purchase separately from 3Com) Strain Relief Channel for the Local Power Cord... -
Page 9: Nj90 Installation
3. NJ90 Installation 3.1 Install the NJ90 Network Jack. 3.2 Set up the power supply 3.1 - Install the NJ90 Network Jack RJ-45 coupler cable Step 1: If the end of the network cable from the wiring closet is terminated... -
Page 10: Led Description
Installation Guide Step 3: Mount the NJ90 Unit to the Wall or Cubicle Outlet with the screws provided. 3.2 - Set up the power supply : Selecting the power scheme and installing it: See Appendix C: Setting up the Power Supply (p.8). -
Page 11: Appendix A: Nj90 Specifications
Appendix A: NJ90 Specifications The NJ90 is a 4-port, un-managed Fast Ethernet switch that fits into most standard data port openings. The NJ90 allows up to four net- working devices, such as computers, printers, Voice over IP (VoIP) telephones, and scanners, to be connected to the network via one Ethernet port. - Page 12 Local power supply Voice Over IP (VoIP) Communication speed (10 Mbps or 100 Mbps) and duplex mode (full or half) is determined through auto-negotiation with the attached devices. The NJ90 attempts to negotiate the fastest connection possible (100 Mbps full-duplex). º º...
-
Page 13: B: Wall Outlet Dimensions
Appendix B: Wall Outlet Dimensions Appendix B: Wall Outlet Dimensions Make sure the wall or cubicle opening where the NJ90 is being installed complies with the NEMA-WD6 standard, as described below. 1.750" (44.45 mm) 3.28125" 2.8125" (83.31 mm) (71.44 mm) -
Page 14: Appendix C: Setting Up The Power Supply
Locally via a 3Com local power supply. Before you begin the installation, determine which type of power supply the NJ90 will use. NOTE: For a list of power supplies that support the NJ90, go to www.3com.com CAUTION: ONLY use the local power supply available from 3Com. -
Page 15: Fig.6 Using A Multi-Port Ethernet Power Supply
6 on page 9. The multi-port Ethernet power supply from 3Com connects to an existing Ethernet or Fast Ethernet infrastructure with standard Cate- gory 5 or Category 5e UTP cabling, and powers up to 24 NJ90 Net- work Jacks. To network... -
Page 16: Fig.7 Using A Single-Port Ethernet Power Supply
If your network does not support Power over Ethernet, or if you are not using a single-port or multi-port Ethernet power supply, you must purchase a local power supply from 3Com. To use the local power supply, make sure you have an electrical outlet near the site where the NJ90 will be installed. -
Page 17: Installation Instructions
Plug the Local Power Supply into the power source. NOTE: Completing these procedures in sequence will reduce issues during the installation process. The NJ90 works with the following Power Supplies. Updated infor- mation is available online at www.3com.com/products Component Integrated Switch... -
Page 18: Appendix D: Setting Up The Network Cabling At Your Site
Terminate the other end of the cable at the location where the NJ90 is being installed using a female RJ-45 connector. Refer to the connector manufacturer’s instructions for terminating the cable. Be sure to test the connector and verify it is working. -
Page 19: Appendix E: Troubleshooting The Nj90
• Adheres to proper length and cabling specifications for your network. Make sure the port on the switch to which the NJ90 is connected is configured as a standard MDI-X port. Make sure all cables con- necting the NJ90 to the patch panel are straight-through cables (not crossover cables). -
Page 20: Appendix F: Contacting Technical Support
90 days from the date of purchase. Hours of operation are subject to change. See “Support from 3Com” on page 15. Online Technical Services 3Com offers worldwide product support 24 hours a day, 7 days a week, through the following online systems: • World Wide Web site •... -
Page 21: Support From Your Network Supplier
3Com. Support from 3Com If you are unable to obtain assistance from the 3Com online techni- cal resources or from your network supplier, 3Com offers technical telephone support services. To find out more about your support... - Page 22 Installation Guide...
-
Page 23: Limited Warranty & Regulatory Compliance Information
HARDWARE: 3Com warrants to the end user (“Customer”) that this- hardware product will be substantially free from material defects in workmanship and materials, under normal use and service, for the following length of time from the date of purchase from 3Com or its authorized reseller: Two (2) Years 3Com’s sole obligation under this express warranty shall be, at... - Page 24 It is recommended that returned products be insured or sent by a method that provides for tracking of the package. Responsibil- ity for loss or damage does not transfer to 3Com until the returned item is received by 3Com. 3Com will retain risk of loss or damage until the item is delivered to Customer.
- Page 25 IN CONNECTION WITH THE SALE, INSTALLATION, MAINTENANCE OR USE OF THIS PRODUCT. 3COM SHALL NOT BE LIABLE UNDER THIS WARRANTY IF ITS TESTING AND EXAMINATION DISCLOSE THAT THE ALLEGED DEFECT OR MAL- FUNCTION IN THE PRODUCT DOES NOT EXIST OR WAS CAUSED BY...
- Page 26 3Com Corporation, 5400 Bayfront Plaza, P.O. Box 58145, Santa Clara, CA 95052-8145 (408) 326-5000 Rev. 10/01/2002 Register Online: When you first call 3Com, we will collect customer and product information from you to determine warranty status. You can eliminate this step and speed your access to technical sup- port by registering on-line at http://support.3com.com/registra-...
- Page 28 3Com Corporation 5500 Great America Parkway, P.O. Box 58145, Santa Clara, CA 95052-8145 U.S.A. www.3com.com 150000038600A R01...
Need help?
Do you have a question about the NJ90 Network Jack and is the answer not in the manual?
Questions and answers