
Related Manuals for Gazzini 10035349


Summary of Contents for Gazzini 10035349
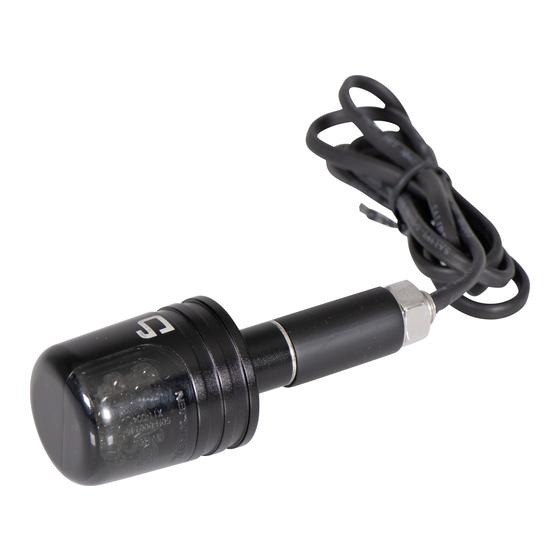
- Page 1 DE | FR | Original Instructions Montageanleitung de montage EN | IT | Installation Istruzioni Instructions di montaggio...
-
Page 2: Table Of Contents
DE | ORIGINAL MONTAGEANLEITUNG INHALTSVERZEICHNIS | Lieferumfang | Allgemeines 2.1 | Anleitung lesen und aufbewahren 2.2 | Zeichenerklärung | Sicherheit 3.1 | Bestimmungsgemäßer Gebrauch 5--6 3.2 | Sicherheitshinweise | Montage 4.1 | Gesetzliche Vorgaben zur Montage von Blinkern 4.2 | Anbau 9-11 4.3 | Elektrischer Anschluss | Lagerung... -
Page 3: Lieferumfang
2.1 | Anleitung lesen und aufbewahren Diese Montageanleitung bezieht sich ausschließlich auf den gazzini LED-Lenkerendenblinker. Sie enthält wichtige Hinweise zu Sicherheit und Handhabung. Lesen Sie die Montageanleitung, insbesondere die Sicherheitshinweise, sorgfältig durch, bevor Sie den gazzini Lenkerendenblinker verwenden. Die Nichtbeachtung dieser Gebrauchsanleitung... -
Page 4: Zeichenerklärung
Verletzungen oder zu Schäden an Ihrem Fahrzeug führen. Bewahren Sie die Gebrauchsanleitung für die weitere Nutzung gut auf. Wenn Sie den gazzini LED-Lenkerendenblinker an Dritte weiterreichen, geben Sie unbedingt diese Gebrauchsanleitung mit. Die Gebrauchsanleitung basiert auf den in der Europäischen Union gültigen Normen und Regeln. -
Page 5: Sicherheitshinweise
über ein gültiges E-Prüfzeichen und kann daher legal im Straßenverkehr als Fahrtrichtungsanzeiger für vorne, ohne zusätzliche Einzelabnahme, eingesetzt werden. Verwenden Sie den gazzini LED-Lenkerendenblinker nur wie in dieser Anleitung beschrieben. Jede andere Verwendung gilt als nicht bestimmungsgemäß und kann zu Sachschäden führen. Der Hersteller oder Händler übernimmt keine Haftung für Schäden,... - Page 6 HINWEIS! Beschädigungsgefahr! Die Elektroinstallation sowie der mechanische Anbau am Fahrzeug müssen fachgerecht ausgeführt werden. Ein fehlerhafter Anbau kann Kurzschlüsse verursachen oder zum Erlöschen der Betriebserlaubnis führen. Vor den Arbeiten an der Fahrzeugelektrik klemmen Sie unbedingt die Fahrzeugbatterie ab - es besteht Kurzschlussgefahr! Der Blinker soll vibrationsgeschützt montiert werden, denn Vibrationen können die Platine der LEDs im Extremfall zerstören (gummigelagerte...
-
Page 7: Montage
4 | MONTAGE 4.1 | Gesetzliche Vorgaben zur Montage von Blinkern Ist das Motorrad nach EG-Recht (fast alle Fahrzeuge ab Erstzulassung ca. 1998) zugelassen worden, gelten die folgenden Maße: Abstand der vorderen Blinker zueinander mindestens 240 mm (Innenkante Blinkerglas zu Innenkante Blinkerglas), Höhe von der Fahrbahn 350 –... - Page 8 Lenkerklemme (zur Mitte hin) die Bohrung zu setzen. Hinweis: Das Bohrloch nicht exakt mittig zwischen den Klemmböcken platzieren. Kennzeichnen Sie die Bohrstelle mit Hilfe eines Körners, arbeiten Sie sehr sorgsam, sodass der Bohrer nicht abrutschen und ggf. Fahrzeugteile beschädigen kann, decken Sie ggf. das Umfeld zum Schutz gut ab. Das Bohrloch wird mit einer kleinen Feile sorgfältig entgratet und geglättet.
-
Page 9: Elektrischer Anschluss
Wiederholen Sie den Vorgang auf der anderen Lenkerseite, wobei die Leuchtfläche symmetrisch ausgerichtet wird. Achten Sie darauf, dass der Gasgriff des Motorrads nicht durch den Blinker blockiert wird. Es sollte ein Zwischenraum von 2 mm zwischen Gasgriff und Blinker vorhanden sein. Der Gasgriff muss leicht zu betätigen sein und beim Loslassen selbsttätig zurückschnellen. - Page 10 Werden Blinker mit geringerer Gesamt-Wattleistung als original montiert, tritt meist eine zu schnelle Blinktaktung auf oder der Blinker „bleibt stehen“. Die richtige Blinktaktung muss dann mit Hilfe eines entsprechenden Blinkrelais oder mit Widerständen (simulieren die fehlenden Watt) wiederhergestellt werden. Als Zubehör gibt es verschiedene universelle Blinkrelais, fahrzeugspezifische Blinkrelais und Widerstände in verschiedenen Größen.
-
Page 11: Lagerung
Ø: 30 mm T: 49 mm 12 V/1,5 W 8 | GEWÄHRLEISTUNG Für den gazzini LED-Lenkerendenblinker gilt die gesetzliche Gewährleistung von zwei Jahren. Der Gewährleistungszeitraum beginnt ab dem Kaufdatum. Gebrauchsspuren,Zweckentfremdung, nicht bestimmungs- gemäßer Gebrauch und Schäden, die aus einem Unfall, einer Manipulation oder einem Reparaturversuch durch unautorisierte Personen resultieren, sind von der Gewährleistung... -
Page 12: Entsorgung
9 | ENTSORGUNG Verpackung entsorgen Entsorgen Sie die Verpackung sortenrein. Geben Sie Pappe und Karton zum Altpapier, Folie in die Wertstoffsammlung. Blinker entsorgen Bedenken Sie bitte, dass viele Komponenten aus wertvollen Rohstoffen bestehen und wiederverwendet werden können. Entsorgen Sie die Blinker daher nicht mit dem Hausmüll, sondern führen Sie sie bitte Ihrer Sammelstelle für Metall- bzw. - Page 14 EN | TRANSLATION OF ORIGINAL INSTALLATION INSTRUCTIONS TABLE OF CONTENTS | Scope of delivery | General information 2.1 | Reading and keeping 15-16 these instructions 2.2 | Explanation of symbols | Safety 16-17 3.1 | Intended use 17-18 3.2 | Safety instructions | Installation 4.1 | Legal requirements for the 18-19...
-
Page 15: Scope Of Delivery
1x rubber bushing 2 | GENERAL INFORMATION 2.1 | Reading and keeping these instructions These installation instructions refer exclusively to the gazzini LED bar-end turn signals. They contain important information on safety and handling. Read the installation instructions carefully, in particular the safety instructions, before using the bar-end turn signals. -
Page 16: Explanation Of Symbols
If you pass the gazzini LED bar-end turn signals on to third parties, you must hand over these instructions for use. The instructions for use are based on the standards valid in the European Union. -
Page 17: Safety Instructions
3.2 | Safety instructions WARNING ! Danger for children and persons with reduced physical, sensory or mental abilities (e.g. partially disabled persons, elderly persons with reduced physical and mental abilities) or lack of experience and knowledge in handling motorcycles (e.g. older children)! Keep the packaging film and small parts away from children, as there is a danger of suffocation. -
Page 18: Installation
that protects it from vibrations, as in extreme cases, vibrations can destroy the circuit board of the LEDs (rubber-mounted handlebar clamps generally offer sufficient vibration protection). The electric cables must not be subjected to any tensile forces, even when the steering is at full lock. -
Page 19: Attachment
If the motorcycle is registered according to German law (older vehicles prior to 1998), please observe the following provisions in accordance with the German Road Traffic Licensing Regulations (StVZO) during installation: Distance between the front turn signals of at least 340 mm (inside edge of turn signal lens to inside edge of turn signal lens), whereby each is 100 mm from the headlight (edge to edge) - Page 20 Place a rubber grommet onto the mounting bolt of the turn signal and screw on the hex nut. Pre-tighten the nut so that it is still just possible to push the rubber holder into the handlebar. Now plug the cable into the handlebar and feed it out through the drill hole.
-
Page 21: Electrical Connection
4.3 | Electrical connection LED turn signals only light up if the positive cable (+) and the negative cable (-) are connected correctly. For marking purposes, there are small flags on the cable. If these small flags are not present, hold the cable to the battery briefly in order to determine the correct polarity prior to the actual connection. -
Page 22: Storage
The required resistance can be determined according to the following formula: Required resistance R (in ohms) is equal to the square of the on-board voltage (12 volts) divided by the watt difference between the old and the new turn signal. The original wattage can either be found on the original bulb itself, in the vehicle handbook or on the turn signal lens. -
Page 23: Specifications
Depth: 49 mm 12 V/1,5 W 8 | WARRANTY The gazzini LED bar-end turn signals are covered by the statutory two-year warranty. The warranty period begins on the date of purchase. The warranty does not cover normal wear and tear, use for anything other than the intended purpose, or damage caused by an accident, manipulation or an attempt to carry out repairs by unauthorised persons. - Page 24 FR | TRADUCTION DES INSTRUCTIONS DE MONTAGE ORIGINALES TABLE DES MATIÈRES | Équipement fourni | Généralités 2.1 | Lire et conserver le 25-26 présent mode d'emploi 2.2 | Légende | Sécurité 26-27 3.1 | Utilisation conforme 27-29 3.2 | Consignes de sécurité | Montage 4.1 | Prescriptions légales concernant 29-30...
-
Page 25: Équipement Fourni
2.1 | Lire et conserver le présent mode d'emploi Ces instructions de montage correspondent uniquement à l'embout de guidon clignotant à LED gazzini. Il contient des remarques importantes à propos de la sécurité et de la manipulation. Lisez attentivement les instructions de montage, en particulier les consignes de sécurité... -
Page 26: Légende
Conservez le mode d'emploi dans un endroit sûr pour une utilisation ultérieure. Si vous cédez l'embout de guidon clignotant à LED gazzini à un tiers, veuillez impérativement transmettre le mode d'emploi à la personne correspondante. Le mode d'emploi se base sur les normes en vigueur dans l'Union européenne. -
Page 27: Consignes De Sécurité
être utilisé en tant que feu indicateur de direction en toute légalité dans la circulation routière sans réception à titre isolé supplémentaire. N'utilisez l'embout de guidon clignotant à LED gazzini que comme décrit dans le présent mode d'emploi. Toute autre utilisation est considérée comme non conforme et peut entraîner des dommages matériels. - Page 28 dégagée et peut revenir automatiquement dans sa position initiale. Assurez-vous que le clignotant est correctement orienté. Un angle de rayonnement mal orienté peut provoquer des accidents. REMARQUE! Risque de dommage ! L'installation électrique et le montage mécanique sur le véhicule doivent être effectués de manière conforme.
-
Page 29: Montage
Selon la durée de fonctionnement des clignotants, des températures de 80 °C et plus peuvent être atteintes. Utilisez uniquement des résistances dotées d'un dissipateur thermique. Le clignotant chauffe lui aussi pendant son fonctionnement, évitez donc tout contact avec la peau. Avant de prendre la route, assurez-vous à... -
Page 30: Montage
véhicules à partir de l'année de construction 1987 de clignotants arrière. Les embouts de guidon clignotants avec homologation E ne sont testés que pour une action vers l'avant (marquage 11 sur le verre) et doivent donc systématiquement être complétés par des clignotants arrière, même sur les modèles plus anciens. - Page 31 Placez un passe-fil sur le boulon fileté du clignotant, puis serrez l'écrou hexagonal de manière à le plaquer contre la rondelle. Serrez l'écrou de manière à pouvoir juste encore enfoncer le support en caoutchouc dans le tube de guidon. Enfoncez ensuite le câble dans le guidon et guidez-le vers l'extérieur à...
-
Page 32: Raccordement Électrique
4.3 | Raccordement électrique Les clignotants à LED ne clignotent que lorsque le câble plus (+) et le câble moins (-) sont correctement branchés. Des petits drapeaux se trouvent sur les câbles pour les identifier. Si aucun petit drapeau n'est présent, branchez brièvement les câbles à... -
Page 33: Stockage
Elles peuvent être placées directement en amont des clignotants ou à un autre emplacement des circuits des clignotants de droite et de gauche (à l'avant ou à l'arrière). La résistance nécessaire peut être calculée avec la formule suivante : la résistance requise R (en ohms) est égale à la tension de bord au carré... -
Page 34: Nettoyage Et Entretien
Profondeur: 49 mm 12 V/1,5 W 8 | GARANTIE LEGALE L'embout de guidon clignotant à LED gazzini est couvert par la garantie légale de deux ans. La période de garantie commence à compter de la date d'achat. Tout signe d'usure, tout usage non conforme ou à... -
Page 35: Contact
10 | CONTACT Pour toutes questions concernant le produit et/ou le présent mode d'emploi, veuillez contacter, avant la première utilisation du produit, notre centre S.A.V. par e-mail à l'adresse : order@louis-moto.fr. Nous vous aiderons dans les plus brefs délais. De cette manière, nous garantissons ensemble une utilisation correcte du produit. - Page 36 IT | TRADUZIONE DELLE ISTRUZIONI DI MONTAGGIO ORIGINALI INDICE | Contenuto della fornitura | Informazioni generali 37-38 2.1 | Leggere e conservare le istruzioni 2.2 | Spiegazione dei simboli | Sicurezza 38-39 3.1 | Uso conforme 39-41 3.2 | Istruzioni per la sicurezza | Montaggio 4.1 | Requisiti di legge per il montaggio 41-42...
-
Page 37: Contenuto Della Fornitura
2 | INFORMAZIONI GENERALI 2.1 | Leggere e conservare le istruzioni Queste istruzioni di montaggio si riferiscono esclusivamente all'indicatore di direzione da manubrio LED gazzini. Esse contengono informazioni importanti per la sicurezza e l'impiego. Leggerle accuratamente prima di utilizzare l'indicatore di direzione da manubrio gazzini, prestando particolare attenzione alle istruzioni per la sicurezza. -
Page 38: Spiegazione Dei Simboli
Si raccomanda di conservare le istruzioni nel caso siano necessarie in futuro. Qualora venga ceduto a terzi, l'indicatore di direzione da manubrio LED gazzini dovrà essere accompagnato dalle relative istruzioni per l'uso. Le presenti istruzioni per l'uso sono conformi alle normative e disposizioni vigenti nell'Unione Europea. -
Page 39: Istruzioni Per La Sicurezza
omologazione E e può essere dunque utilizzato legalmente nel traffico stradale come indicatore di direzione anteriore, senza bisogno di ulteriore omologazione singola. Utilizzare l'indicatore di direzione da manubrio LED solo come descritto nelle presenti istruzioni. Qualsiasi uso diverso è da considerarsi non conforme e può... - Page 40 AVVISO! Pericolo di danni! L'installazione elettrica e il montaggio meccanico sul veicolo devono essere eseguiti a regola d'arte. Il montaggio scorretto può causare cortocircuiti o il decadimento dell'omologazione. Prima di iniziare a lavorare sull'impianto elettrico del veicolo, è assolutamente necessario staccare la batteria: sussiste infatti il rischio di cortocircuito! L'indicatore di direzione deve essere montato in modo che sia protetto dalle vibrazioni, perché...
-
Page 41: Montaggio
Prima di utilizzare il veicolo verificare sempre che gli indicatori di direzione siano correttamente fissati e funzionanti. 4 | MONTAGGIO 4.1 | Requisiti di legge per il montaggio degli indicatori di direzione: Per i ciclomotori omologati secondo la normativa europea (quasi tutti i veicoli immatricolati per la prima volta a partire ca. -
Page 42: Montaggio
4.2 | Montaggio Sollevare e stabilizzare il veicolo sul cavalletto centrale o sull'alzamoto. Scollegare la batteria. Smontare gli indicatori di direzione presenti e staccare i cavi di collegamento. Se presenti, rimuovere le estremità del manubrio originali, in modo che il manubrio aperto sia accessibile su entrambi i lati. I manubri saldati o bloccati con inserti filettati non sono adatti al montaggio degli indicatori di direzione. -
Page 43: Collegamento Elettrico
far passare il cavo attraverso il manubrio e il foro aiutandosi con filo metallico o da pesca. Eseguire quindi il collegamento elettrico. Inserire completamente l'indicatore di direzione con la boccola in gomma predisposta nell'estremità del manubrio e ruotarlo in senso orario, in modo da stringere ulteriormente la boccola in gomma. - Page 44 Collegare il cavo positivo e negativo dell'indicatore con le linee dell'indicatore originale, ad es. sotto il comando, realizzando piccole saldature, isolate con guaina termoretraibile (spingere indietro la guaina termoretraibile, quindi saldare il cavo, tirare la guaina termoretraibile sulla saldatura e farla restringere con un accendino, un fon o altro).
-
Page 45: Stoccaggio
essere controllato sulla lampadina originale, nel libretto di manutenzione o sul vetro dell'indicatore di direzione. Esempio: una resistenza da 7,5 ohm simula 19,2 watt, una resistenza da 8,2 ohm simula 17,6 watt e una resistenza da 10 ohm simula 14,4 watt. Le resistenze sono disponibili parzialmente precablate e quindi sono particolarmente facili da montare;... -
Page 46: Garanzia
8 | GARANZIA L'indicatore di direzione da manubrio LED di gazzini è coperto dalla garanzia di legge di due anni. La garanzia decorre dalla data di acquisto. La garanzia non copre tracce di usura, uso improprio, uso non conforme e danni derivanti da incidente, manipolazione o tentativi di riparazione a opera di persone non autorizzate. - Page 48 Rungedamm 35 · 21035 Hamburg · Germany Tel.: 00 49 (0)40 - 734 193 60 · www.louis.de · order@louis.de Detlev Louis AG · Im Schwanen 5 · 8304 Wallisellen · Switzerland Tel.: (00 41) 044 832 56 10 · info@louis-moto.ch MA-10035349-01-1801...
Need help?
Do you have a question about the 10035349 and is the answer not in the manual?
Questions and answers