Table of Contents
Advertisement
Quick Links
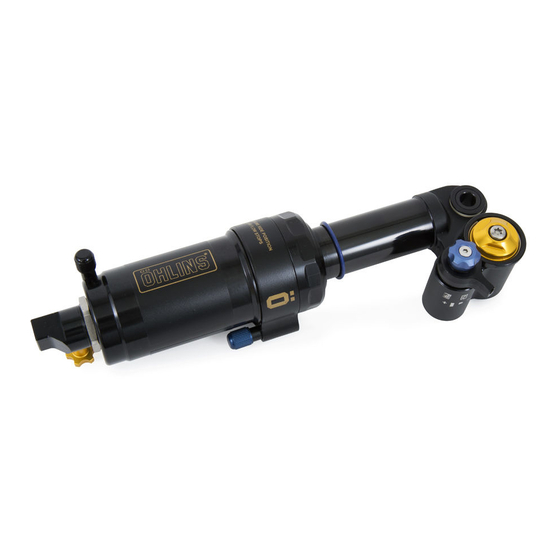
Shock absorber for Specialized Enduro, Stumpjumper and Rhyme
STX22Air
Owner's Manual/ Mounting Instructions
Kit Contents
Description
Shock absorber
⚠
arningg!
Before installing this product, read this manual. The
shock absorber is an important part of your bicycle and
will affect the stability.
oteg!
1
Please note that the images in this manual are a
general representation of the product and may differ
slightly from your product.
oteg!
1
Please note that during storage and transportation,
especially at high ambient temperature, some of the oil
and grease used for assembling may leak and stain the
packaging. This is in no way detrimental to the product,
wipe off the excessive oil/grease with a cloth.
oteg!
1
This manual refers to different bikes so pictures might
differ from the actual bike but procedure is the same.
Part
o
Pcs
STX22Air
1
Advertisement
Table of Contents

Related Manuals for Öhlins STX22Air


Summary of Contents for Öhlins STX22Air
- Page 1 Kit Contents Description Part Shock absorber STX22Air ⚠ arningg! Before installing this product, read this manual. The shock absorber is an important part of your bicycle and will affect the stability. oteg! Please note that the images in this manual are a general representation of the product and may differ slightly from your product.
- Page 2 SAFETY PRECAUTIO S oteg! SAFETY SYMBOLS The shock absorber is an important part of the bicycle and will affect the stability. In this manual and other technical documents, important information oteg! concerning safety is distinguished by the Read and ensure you understand the information in this following symbols: manual and other technical documents provided by the bicycle manufacturer before using the product.
- Page 3 MOU TI G I STRUCTIO S arningg! It is advisable to have an Authorized Specialized Service Centre install the shock absorber. arningg! If the bicycle is mounted in a work stand please make sure to hold the frame when shock is removed to prevent damage to paint and (or) finish.
- Page 4 SETTI G SAG Setting sag is a crucial part of setting your bicycle since it affects the height of the bicy- cle and the fork angle. In the following chapter we will describe two alternative ways of set- ting the sag. oteg! This procedure must be performed on a flat surface.
- Page 5 SETTI G SAG Setting sag alternative 2: Manual sag set up Keep track of your personal settings and it is easier to adjust your set up after different type of terrain or to do quick pre-ride control. When controlling pressures be aware that the pump takes up to 10 psi when connected.
- Page 6 ADJUSTERS Compression damping controls the energy absorption 2. Adjust high speed when the shock absorber is being compressed, thus To adjust, turn the black coloured adjuster on controls how easily the shock absorber compresses the side of the cylinder head. when you hit a bump.
- Page 7 SETTI G UP Stability and traction Adjustment range All bicycles are designed with a suspension The STX shock is designed for use within the geometry that include height and fork angle. full adjustment range, and using the shock Changing any components may affect the sus- fully open or closed is normal for some riders.
- Page 8 Air pressure Position 3 is for those long climbs where the need for traction is limited and additional plat- The correct air pressure and sag is along with form control helps to gain efficiency. the clicks, crucial to find the best set up that suits your riding style.
Need help?
Do you have a question about the STX22Air and is the answer not in the manual?
Questions and answers