
Related Manuals for Chef's Choice Ceramic + Steel Diamond Hone 702


Summary of Contents for Chef's Choice Ceramic + Steel Diamond Hone 702
- Page 1 INSTRUCTIONS MODEL 702 Ceramic + Steel Diamond Hone ® Knife Sharpener Read these instructions before use. It is essential that you follow these instructions to achieve optimum results. © 2017 EdgeCraft Corp.
-
Page 2: Important Safeguards
IMPORTANT SAFEGUARDS When using electrical appliances, basic safety precautions should always be followed including the following: 1. Read all instructions. Every user should read this manual. 2. To protect against electrical hazards, do not immerse the Chef’sChoice Ceramic + Steel ®... - Page 3 YOU MADE AN EXCELLENT CHOICE Congratulations! As an owner of the highly versatile Chef’sChoice ® Ceramic + Steel Model 702 you will appreciate how easy it is to maintain all of your Ceramic and Steel knives in factory sharp condition. A precise guide system is provided to position each style knife automatically at the optimum sharpening angle as customized diamond abrasive disks quickly restore a fresh edge.
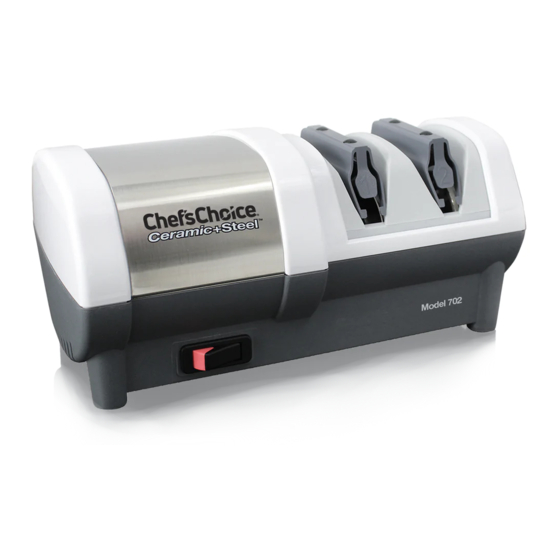
- Page 4 GETTING ACQUAINTED WITH THE MODEL 702 SHARPENER The Model 702 (Figure 1) is a unique sharpener designed to sharpen both Steel knives and Ceramic knives. The Stropping/Finishing Stage 2 contains the proprietary Chef’sChoice ® ultrafine abrasive stropping disks designed to create a microscopic bevel along the edge and to polish it to astonishing sharpness.
- Page 5 Never operate the sharpener from the back side. Use just enough downward pressure when sharpening to ensure uniform and consistent contact of the blade edge with the abrasive disks on each stroke Additional pressure is unnecessary and will not speed the sharpening process. Avoid excessive cutting into the plastic enclosure.
- Page 6 SHARPENING THE CERAMIC KNIFE SHARPENING THE EDGE IN STAGE 1 Turn ON the power and pull the CERAMIC blade thru the left slot of the Stage1 (Figure 5), then thru the adjacent right slot of Stage 1. Repeat pairs of pulls in Stage 1 using the left and right slots on alternate pulls.
- Page 7 RESHARPENING CERAMIC KNIVES In order to freshen up the edge of your ceramic knives, it is not necessary to sharpen in stage 1. Simply use Stage 2 Polish/Finish with 4-5 pairs of slow alternating passes (take about 2 seconds per inch of blade) and then test for sharpness. If the knife is still not sufficiently sharp, try another 2-3 pairs of alternating pulls.
- Page 8 Do not over sharpen. When you have developed a burr along the full blade length proceed to the Stropping/Finishing Stage (Stage 2). DETECTING THE BURR To confirm the presence of a burr move your forefinger carefully across the edge in the direction shown (Figure 8).
- Page 9 If your serrated blade edge has light wear, then only minimal effort is required to re-sharpen the edge, using only Stage 2 (Figure 10). First you need to establish on which side of the blade the serrations are formed. If the serrations are on the right side of the blade (as you would hold the knife when cut- ting) then re-sharpen the blade in the right slot of Stage 2.
- Page 10 Before you start to sharpen a traditional Japanese blade, examine it carefully in order to confirm that you have the traditional single bevel blade and to determine whether you have a right or left handed type as described in Figure 11. It is essential that you follow carefully the sharpening procedure and sequence as described below in order to achieve the optimum edge on your traditional blade.
- Page 11 SHARPENING LEFT HANDED TRADITIONAL JAPANESE BLADES The procedure you must use with left handed blades is similar to that procedure for right handed blades as detailed above – Except in all cases the slots you must use are reversed. Where the sharpening procedure for right handed blades calls for use of just the left slot, you must use only the right slot when sharpening a left-handed blade.
- Page 12 SUGGESTIONS 1. Always clean all food, fat and foreign materials from the blade surfaces before sharpening or resharpening. If badly soiled, use detergent and water to clean then dry knife thoroughly. 2. Always pull the blades at the recommended speed and at a constant rate over length of blade.
-
Page 13: Normal Maintenance
8. Used correctly, you will find you can sharpen the entire blade to within 1/8” of the bolster or the knife handle. This is a major advantage of the Chef’sChoice Ceramic + Steel Model ® 702 compared to other sharpening methods—especially important when sharpening chef’s knives where you need to sharpen the entire blade length in order to maintain the curvature of the edge line. - Page 14 However, ceramic knives are not magnetic, and therefore the ceramic swarf generated during the sharpening of ceramic knives needs to be cleaned out by different methods. The Model 702 has been designed with removable spring guides in Stages 1 and 2 (see Figures 16 and 17). To remove the spring guides, first turn off the sharpener and unplug it from the electric receptacle or power source.
- Page 15 SERVICE In the event post-warranty service is needed, return your sharpener to the EdgeCraft factory where the cost of repair can be estimated before the repair is undertaken. Outside the USA, contact your retailer or national distributor. Please include your return address, daytime telephone number and a brief description of the problem or damage on a separate sheet inside the box.
- Page 16 ® EdgeCraft Corporation 825 Southwood Road, Avondale, PA 19311 U.S.A. Customer Service (800) 342-3255 or 610-268-0500 www.chefschoice.com Assembled in the U.S.A. This product may be covered by one or more EdgeCraft patents and/or patents pending as marked on the product. Chef’sChoice , EdgeCraft , and the overall design of this product are registered trademarks of...
Need help?
Do you have a question about the Ceramic + Steel Diamond Hone 702 and is the answer not in the manual?
Questions and answers