Table of Contents
Advertisement
Quick Links
Owner's Manual
4-Port DisplayPort 1.4 KVM
Switch with 4K Video, Audio
and Peripheral Sharing
Este manual esta disponible en español en la página de Tripp Lite:
Ce manuel est disponible en français sur le site Web de Tripp Lite :
Русскоязычная версия настоящего руководства представлена на веб-сайте
компании Tripp Lite по адресу: tripplite.com/support
WARRANTY REGISTRATION
Register your product today and be
automatically entered to win an ISOBAR
surge protector in our monthly drawing!
tripplite.com/warranty
1111 W. 35th Street, Chicago, IL 60609 USA • tripplite.com/support
Copyright © 2020 Tripp Lite. All rights reserved.
Model: B005-DPUA4
tripplite.com/support
tripplite.com/support
1
Advertisement
Table of Contents

Related Manuals for Tripp Lite B005-DPUA4


Summary of Contents for Tripp Lite B005-DPUA4
- Page 1 Model: B005-DPUA4 Este manual esta disponible en español en la página de Tripp Lite: tripplite.com/support Ce manuel est disponible en français sur le site Web de Tripp Lite : tripplite.com/support Русскоязычная версия настоящего руководства представлена на веб-сайте компании Tripp Lite по адресу: tripplite.com/support...
-
Page 2: Package Contents
Package Contents • B005-DPUA4 4-Port DisplayPort 1.4 KVM Switch • IR Extender • IR Remote Control • External Power Supply (Input: 100–240V, 50/60 Hz, 0.5A; Output: 5V 3A) • Mounting Hardware • Owner’s Manual Optional Accessories • P785-DPKIT06 or P785-DPKIT10 KVM Cables •... -
Page 3: Product Features
Product Features • Controls 4 DisplayPort computers from a single DisplayPort video console • Supports True 4K @ 60 Hz video resolutions, including 4:4:4 HDR and HDCP 2.2 • DisplayPort 1.4 compliant • Supports RGB 4:4:4/ YCbCr 4:4:4/ YCbCr 4:2:2/ YCbCr 4:2:0 •... -
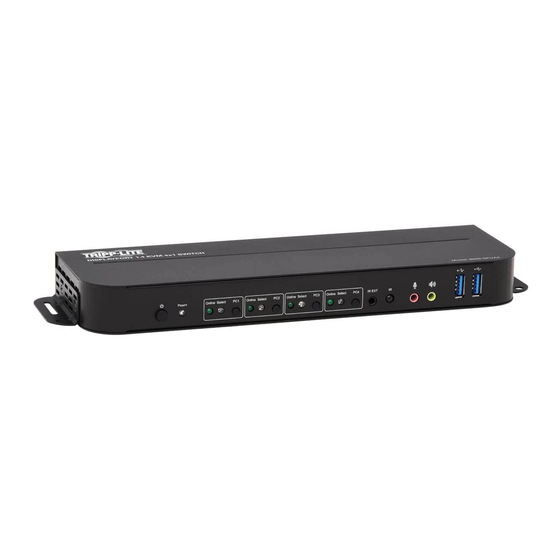
Page 4: Panel Descriptions
Panel Descriptions Front Panel Power – Press to turn the unit on and off. Power Indicator – Illuminates red to signal the DC power supply is connected to an outlet and the KVM switch is turned on. Input Selector – Illuminates blue to indicate whether PC1, PC2, PC3 or PC4 has been selected. - Page 5 Panel Descriptions Rear Panel Outputs a. Connect a mouse and keyboard to the USB 2.0 ports. b. Connect an amplifier to the 3.5 mm stereo port. c. Connect a microphone to the 3.5 mm microphone port. d. Connect a local HDMI monitor to the HDMI Out port. e.
- Page 6 Installation and Operation Refer to the following steps and diagram to set up your KVM switch installation. Note: Before making any connections, make sure power to all devices connected to the KVM switch is turned off. Unplug the power cords of any computers that have the Keyboard Power On function.
- Page 7 Installation and Operation 3. Connect the included DC power supply, and press the Power button. The Power LED will illuminate. When computers are connected to the PC1, PC2, PC3 and PC4 ports, the Online LEDs will illuminate. 4. Press the buttons on the front panel to select the desired computer. The Select LED will illuminate to indicate which computer is currently selected.
-
Page 8: Special Function Operation
Special Function Operation 1. Mouse Traversal Function – Place the mouse on the far right of the monitor, and continue to slide it to the right for 2 seconds. The KVM switch will automatically switch to the next port. Switching order is PC1>PC2>PC3>PC4>PC1…... - Page 9 Special Function Operation ³ Turning on this function will cause DisplayPort, microphone and speaker ports to enter automatic switching mode without USB. Press any key (except Spacebar) to exit to the port used prior to the automatic switching sequence. Press Spacebar to stay at the port currently in use. When automatic switching mode is enabled, the corresponding “Select”...
-
Page 10: Specifications
Specifications Connectors KVM Connectors (Female) USB 3.0-B x4 (Rear) DisplayPort x4 (Rear) 3.5 mm Stereo x4 (Green, Rear) 3.5 mm Stereo x4 (Pink, Rear) Console Connectors (Female) USB 2.0-A x2 (Rear) DisplayPort x1 (Rear) HDMI x1 (Rear) 3.5mm Stereo x2 (Green, 1 Front, 1 Rear) 3.5mm Stereo x2 (Pink, 1 Front, 1 Rear) USB Hub Connectors (Female) USB 3.0-A x2 (Front) -
Page 11: Warranty And Product Registration
Visit tripplite.com/warranty today to register your new Tripp Lite product. You’ll be automatically entered into a drawing for a chance to win a FREE Tripp Lite product!* * No purchase necessary. Void where prohibited. Some restrictions apply. See website for details. - Page 12 1111 W. 35th Street, Chicago, IL 60609 USA • tripplite.com/support 20-04-030 • 93-3C90_RevA...
Need help?
Do you have a question about the B005-DPUA4 and is the answer not in the manual?
Questions and answers