
Subscribe to Our Youtube Channel
Related Manuals for WolfPack HDTVBYOD8200


Summary of Contents for WolfPack HDTVBYOD8200
- Page 1 User Manual HDTVBYOD8200 4K BYOD Wireless 8x2 Presentation Switcher Version: V2020.001...
-
Page 2: Important Safety Information
Important Safety Information 1. Read, follow, and keep these instructions. 2. Heed all warnings. 3. Do not use this product near water. Keep away from wet places, such as: spas, pools, sinks, laundries, wet basements, etc. 4. When cleaning, unplug the switcher and wipe with a dry cloth. Do not use damp cloths, cleaning fluids, or aerosols which may result in electric shock, fire, or switcher damage. -
Page 3: Table Of Contents
Contents Important Safety Information..........................2 1. Introduction................................1 2. Features................................1 3. Package Contents............................1 4. Panel Description.............................1 Front Panel................................1 Rear Panel................................2 5. Specifications................................3 6. Installation and Wiring............................5 Installation................................5 Wiring..................................5 7. Key Function..............................6 Screen Layout Switch............................6 Automatic Signal Switching..........................7 Screen Mirroring..............................7 (1) Screen Mirroring over Airplay ........................ - Page 4 Sink Power Management ..........................17 Password ................................18 Guide Screen Picture ............................18 Maintenance ................................. 18 Version Information ............................19 Video Source Tab..............................19 State & Switch ..............................19 Manage Alias ................................ 20 9. Video Source Tab............................20...
-
Page 5: Introduction
1. Introduction The HDTVBYOD8200 is a high-performance BYOD presentation switcher with wireless presentation capability. It equips built-in Wi-Fi module and supports multiple access approaches, including Airplay Mirroring, Miracast, physical interfaces (HDMI, VGA and USB-C) and USB Dongle, with which you can project screen contents of your computer (Mac/Windows) or mobile device (iPhone/iPad/Android) to a display in Multiview mode. -
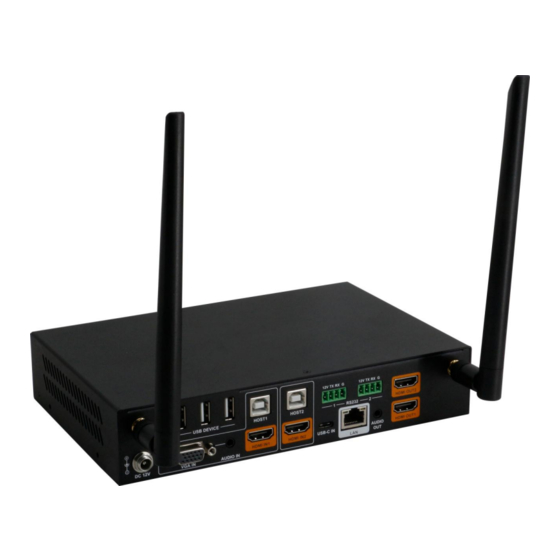
Page 6: Rear Panel
Name Description On: The corresponding video signal is valid and is being output. Blinking quickly: The corresponding video signal is valid but is not being output. Blinking slowly: The corresponding video signal is being output but is not valid. ... -
Page 7: Specifications
5. Specifications Technical 1 x VGA; 2 x HDMI; 1 x USB-C; Input Video Port 1 x LAN, 10/100/1000 Mbps Ethernet; 1 x WLAN VGA: 640x480 , 720x480 , 720x576 , 800x600 , 1024x768 , 1280x720 , 1280x800 1280x1024 1360x768 , 1366x768 , 1400x1050 , 1440x900... -
Page 9: Installation And Wiring
6. Installation and Wiring Installation Note: Before installation, please ensure the switcher is disconnected from the power source. It is recommended that you remove other WiFi hotspot devices nearby (if any) so to prevent potential interferences on screen projection. Attaching Antennas 6.1 Attach the antenna provided to the threaded connector, and screw it down in clockwise. -
Page 10: Key Function
Laptop Laptop Display Dongle Sender USB Audio USB Camera Dongle Sender HDMI Amplifier Ethernet Switch USB-C AUDIO Wi-Fi AP MacBook Note: If you connect the switcher to an Ethernet Switch, please ensure the switch is able to forward messages from the 224.0.0.251 multicast group. Most non-management switches meet this requirement. -
Page 11: Automatic Signal Switching
As the video sources increase till there’s no available screen layout to allows for all these sources to be displayed on the screen, when a new video source inputs: 1) The source that displays on the screen for the longest will be replaced by the latest input source;... -
Page 12: Screen Mirroring Over Miracast
C. To disconnect iPhone: click Stop Mirroring, the display will stop outputting the screen of iPhone. (2) Screen Mirroring over Miracast For Android mobile (take Samsung Galaxy S9 for example): 1. Enable the Wi-Fi or WLAN feature of the mobile. 2. - Page 13 3. The Smart View window will appear and start to search Miracast receiver. Click the device name in the search result, the display will output the the mobile’ screen. 4. To disconnect mobile from the switcher: click the icon on the mobile screen, and choose Disconnect in the Smart View window.
-
Page 14: Screen Mirroring Over Usb Dongle
restart the mobile if necessary. For Windows 10 PC: 1. Enable the WLAN feature of your PC. 2. Click the icon on bottom right of the screen to open Action Center. 3. Click Connect. 4. Click the switcher’s device name in the search result. 5. -
Page 15: Guide Screen
Name Description USB port Connect to the switcher or laptop for pairing up or projecting screen. Blinking: When connected to the switcher: USB Dongle is being pairing up with the switcher. When connected to the computer: USB Dongle is starting or is establishing connection with the switcher. -
Page 16: Osd
• Manual switching: 1) Short press the source selection button on front panel until no active video sources are displayed. 2) Send API command through telnet to the switcher to show the Guide Screen. For more information, please see the separate API documentation. Note: •... -
Page 17: Web Ui
Example 2: Multiview mode Video source name Access code Device name of the switcher HDMI1 MIR AC AS T1 MIR AC AS T1 1111@WMS42S W-123 AIR P L A Y1 HDMI2 IP address of the switcher IP: 192.168.1.8 WiFi Pwd:12345678 WiFi password of the switcher Note:... -
Page 18: General Tab
4. Choose the language you wish to use: English or Chinese. 5. Input password (default password: admin) and click Login to enter the main page of Web UI. The Web UI main page consists of General and Video Source Tabs. General Tab Device Name UI Element... -
Page 19: Access Code
UI Element Description For network settings in the switcher’s LAN port. Network Select an IP mode from DHCP and Static. IP Mode By default, it’s set as Static. Set IP address manually for the switcher when Static mode is selected. IP Address Set subnet mask manually for the switcher when Static mode is selected. -
Page 20: Soft Ap Password
Soft AP Password UI Element Description Set soft AP password. Note: • The soft AP SSID is as same as the Device Name of WMS42SW. (Default Password Device Name is WMS42SW) • The soft AP password must be 8 to 20 characters in length. If you don’t want to set password, you can leave it blank here. -
Page 21: Sink Power Management
UI Element Description If it’s set to 0 minute, it means this function is disabled, you cannot set the display to standby mode. By default, auto standby is set as 1 minute. Click to perform current settings. Apply Sink Power Management UI Element Description Set display to enter standby mode or to return to their normal working state... -
Page 22: Password
UI Element Description Disable: select to directly send the original standby or wakeup commands to control display devices. By default, it’s set as Disable. Click to power on the connected display. Power On Click to power off the connected display. Power Off Click to perform current settings. -
Page 23: Version Information
The following window will appear once the upload is completed. Then the switcher will reboot. Please refresh the page and then re-login. Version Information UI Element Description Displays the switcher’s firmware information. Version Info Version Shows the switcher’s firmware version. Build Time Shows the time and date when the switcher’s firmware was built. -
Page 24: Manage Alias
Restore Click to perform the current settings. Apply 9. Video Source Tab HDTVBYOD8200 supports firmware upgrade through Web UI and USB ports on the front panel. To upgrade firmware through Web UI, see Maintenance section. To upgrade firmware through USB port on the front panel, perform the following: 1.
Need help?
Do you have a question about the HDTVBYOD8200 and is the answer not in the manual?
Questions and answers