Advertisement
Available languages
Available languages
Quick Links
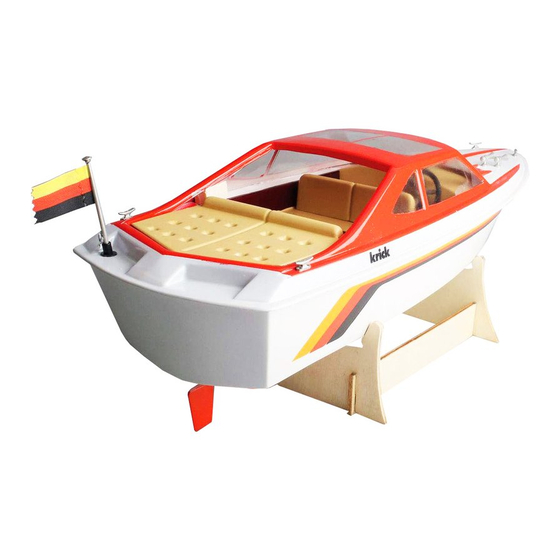
Technische Daten: Länge:
Allgemeine Bauhinweise zu Katja
Das Sportboot Katja kann sowohl für Freifahrt als auch für RC-Betrieb gebaut werden.
Welche Teile für die gewünschte Version zusätzlich benötigt werden, entnehmen Sie bitte
den nachstehenden Tabellen.
Nicht enthaltenes, jedoch erforderliches Zubehör für Freifahrt
Stück
Bezeichnung
1
Taschenlampenbatterie
2
Anschlussklemme (Büroklammer)
1
Schalter (im Elektrofachhandel erhältlich 40
Nicht enthaltenes, jedoch erforderliches Zubehör für RC-Betrieb
Stück
Bezeichnung
1
Fernsteueranlage ab 2 Kanälen in
Verbindung
kleinem Empfänger
1
Fahrtregler
1
Fahrakku
Stück
Bezeichnung
1
Ladegerät
1
Stahldraht, Ø 0,8 mm für Antenne falls Fernsteuerung nicht 2,4 GHz
Bauanleitung
Breite:
Gewicht fahrfertig: ca. 1100 g mit RC-Anlage
mit einem Servo
Katja
520 mm
180 mm
Stückl.-Nr.
38
39
Stückl.-Nr.
43, 44, 46
und
49, 50
45
51
Stückl.-Nr.
Best.-Nr.
67051
667218
Best.-Nr.
Advertisement

Related Manuals for Krick Ro-marin Katja


Summary of Contents for Krick Ro-marin Katja
- Page 1 Katja Bauanleitung Technische Daten: Länge: 520 mm Breite: 180 mm Gewicht fahrfertig: ca. 1100 g mit RC-Anlage Allgemeine Bauhinweise zu Katja Das Sportboot Katja kann sowohl für Freifahrt als auch für RC-Betrieb gebaut werden. Welche Teile für die gewünschte Version zusätzlich benötigt werden, entnehmen Sie bitte den nachstehenden Tabellen.
- Page 2 Buchse mit Isolierung Stecker mit Isolierung Elektromotor 42235 Entstörsatz 3, 4 42128 Motoranschlusskabel Benötigte Werkzeuge und Hilfsmittel Balsamesser, Schere, Bohrer, Lötkolben mit Zubehör, Feilen, Schraubenzieher, Kombi- Zange, feines Schmirgelpapier, Pinsel, Wäscheklammern, Abklebeband. Erforderliche Lacke Porenfüller zum Grundieren der Holzteile. Lacke und Verdünnung für die Lackierung des Bootes.
- Page 3 Nun den Kupplungsschlauch 14 so auf Schiffswelle und Motorwelle aufschieben, dass er ca. 10 mm auf beiden Wellen sitzt. Ganze Antriebseinheit nochmals ausrichten und sowohl Stevenrohr als auch Motorhalterung Sekundenkleber anpunkten. Anschließend werden die Teile 6 und 10 gut mit UHU acrylit im Rumpf vermufft.
- Page 4 Zusammenfügen von Rumpf und Deck Um das bereits vorbereitete Deck beim Aufkleben einwandfrei fixieren zu können, sollten Sie sich einige Holz-Wäscheklammern an den Spitzen so bearbeiten, dass sie an dem schmalen Kleberand von Rumpf und Deck nicht abrutschen können. Bitte Zeichnung D beachten. Rumpf und Deck genau aufeinander setzen, ausrichten und die Passung prüfen.
- Page 5 Der Fahrtregler 42 wird auf der anderen Seite neben dem Servo mit etwas doppelseitigem Klebeband befestigt. Die meisten modernen Fahrtregler benõtigen keine externe Stromversorgung mittels einer Empfängerbatterie mehr. Daher ist diese Batterie oder Akku 50 in der Regel nicht mehr nötig. Der Schalter 46 ist zumeist direkt am Fahrtregler 42 befestigt.
- Page 6 Stückl.-Nr. Bezeichnung Material Maße in mm Stück Bemerkungen Kupplungsschlauch Gummi Ø1xØ5x30 Abstützung für Stevenrohr 1 nach Plan aus Abfall Abstützung für Ruderlager Sperrholz 3 nach Plan Ruderlager Ø3,2 mm innen 1 Rohrniet Ruder mit Schaft MS./Ku. Fertigteil U-Scheibe Ø3,2 mm innen 1 O-Ring Gummi Ø3 mm innen...
- Page 9 Building instructions for the Katja R/C sports boat Specification: Length: 520 mm Beam: 180 mm Weight, ready to run: approx. 1100 g complete with R/C General notes on building the Katja The Ro-marinKatja sports boat can be built in a free-running version or for radio control. The extra parts needed for each version are shown in the tables below.
- Page 10 Notes on the wooden parts The few wooden parts which are required to built this model should be given two or three coats of sanding sealer before fitting. Rub down with fine sandpaper after each coat. Roughen up the gluing surfaces thoroughly, to ensure a firm bond. The hull Installation of the drive system (see drawing A) The gluing flange running round the trimmed hull 1 is filed and sanded until it is flat.
- Page 11 edge c facing upwards. Please refer to drawing A, section d-e and drawing C here. Using instant glue, stick edges f-f and g-g of the support flange 25 to the deck. The cabin floor 30 is extended by adding parts 28, 29, 31 and 32, as shown in the drawing E. Use instant glue for all joints here.
- Page 12 The free-running version Fitting the battery, and the final operations (see drawing G) See drawing G. Cut the four retaining strips 37b to length, so that they form an accurate frame round the torch battery 38; glue the strips in place. Cut off the plug from the motor lead, and remove about 8 mm of insulation.
- Page 13 Parts list no. Description Material Dimensions mm No. off Notes Boat stand base plate Plywood 4 mm laserpart Boat stand front support Plywood 4 mm laserpart Boat stand rear support Plywood 4 mm laserpart Hull Plastic 1 , vac. moulded 1 Motor Ready made Not included...
- Page 14 Parts list no. Description Material Dimensions mm No. off Notes Switch Ready made Not included R/C installation plate Plywood 3, as plan Not included Servo mount (R/C accessory) Plastic Ready made Not included Switching servo Ready made Not included Steering servo Ready made Not included Reversing switch...
- Page 15 NOTICE DE MONTAGE DU CANOT A MOTEUR KATJA Référence ro1020 Caractéristiques techniques Longueur 520 mm Largeur 180 mm Poids en ordre de marche avec radiocommande environ 1100 g Généralités Le canot à moteur Katja peut être utilisé aussi bien en navigation libre que radiocommandée. Le tableau suivant énonce les éléments nécessaires à...
- Page 16 Préparation des pièces thermoformées Les différents croquis présentent une partie hachurée sur les pièces thermoformées à découper selon les indications. Observez que les demi-dossiers 31 sont découpés dans l'arrière du pont 21, figure D. La pièce 25 est retirée directement du plancher de cabine 30. Ces diverses découpes sont à...
- Page 17 Le gouvernail doit alors se trouver dans une position correspondant à une course « droit devant » du bateau. Appuyez alors le safran par en-dessous et serrez la vis creuse. Le point (voir croquis D) Poncez les endroits à encoller sur le pont afin qu'ils viennent s'appuyer avec précision sur la coque.
- Page 18 Remarque : Le modèle est ainsi terminé. Il faut déterminer maintenant si vous allez l'utiliser en navigation libre ou radiocommandé. Pour la navigation libre, utiliser les pièces 37b-40, les pièces 41-52 sont inutiles. A l'inverse, en équipant le modèle avec un ensemble de radiocommande, les pièces 37b - 40 sont inutiles.
- Page 19 LISTE DES PIECES ET DES MATERIAUX N° Matériau Dimensions Nombre de pièces Désignation Matériau en mm de pièces Remarque Assise de berceau 4 mm pièce Laser Flanc avant 4 mm pièce Laser Flanc arrière 4 mm pièce Laser Coque 1, thermoformée Moteur terminé...
- Page 20 N° Matériau Dimensions Nombre de pièces Désignation Matériau en mm de pièces Remarque Pinces de connexion Métal terminé non contenu trombones Interrupteur terminé non contenu Platine RC 4 mm pièce Laser Support servo 4 mm pièce Laser Régulateur de vitesse terminé...
Need help?
Do you have a question about the Ro-marin Katja and is the answer not in the manual?
Questions and answers