Advertisement
Table of Contents
Библиотека СОК
INSTALLATION AND OPERATION MANUAL
MANUAL DE INSTALACIÓN Y FUNCIONAMIENTO
INSTALLATIONS- UND BETRIEBSHANDBUCH
MANUEL D'INSTALLATION ET DE
FUNCTIONNEMENT
MANUALE D'INSTALLAZIONE E D'USO
Do not perform installation work, without referring to our installation manual.
No realice la instalación de este equipo, sin antes consultar este manual de instalación.
Bei der Installation unbedingt die Hinweise in der Installationsanleitung beachten.
Consulter notre manuel avant de réaliser une quelconque installation.
Realizzare l'installazione, seguendo quanto indicato in questo manuale.
Nao inicie os trabalhos de montagem, sem consultar o nosso manual de montagem.
Udfor ikke installationsarbejder uden forst at donsultere vores vejledning.
Voer geen enkele handeling uit om de apparatuur alvorens deze hadleiding te hebben
doorgelezen.
Utför inte nagra installationsarbeten utan att först läsa var installationsmanual
Ìçí Þóåôå óôçí åãêáôÜóôáóç, ÷ùñßò ðñéí íá Ý÷åôå óõìâïõëåõèåß áõôo ôï åã÷åéñßäéï åãêáôÜóôáóçò
PSC-5S
MANUAL DE INSTALAÇÄO E DE
FUNCIONAMENTO
BRUGER- OG MONTERINGSVEJLEDNING
INSTALLATIE- EN BEDIENINGSHANDLEIDING
HANDBOK FÖR INSTALLATION OCH ANVÄNDING
ÅÃ×ÅÉÑÉÄÉÏÅÃÊÁÔÁÓÔÁÓÇÓÊÁÉËÅÉÔÏÕÑÃÉÁÓ
Advertisement
Table of Contents

Related Manuals for Hitachi PSC-5S


Summary of Contents for Hitachi PSC-5S
- Page 1 Библиотека СОК PSC-5S INSTALLATION AND OPERATION MANUAL MANUAL DE INSTALAÇÄO E DE MANUAL DE INSTALACIÓN Y FUNCIONAMIENTO FUNCIONAMENTO INSTALLATIONS- UND BETRIEBSHANDBUCH BRUGER- OG MONTERINGSVEJLEDNING MANUEL D’INSTALLATION ET DE INSTALLATIE- EN BEDIENINGSHANDLEIDING FUNCTIONNEMENT HANDBOK FÖR INSTALLATION OCH ANVÄNDING ÅÃ×ÅÉÑÉÄÉÏÅÃÊÁÔÁÓÔÁÓÇÓÊÁÉËÅÉÔÏÕÑÃÉÁÓ MANUALE D’INSTALLAZIONE E D’USO Do not perform installation work, without referring to our installation manual.
- Page 3 DANGER – Immediate hazard which WILL result in severe injury or death. PELIGRO – Peligros inmediatos que DARÁN como resultado graves lesiones o incluso la muerte. GEFAHR – Ernsthafte Gefahrenquelle, die zu schweren Verletzungen oder zum Tod führt. DANGER – Dangers instantanés de blessures personnelles sévères ou de mort. PERICOLO –...
- Page 4 120 mm...
-
Page 5: Safety Summary
WARNING: DO NOT perform installation work and electrical wiring connection by yourself. Contact your distributor or dealer of HITACHI and ask them for installation work and electrical wiring by service person. CAUTION: DO NOT install the indoor unit, outdoor unit, central station and cable at such places as;... -
Page 6: Installation Work
INSTALLATION WORK 2.3. INSTALLATION SPACE In case of installing the central stations in the vertical direction, keep a distance more than 50mm between the central stations vertically. If the distance is insufficient, the front cover of More than 50mm the central station can not open wide enough. -
Page 7: Electrical Wiring
ELECTRICAL WIRING ELECTRICAL WIRING 3.1. ELECTRICAL WIRING Up to 8 Central Stations can be connected to the H-LINK. Unit Outdoor Central Station To be connected to Terminal Terminal the terminal board Board Board of indoor unit or outdoor unit Power Supply H-LINK (AC 220V or To TB2 of... -
Page 8: Group Setting
GROUP SETTING GROUP SETTING In case that group setting is not performed, the indication of the central station is as shown below for checking indoor unit connection after turning ON the power supply. Completion of Connection Check In Case of Item 1 Below In Case of Item 2 Below Refrigerant Number of... - Page 9 GROUP SETTING Central Station Maste Master Master Slave Slave Master Without Remote Control Switch Refrigerant No. Setting Indoor Unit RSW Setting Group Number 4.2.1. GROUP SETTING PROCEDURE Changing to Group Setting Mode 1. Depress the “CHECK” switch for 3 seconds during the units of all groups are stopped. The central station is changed to the check mode and the “CHECK”...
- Page 10 GROUP SETTING “1” shows the master unit setting Ref. No. of Outdoor Unit To Be Set mode. (Can be changed by depressing the “∇” (TEMP) switch.) When the “SET” indication appears, the indicated indoor unit is set as the master unit. (When “SET”...
- Page 11 GROUP SETTING 2. Selection of Indoor Unit To Be Set: Change Ref. No. by depressing “∇” (TEMP) switch and I.U. Add. by “∆” (TEMP) switch, and select the indoor unit to be set. The indication is changed in order as shown below. •••...
- Page 12 GROUP SETTING Setting of Slave Unit Indication of Slave Unit Setting Mode When the central station is changed to the slave unit setting mode, the LCD indication on the central station is as shown below. The indication of the group to be set is flickered. The Ref. No.
- Page 13 GROUP SETTING 2. Selection of Indoor Unit To Be Set Change Ref. No. by depressing “∇ ” (TEMP) switch and I.U. Add. by “∆ ” (TEMP) switch, and select the indoor unit to be set. The indication is changed in order as shown below. •••...
- Page 14 INPUT/OUTPUT FUNCTION CAUTION: - Up to 15 slave units can be set in one group (Max. 16 units (including the master unit) in one group). - For changing the setting of slave unit to another group, cancel the present slave unit setting and perform the setting for another group.
-
Page 15: Input/Output Function
INPUT/OUTPUT FUNCTION 2. Changing to Demand Setting Mode Depress the “CHECK” switch and change the 7-segment indication for check to “5” (Demand Setting Mode). The LCD indication of the central station is as shown below. Ref. No. of Indoor Unit Set as Master Unit of Group To Be Set “5”... -
Page 16: Option Setting
OPTION SETTING OPTION SETTING 6.1. CHANGING TO OPTION SETTING MODE Changing to Option Setting Mode 1. Depress the “CHECK” switch for more than 3 seconds while all the groups are stopped. The central station is changed to the option setting mode and the “CHECK” indication appears, and “1”... - Page 17 INITIALIZATION OF CENTRAL STATION Setting Procedure 1. Depress the “CHECK” switch and select the setting item A – E. 2. Select the group to be set by depressing the “GROUP” switch. 3. Depress the “RUN/STOP” switch, the option setting is done. At that time, the “ ” indication appears and the “SET”...
- Page 18 Indoor Unit Address RSW of Indoor 9 A B C D E F Unit Indication 9 10 11 12 13 14 15 of PSC-5S Fill the group number (1-16) in the above table. Circle the unit number of the master unit.
-
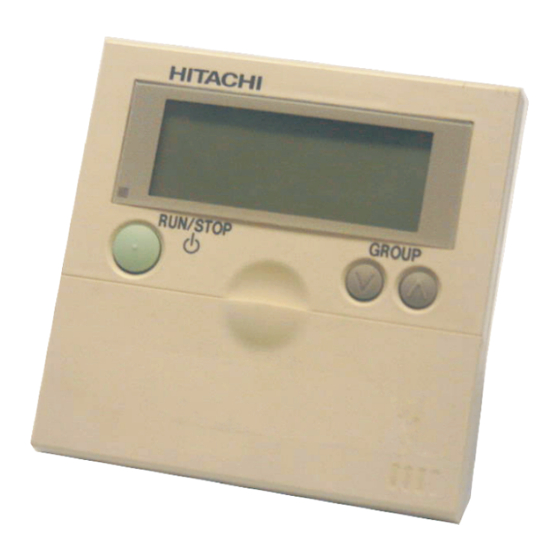
Page 19: Switch Names And Functions
SWITCH NAMES AND FUNCTIONS SWITCH NAMES AND FUNCTIONS Liquid Crystal Display Section The figure below shows all the indications for reference.The actual display during operation is different. Indication of Indication of Indication of Indication of Demand Control Group Number Timer Setting temperature (Page 21) (Page 16) - Page 20 OPERATION PROCEDURE OPERATION PROCEDURE Group Selection and Monitoring Unit Operation Status The central station can control up to 16 groups by each group or simultaneously. (The selected groups can be operated and the unit operation status of the groups can be monitored.) NOTE: The group number is changed by depressing the “GROUP”...
-
Page 21: Operation Procedure
In case of the same setting for all groups, select the group number of “AA”. Some operation modes can not be set according to the unit model. Contact to HITACHI dealer or your distributor for details. - Page 22 OPERATION PROCEDURE <FAN SPEED> Depress the “FAN SPEED” switch. By depressing the “FAN SPEED” switch, the indication is changed in the following order; HIGH The above figure shows the case of setting “HIGH” fan speed. NOTE: - In case of dry operation, the fan speed is automatically changed and fixed at the “LOW” fan speed.
- Page 23 OPERATION PROCEDURE ATTENTION: The louver angle is automatically changed during heating operation for unit control. When heating operation is When the discharged air started The louver angle temperature is increased over When dry operation is is automatically 30°C, the louver angle started changed.
- Page 24 OPERATION PROCEDURE Prohibiting Operation by Remote Control Switch <Function> To prohibit the operation by the remote control switch. When this function is available, the “CENTRAL” indication appears on the LCD on the remote control switch and the operation by the remote control switch is not available. 1.
- Page 25 The “EMERGENCY” is indicated when the emergency stop signal is input by the outside input function. During the emergency stoppage, indoor units are stopped and the operation by the remote control switch is not available. Contact your distributor or dealer of HITACHI for details.
- Page 26 The indication is indicated for the group with demand setting and the “DEMAND” indication flickers when the demand signal is input. In Case of Demand Setting Contact your distributor or dealer of HITACHI for details. Flickers In Case of Demand Signal Input <FILTER>...
Need help?
Do you have a question about the PSC-5S and is the answer not in the manual?
Questions and answers