Table of Contents
Advertisement
Quick Links
Advertisement
Table of Contents

Subscribe to Our Youtube Channel
Related Manuals for Bartscher Panini 1RDIG


Summary of Contents for Bartscher Panini 1RDIG
- Page 1 “Panini“ 1RDIG A150684 Original-Bedienungsanleitung V1/0917...
-
Page 3: Table Of Contents
GB/UK ENGLISH Table of contents Safety ....................... 20 1.1. Warning symbols explanation ..............20 1.2. Safety instructions ..................21 1.3. Use as intended ................... 24 1.4. Use against the intended purpose ............... 24 General information ..................25 2.1. Manufacturer Liability and Warranties ............25 2.2. -
Page 4: Safety
Read these instruction manual before using and keep it available at all times! This instruction manual contains information about the installation, operation and maintenance of the device and should be consulted as an important source of information and reference guide. The knowledge of all the operational and safety instructions included in this manual is the pre-condition for the safe and proper dealing with the device. -
Page 5: Safety Instructions
NOTE The symbol INFORMATION present The warning symbol NOTE warns information and guidelines to the user against material damage. about the use of the device. 1.2. Safety instructions Risk of fatal electric shock! Too a high mains voltage or incorrect installations may cause electric shock. ... - Page 6 Risk to life due to lack of experience and knowledge! Keep children away from the device and power supply cable. Store the device out of the reach of children. Do not leave the device unattended in the presence of children. ...
- Page 7 Risk of damage due to improper operation! Incorrect handling may cause damage to the device. Never expose the device to high temperature (a cooker, etc.) or weather conditions (rain, etc.). Do not use the device or place on a hot surface, e. g. on a cooktop or near open fire. ...
-
Page 8: Use As Intended
1.3. Use as intended Every use of the device for a different purpose and/or in a way that diverges from the intended use is not allowed and is assumed as the use against the intended purpose. Any claims against the manufacturer or their authorized representatives as a consequence of experiencing damage resulting from the use against the intended purpose are inadmissible. -
Page 9: General Information
2. General information 2.1. Manufacturer Liability and Warranties All the information and instructions in this manual take into account standard safety regulations, current levels of technical engineering as well as the expertise and experience we have developed over the years. If the order consists of a special model or includes additional options, the actual scope of delivery may differ from the descriptions and illustrations in this manual. -
Page 10: Transport, Packaging And Storage
3. Transport, packaging and storage 3.1. Delivery check Check the delivery upon completeness and transport damage immediately after receipt. In case of visible transport damage refuse to accept the receipt or conditionally accept the receipt. Note the scope of damage on the transport documents/consignment list of the shipping company and place a complain. -
Page 11: Technical Data
4. Technical data 4.1. Technical specification Contact grill “Panini” 1RDIG Name A150684 Art. no.: Body: stainless steel, grill plates: cast iron Material: Number of grill units: 1 Temperature control: via a thermostat ON/OFF switch Realization: Indicator light: heating indicator, ON/OFF ... -
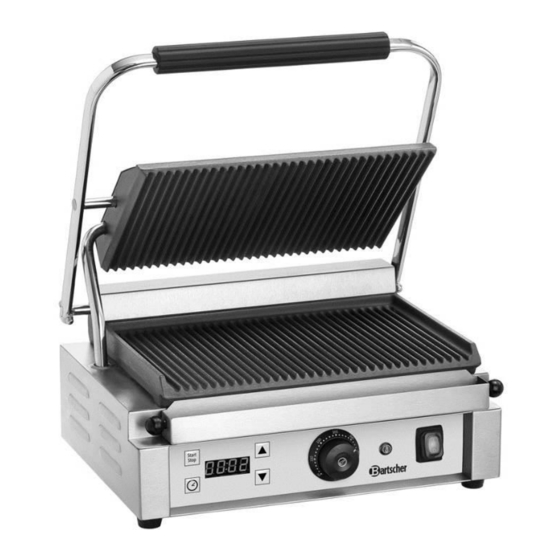
Page 12: List Of Components
4.2. List of components 1 ON/OFF switch with integrated 9 Lower grill plate indicator light (green) 10 Cable guide 2 Heat up indicator (orange) 11 Upper grill plate 3 Temperature controller knob 12 Upper casing 4 Up/Down buttons 13 Operating handle 5 Digital display 14 Power cable 6 Timer button... -
Page 13: Installation And Operation
5. Installation and operation 5.1. Installation 5.1.1. Location Remove the device from the packaging and discard all the packing materials. Never remove the rating plate or any warning signs from the device. The installation place must be easily accessible and sufficiently spacious to allow easy operation of the device and good air circulation. -
Page 14: Operation
5.2. Operation 5.2.1. Before the first use NOTE Incorrect use may cause damage. Use the device only with the grease collection tray attached to it to prevent the device damage or soiling. The grease colletion tray (9), where the dripping fat and other liquids from the grill are collected, is located at the front of the lower grill plate. -
Page 15: Grilling
8. Turn the temperature controller knob (3) clockwise to the highest level. 9. Heat up the device for 20 minutes. Switch off the device after 20 minutes: 10. Turn the temperature controller knob (3) anti-clockwise to its 0 position. 11. Set the ON/OFF switch (1) to O to switch off the device. 12. -
Page 16: Programs
The heating time is approximately 20 minutes to reach 250 °C. When the required temperature has been reached the orange heating indicator light (2) is off. When the temperature falls down by approx. 10 °C, the heating is turned on again and the orange heating control light (2) comes on. -
Page 17: Cleaning And Maintenance
3. Set required time in the range from 1 second to 99:59 minutes. 4. Press the Start/Stop button (7) to switch on the timer. 5. Press the Start/Stop button (7) to switch off the timer. After the set time has expired the acoustic signal sounds and the display shows End1. End1 means the end of program 1. -
Page 18: Cleaning The Grease Collection Tray
9. Carefully remove coarse soiling by the supplied brush (17). 10. Empty and clean the grease collection tray (8). 11. After cleaning, dry and polish the surface (12, 15) with a dry, soft cloth. 12. Make sure that the device has been properly cleaned before leaving it in a dry place. 6.2. -
Page 19: Possible Defects
Possible defects In case of malfunction immediately disconnect the device from the power supply (unplug). Before contacting the customer service department or vendor check the troubleshooting table below. Problem Possible reason Solution The temperature Contact the vendor. controller knob is damaged. -
Page 20: Disposal
Electric devices should be used and disposed of properly to prevent the impact on the environment. Disconnect the device from the power supply and remove the power cord from the device with the use of diagonal pliers. Bartscher GmbH Franz-Kleine-Str. 28 33154 Salzkotten Tel.: +49 (0) 5258 971-0 Germany...
Need help?
Do you have a question about the Panini 1RDIG and is the answer not in the manual?
Questions and answers