Table of Contents
Advertisement
Quick Links
• it
- Manuale d'installazione ed uso
• GB
- installation and oPeRatinG instRuCtions
• DE
- installations und BetRieBsanleitunG
• FR
- instRuCtions d'installation et d'eMPloi
• ES
- Manual de instalaCión y funCionaMiento
HI LITE / HI TOUCH
SALAMANDRE ELETTRICHE
ELECTRIC SALAMANDERS
ELEKTRISCHE SALAMANDER
SALAMANDRES
SALAMANDRAS ELÉCTRICAS
SH20D / 101552
SH31D / 101546
SH40D / 101554
SFH31D / 101548
ST30D / 101547
ELECTRIQUES
Rev. 10-2014
Advertisement
Table of Contents

Subscribe to Our Youtube Channel
Related Manuals for Bartscher 101552


Summary of Contents for Bartscher 101552
- Page 1 - instRuCtions d’installation et d’eMPloi • ES - Manual de instalaCión y funCionaMiento HI LITE / HI TOUCH SALAMANDRE ELETTRICHE ELECTRIC SALAMANDERS ELEKTRISCHE SALAMANDER SALAMANDRES ELECTRIQUES SALAMANDRAS ELÉCTRICAS SH20D / 101552 SH31D / 101546 SH40D / 101554 SFH31D / 101548 ST30D / 101547...
-
Page 2: Table Of Contents
THE MANUFACTURER DECLINES ALL RESPONSIBILITY FOR DAMAGE DUE TO INCORRECT INSTALLATION INSTALLATION, TAMPERING, IMPROPER USE, FAULTY MAINTENANCE, FAILURE TO OBSERVE THE CURRENT REGULATIONS AND INCOMPETENCE. IMPORTANT INFORMATION THE MANUFACTURER RESERVES THE RIGHT TO MODIFY WITHOUT NOTICE THE Read this handbook through carefully as it provides important information about safely APPLIANCE CHARACTERISTICS DESCRIBED IN THIS HANDBOOK. -
Page 3: Connecting To The Mains
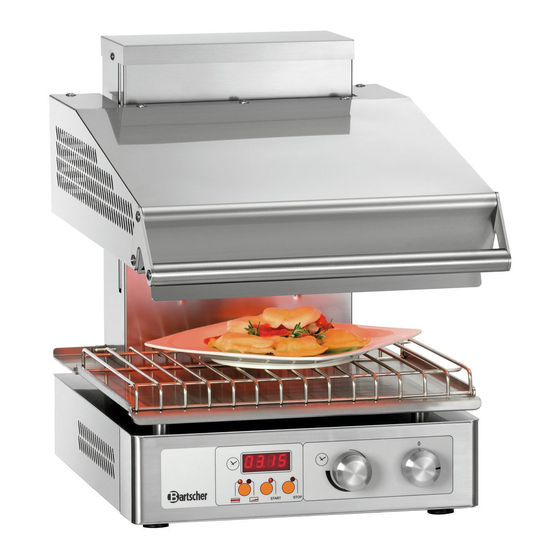
Do not obstruct the aspiration or heat vents. INSTRUCTIONS FOR HI-LITE MODELS fig.2 if you put the unit on a table, leave at least 50 the unit should only be used for the designated purpose. any other use is improper. do mm between the back of the unit and the rear wall not leave appliance unattended when in use. (fig. 2). To wall mount the salamander use the wall- mounting brackets and screws and inserts suitable for the type of wall and unit weight. -
Page 4: Starting
In the version with 4 heating elements, if light (2) is on, the two central resistances go HOLD mode: on and off at regular intervals during cooking. movement of the salamander must be at maximum height This system for switching on and off central resistances guarantees even heat above hob level (fig. 6). distribution over the entire appliance surface. Thanks to the side heating elements turning on and off, the food on the tray will •... -
Page 5: Setting
SWITCHING OFF: INSTRUCTIONS FOR HI TOUCH MODELS • The cooking cycle stops automatically giving an acoustic signal when the set time (fitted with plate) is finished. If no time has been set, the system stays in the START mode until the tray is taken off the hob or button (3) is pressed causing the corresponding STOP the unit should only be used for the designated purpose. any other use is improper. do led to come on. not leave appliance unattended when in use. • turn knob (6) to position 0. • Switch off the switch upstream of the salamander. -
Page 6: User Interface
USER INTERFACE AUTOMATIC MODE Switch on the salamander by pressing the ON/OFF button select the desired program by pressing the P1 or P2 or P3 button Press staRt or place the plate on the plate detection device as in the manual mode. SETTING A PROGRAM On/off button; when the appliance is switched off all the functions are Switch on the appliance by pressing the ON/OFF button switched off as well. -
Page 7: Technical Chart
TABELLA TECNICA SH2.. TECHNICAL CHART TECHNISCHE DATEN FICHE TECHNIQUE FICHA TÉCNICA Codice Potenza kW alimentazione sezione del cavo Code Power kW Power supplay Cable section Code leistung kW stromversorgung Kabelquerschnitt Code Puissance kW tension Section du câble Código Potencia kW alimentación sección del cable 3x2.5 1N 230V AC 50 Hz SH3..3N 400V AC 50 Hz 5x1.5 1N 230V AC 50 Hz 3x2.5 SHF3.. - Page 8 SH4... SH31 SHF31...
- Page 9 SHP3.. SHP4...
- Page 10 ST3... ST4...
- Page 11 SH3...
Need help?
Do you have a question about the 101552 and is the answer not in the manual?
Questions and answers