Liberty Pumps Omnivore LSG202-RE Installation Manual
Grinder pump retrofit unit
Hide thumbs
Also See for Omnivore LSG202-RE:
- Installation manual (11 pages) ,
- Installation manual (8 pages)
Advertisement
Quick Links
Installation Manual
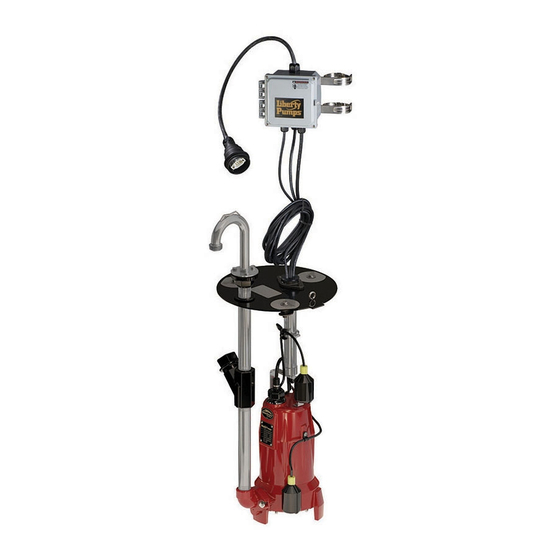
Omnivore Grinder Pump Retrofit Unit
FOR E-ONE* GP200, GP2000 AND EXTREME SERIES
Models to replace GP200 and GP2000:
LSG202-RE
LSGX202-RE
Models to replace the Extreme:
LSG202-REX
LSGX202-REX
*Do not throw away or lose this manual.
installation and refer to it often.
* E-One is a registered Trademark of Environment One Corporation and is not affiliated with Liberty Pumps.
7000 Apple Tree Avenue
Bergen, NY 14416
Phone: (800) 543-2550
Fax: (585) 494-1839
www.libertypumps.com
2Hp, 208/230V, 1 phase, Automatic
2Hp, 208-230V, 1 phase, Automatic
2Hp, 208/230V, 1 phase, Automatic
2Hp, 208-230V, 1 phase, Automatic
©Copyright 2010 Liberty Pumps Inc. All rights reserved
Keep it with the
IMPORTANT:
Prior to installation, record Model, Serial
Number, and Code Number from pump
nameplate for future reference.
MODEL _____________________
SERIAL _____________________
CODE
_____________________
INSTALLATION
DATE
_____________________
5672000E
- 1 -
Advertisement

Subscribe to Our Youtube Channel
Related Manuals for Liberty Pumps Omnivore LSG202-RE


Summary of Contents for Liberty Pumps Omnivore LSG202-RE
- Page 1 *Do not throw away or lose this manual. Keep it with the installation and refer to it often. * E-One is a registered Trademark of Environment One Corporation and is not affiliated with Liberty Pumps. IMPORTANT: Prior to installation, record Model, Serial Number, and Code Number from pump nameplate for future reference.
-
Page 2: Table Of Contents
TABLE OF CONTENTS SECTION GENERAL INFORMATION------------------------------------------------------------------------------ 3 SECTION INTRODUCTION-------------------------------------------------------------------------------------------- 4 SECTION INSTALLATION ------------------------------------------------------------------------------------------- 4-6 SECTION OPERATION -------------------------------------------------------------------------------------------------7 TROUBLESHOOTING CHART ------------------------------------------------------------------------ 9 PANEL INSTALLATION SHEET----------------------------------------------------------------------- 10 SECTION WARRANTY INFORMATION--------------------------------------------------------------------------- 11 ©Copyright 2010 Liberty Pumps Inc. All rights reserved - 2 -... -
Page 3: Section 1 General Information
If pump is installed during construction before power is available, it must be protected from the environment to prevent water from entering through the cord plug end, etc. ©Copyright 2010 Liberty Pumps Inc. All rights reserved - 3 -... -
Page 4: Section 2 Introduction
STORAGE BEFORE USE Liberty pumps are shipped from the factory ready for installation and use. They should be held in storage if the pump station is not complete. If storage is necessary, the pump should remain in its shipping container. It should be stored in a warehouse or storage shed that has a clean, dry temperature-stable area where the pump and its container should be covered to protect it from water, dirt, dust, etc. - Page 5 USE THE LIFTING CHAIN OR CABLE ONLY OLD PUMP REMOVAL The supply power must be turned off. Liberty Pumps recommends the use of a 30 amp circuit breaker. Check the electrical panel and replace if necessary. Locate the riser and remove basin lid from current unit.
- Page 6 10. Once testing is complete, replace the basin lid and lock if applicable. 11. Affix the second nameplate to the control box or panel so the unit can be identified. Note: Please leave this manual with the equipment owner. ©Copyright 2010 Liberty Pumps Inc. All rights reserved - 6 -...
-
Page 7: Section 4 Operation
PERIODIC MAINTENANCE & LUBRICATION Liberty pumps are designed for long lasting, efficient and reliable service with a minimum of preventive maintenance checks. These checks are few but will add years of satisfactory service to the life of the pump. Maintenance checks should be performed at the intervals stated. - Page 8 Consult 1-1/2" PIPE factory for proper pump sizing. 64.9 1-800-543-2550 60.6 56.3 2" PIPE 51.9 47.6 LSGX-SERIES 43.3 39.0 34.6 LSG-SERIES 30.3 26.0 21.6 17.3 13.0 FlOW (GPM) ©Copyright 2010 Liberty Pumps Inc. All rights reserved - 8 -...
-
Page 9: Troubleshooting Chart
B. Damaged O-Ring between oil B. Replace O-Ring chamber and motor plate C. Damaged cable C. Replace cable IF SYMPTOMS CONTINUE, CONSULT THE LIBERTY PUMPS PRODUCT SERVICE DEPT. ©Copyright 2010 Liberty Pumps Inc. All rights reserved - 9 -... -
Page 10: Panel Installation Sheet
ILLUSTRATION 2 CONTROL PANEL INSTALLATION ©Copyright 2010 Liberty Pumps Inc. All rights reserved - 10... - Page 11 Liberty Pumps, Inc. shall not be liable for any loss, damage or expenses resulting from installation or use of its products, or for consequential damages, including costs of removal, reinstallation or transportation.
Need help?
Do you have a question about the Omnivore LSG202-RE and is the answer not in the manual?
Questions and answers