Table of Contents
Advertisement
Quick Links
Advertisement
Table of Contents

Related Manuals for Koden CVR-010


Summary of Contents for Koden CVR-010
- Page 3 Koden Electronics Co., Ltd. The technical descriptions contained in this publication are subject to change without notice. Koden assumes no responsibility for any errors, incidentals or consequential damages caused by misinterpretation of the descriptions contained in this publication.
- Page 4 - This page intentionally left blank.-...
- Page 5 CVR–010 GENERAL SAFETY WARNINGS General Safety Warnings – (1) THE REAR–PANEL TRANSDUCER CONNECTOR RECEPTACLE IS EMITTING EXTREMELY HIGH VOLTAGE RADIO–FREQUENCY PULSES WHEN THE EQUIPMENT IS TURNED ON. THE CONNECTOR IS NORMALLY COVERED WITH A SCREW–LOCKED PROTECTIVE RUBBER CAP WHEN THE EQUIPMENT IS INITIALLY DELIVERED.
- Page 6 CVR–010 GENERAL SAFETY WARNINGS General Safety Warnings – (5) WITH A TRANSDUCER DRAFT ENTERED, THE ON–SCREEN DIGITAL READOUT SHOWS THE DEPTH FROM THE WATERLINE AND NOT FROM THE TRANSDUCER FACE OR FROM THE SHIP’S KEEL. GREAT CARE SHOULD, THEREFORE, BE TAKEN IN USING THE DEPTH READOUT WHEN NAVIGATING SHALLOW WATER AREAS.
-
Page 7: Table Of Contents
CVR–010 List of Contents List of Contents Page List of Figures and Tables........................1 List of Abbreviations ..........................3 Password–Protecting the Menu Settings ....................5 3.1. Introduction ............................5 3.2. Setting a Password ........................5 3.3. Changing or Removing the Password ....................6 Standard Components and Parts Supplied...................7 Product Description ..........................8 Specifications............................10 6.1. - Page 8 CVR–010 List of Contents List of Contents (2/3) 8.4. Echo Threshold Adjustment......................45 8.4.1. Introduction 8.4.2. Adjusting Echo Threshold Level 8.5. Reducing Noise Interference ......................46 8.6. White Line Adjustment........................46 8.6.1. Introduction 8.6.2. Adjusting White–Line Level 8.7. Selecting Time Passage Scales ....................48 8.8.
- Page 9 CVR–010 List of Contents List of Contents (3/3) 11. User–Level Trouble Shooting ......................71 11.1. Introduction ..........................71 11.2. Depth Readout ..........................71 11.3. Automatic Range Selection ......................72 11.4. Bottom Echo Appearance......................72 11.5. Alarms ............................73 11.6. Soundings Data History Window ....................73 11.7. Settings through Menu System ....................74 11.8.
- Page 10 - This page intentionally left blank.-...
-
Page 11: List Of Figures And Tables
CVR–010 List of Figures and Tables 1. List of Figures and Tables Figure No. Description Page Figure 3-1 Password Entry Window............................ 5 Figure 3-2 Entering Password............................. 5 Figure 3-3 Password Initialization Window ......................... 6 Figure 3-4 Changing / Removing Password – 1/2 ....................... 6 Figure 3-5 Changing / Removing Password –... - Page 12 CVR–010 List of Figures and Tables 1. List of Figures and Tables (continued – 2/2) Figure No. Description Page Figure 8-28 Accessing TRANSDUCER SETTINGS Submenu ..................58 Figure 8-29 Indication of Relative Transducer Sites ......................58 Figure 8-30 Registering Transducer Site and On–Screen Indication................58 Figure 8-31 Keel Offset –...
-
Page 13: List Of Abbreviations
CVR–010 List of Abbreviations 2. List of Abbreviations The abbreviations used in this manual and menus, on the echogram screen, control panel and rear panel are listed below. ABS: Acrylonitrile Butadiene Styrene (thermoplastic polymer material) ACK: Acknowledgement (header of IEC 61162–1 Ed. 4 command sentence) ACN: Acknowledgem (head... - Page 14 CVR–010 List of Abbreviations List of Abbreviations (continued – 2/2) KL : Keel offset (depth from transducer to keel) KT, KTS: knot(s) LAT / LON : Latitude/Longitude coordinates LCD : Liquid Crystal Display LED: Light–Emitting Diode Line Feed code (cursor control code in software programming) LST: Local Standard Time meters...
-
Page 15: Password-Protecting The Menu Settings
CVR–010 Password Protecting the Menu Settings 3. Password–Protecting the Menu Settings 3.1. Introduction ・ To prevent an unauthorized change in menu settings you have made, a 4–digit user– definable password can be set. ・ Once a password is set, every time you press to check or change some settings, a password entry window will pop up, asking you to enter the password before you can open the MAIN MENU. -
Page 16: Changing Or Removing The Password
CVR–010 Password Protecting the Menu Settings Password–Protecting the Menu Settings (continued – 2/2) 3.3. Changing or Removing the Password ・ If you wish to change the current password or remove the password to allow free access to the menu system, execute the following steps: Figure 3-3 Password Initialization Window (1) Display a password initialization MENU OLD PASSWORD... -
Page 17: Standard Components And Parts Supplied
CVR–010 Standard Components and Parts Supplied 4. Standard Components and Parts Supplied ・ The following components and parts are initially supplied as standard for each unit of the CVR–010 echo sounder, unless otherwise prearranged under a separate agreement with your dealer or the manufacturer. ・... -
Page 18: Product Description
CVR–010 Product Description 5. Product Description ・ The Model CVR–010 is a single–frequency navigation echo sounder designed to comply fully with IMO Resolution MSC.74( 69) Annex 4, and is type–approved by BSH on the basis of compliance with DIN EN ISO 9875 and relevant IEC requirements for wheel mark certification. - Page 19 CVR–010 Product Description 5. Product Description (continued – 2/2) ・ The built–in alarms include depth alarm, bottom–missing alarm , power failure/ low voltage alarm and power removal/shutoff alarm. ・ The depth alarm alerts the operator to decreasing depth (shallow alarm) . A variable depth marker can be turned on to set the alarm depth graphically as well as digitally.
-
Page 20: Specifications
CVR–010 Specifications 6. Specifications 6.1. General Specifications Display Screen: 5.7 inch 7–analog RGB-color LED–backlit TFT–LCD, QVGA resolution, with backlighting level adjustable in 10 steps - The LCD module complies with IEC 62288 (Ed.2.0, 2014) standard. Data Storage: Up to 12 hours of soundings data, depth range, associated UTC date/time and LAT/LON readouts are automatically retained in flash memory protected from power shutoff or... - Page 21 CVR–010 Specifications Echo Sounder Specifications 6.2. (continued – 2/4) Transducer Frequencies (and BSH–Approved Matched Transducers) ・ 50 kHz (TOKIN TGM60–50–20L) ・ 200 kHz (TOKIN TGM80–200–20L) Transmit Power: Approx. 600W max. Transmit Pulse Lengths ( in milliseconds ): ・ Meters (m) : 0.14 ・...
- Page 22 CVR–010 Specifications 6.2. Echo Sounder Specifications (continued – 3/4) Audible and Visual Alarms The following alarms are available and enabled at all times, except for the bottom–missing alarm: Depth: Warns against decreasing depth, with alarm triggering depth ● user–presettable in 0.1–meter steps. - Alert ID: 230/IEC 61162–1 Ed.
- Page 23 CVR–010 Specifications 6.2. Echo Sounder Specifications (continued – 4/4) External I/O Interface Specifications (2/2) Stored Data Output: IEC 61162 – 1/ NMEA–0183–compatible proprietary format ● via rear–panel RS–422–A/B and I/O serial interface ($PJMCN ports simultaneously Data Inputs: IEC 61162–1/NMEA–0183 format data sentences ●...
-
Page 24: Basic Operating Instructions
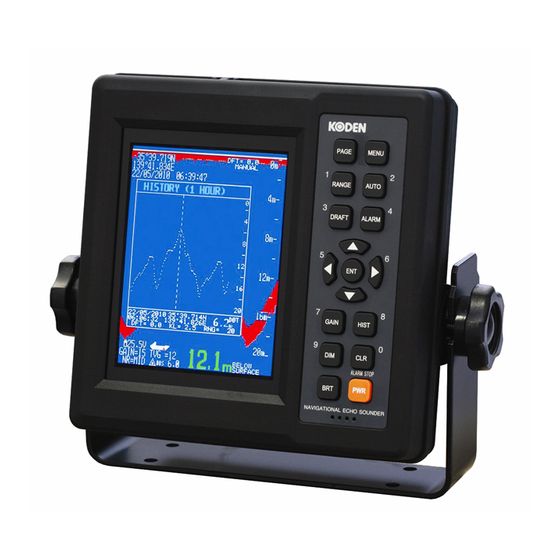
CVR–010 Basic Operating Instructions 7. Basic Operating Instructions 7.1. Interpreting Navigation Sounder Screen ・ The figure below illustrates a typical operating display showing a full–color bottom topography. ・ A brief description of on–screen readouts and objects is given in the following pages. Figure 7-1 Typical Full–Screen Full–Color Echogram Display ⑨... - Page 25 CVR–010 Basic Operating Instructions 7.1. Interpreting Navigation Sounder Screen (continued – 2/5) ① Bottom Echo ・ The bottom echo is shown in up to a total of seven different colors, depending on the strength. ・ The colors used to display the echoes are shown on the color scale ( ② ) in order of strength.
- Page 26 CVR–010 Basic Operating Instructions 7.1. Interpreting Navigation Sounder Screen (continued – 3/5) ③ Depth Readout (2/2) ・ If you are operating the unit in the manual control mode ( MANUAL, ④ ) , adjust the appropriate gain control accordingly. ・ The TVG level may also have to be adjusted to prevent surface clutters from disturbing depth reading.
- Page 27 CVR–010 Basic Operating Instructions 7.1. Interpreting Navigation Sounder Screen (continued – 4/5) ⑨ One–Minute Time Calibrations Figure 7-4 One Minute Time Calibrations – ・ These graduations are displayed at one–minute intervals, allowing you to check the time passage to 1 minute across a 1 minute given segment of the echogram.
- Page 28 CVR–010 Basic Operating Instructions 7.1. Interpreting Navigation Sounder Screen (continued – 5/5) ⑭ Gain and TVG Levels, GAIN=XX, TVG=XX ・ The receiver gain and TVG levels currently in use are indicated. ・ When the equipment is working in the automatic control (AUTO) mode, both indications read “AT .”...
-
Page 29: Control Panel Functions
CVR–010 Basic Operating Instructions Control Panel Functions 7.2. ・ The figure below shows the control panel of the equipment. A summary description of the functions the keys and controls provide is given below and on the following pages. Figure 7-6 Control Panel ⑩... - Page 30 CVR–010 Basic Operating Instructions 7.2. Control Panel Functions (continued – 2/7) ② Depth Range Key Figure 7-7 Indication of Activating Range Selection Function – Example ・ Pressing this key activates the function of depth range selection, highlighting the lower range limit calibration, like the example at right.
- Page 31 CVR–010 Basic Operating Instructions 7.2. Control Panel Functions (continued – 3/7) ⑤ Left Key ・ On normal echogram screen, pressing this key will result in an operational error, causing the unit to beep three times in quick succession. ・ When a menu is being opened, this key acts as numeric key “5” to enter value 5 or to select menu option 5.
- Page 32 CVR–010 Basic Operating Instructions 7.2. Control Panel Functions (continued – 4/7) ⑧ Dimmer Key ・ Pressing this key changes the backlighting level of the keypad in a total of 6 steps. After the lowest level is reached, further keypress returns you to the highest level. ・...
- Page 33 CVR–010 Basic Operating Instructions 7.2. Control Panel Functions (continued – 5 / 7) ⑪ Auto / Manual Control Mode Key ・ Pressing this key selects two control modes: AUTO and MANUAL. ・ The equipment is initially placed in the AUTO mode, selecting depth ranges and adjusting receiver gain and TVG levels automatically so that the bottom echo is always displayed in the lower half of the screen.
- Page 34 CVR–010 Basic Operating Instructions 7.2. Control Panel Functions (continued – 6/7) ⑫ Alarm/VRM Key Figure 7-12 Variable Range Marker – Example ・ Pressing the key once turns on the VRM (variable range marker) , a horizontal dotted line with its current position readout, as in the example at right.
- Page 35 CVR–010 Basic Operating Instructions 7.2. Control Panel Functions (continued – 7/7) ⑮ Soundings History Key Figure 7-13 Soundings History Window – Example PLAYBACK (12 HOURS) ・ Pressing this opens soundings history (HISTORY) window in the left half screen, as in the example at right, in which the history of depth soundings over the past 12 hours is shown graphically.
-
Page 36: Selecting Depth Ranges
CVR–010 Basic Operating Instructions 7.3. Selecting Depth Ranges 7.3.1. Manual Selection ・ A total of eight depth ranges are available in meters (m) , fathoms (FM) or feet (FT) , as illustrated below, and are automatically selected to display the bottom echo and read depth when the unit is working in the automatic control (AUTO) mode. -
Page 37: Automatic Selection (Automatic Mode Of Operation)
CVR–010 Basic Operating Instructions 7.3.2. Automatic Selection (Automatic Mode of Operation) ・ The equipment is initially in the automatic control (AUTO) mode, selecting depth ranges, adjusting the receiver gain and TVG levels (shallow gain suppression level) – all automatically. ・ The bottom echo will remain displayed in the lower half screen area regardless of changes in depth. -
Page 38: Interpreting Echo Display
CVR–010 Basic Operating Instructions 7.4. Interpreting Echo Display 7.4.1. Bottom Echo in Full Colors ・ The equipment normally shows only the strongest part of the bottom echo in a single color (initially red) . ・ Echoes including the bottom reflection can however be displayed in up to a total of seven different colors –... -
Page 39: Multiple Bottom Echoes
CVR–010 Basic Operating Instructions 7.4.2. Multiple Bottom Echoes ・ When navigating a shallow water area, you may observe a bottom–like echo at twice the present depth, and sometimes also at three or four times the depth. ・ This multiple echo phenomenon occurs when the first echo is reflected back and forth a number of times between the water surface and the bottom like reverberations. -
Page 40: Other Echoes
CVR–010 Basic Operating Instructions 7.4.3. Other Echoes ・ When the echo display is set to show echoes in full colors, the equipment will show echoes from fish schools, temperature layers, and surface clutters (various tiny objects , in addition to the bottom echo. near the surface, like plankton concentrations and air bubbles) ・... -
Page 41: Adjusting Receiver Gain Level Manually
CVR–010 Basic Operating Instructions 7.5. Adjusting Receiver Gain Level Manually ・ The appropriate receiver gain level is automatically maintained while the unit is operating in the automatic control (AUTO) mode. ・ In situations where greater gain is required for stable depth reading operation, use the following steps: ... - Page 42 CVR–010 Basic Operating Instructions 7.6. Adjusting TVG Level Manually (continued – 2/2) < CAUTION > With the TVG set at its maximum level during shallow depth operation, extremely weak bottom echo may result, triggering the bottom–missing alarm. Figure 7-23 Parameter Indication for Manual TVG Adjustment – Example ...
-
Page 43: Retrieving Soundings Data History
CVR–010 Basic Operating Instructions 7.7. Retrieving Soundings Data History 7.7.1. Introduction ・ The equipment automatically stores depth, UTC date and time, maximum depth range used, and position data for a 12–hour period at intervals of two seconds. ・ The following instructions enable the user to retrieve such data via an on–screen graphical user interface called the “HISTORY”... -
Page 44: Retrieving Data Registered At Specific Date/Time
CVR–010 Basic Operating Instructions 7.7.3. Retrieving Data Registered at Specific Date/Time ・ An example soundings data history window is illustrated below where the vertical axis represents the depth scale and the horizontal axis, the time passage. ・ The history of soundings over the past 12 hours is displayed graphically, while the rest of the data stored at the line cursor position are digitally shown at the bottom of the window, as in the example. -
Page 45: Reviewing Detailed Soundings Data History Via Log Window
CVR–010 Basic Operating Instructions 7.7.3. Retrieving Data Registered at Specific Date/Time (continued – 2/2) ・ On a large time scale, such as 12 hours, the line cursor moves in large steps, such as approx. 5 minute steps on the 12–hour scale or 2 min.24 sec. steps on the 6–hour scale, making it difficult to review the soundings history over a 15–minute segment of a specific point in time. -
Page 46: Alarms
CVR–010 Basic Operating Instructions 7.8. Alarms 7.8.1. Introduction ・ To comply with the alarm requirements stipulated in the IMO Resolution for Navigational Echo Sounding Equipment, the following alarms are incorporated and enabled at all times while the equipment is switched on, except for the bottom–missing alarm: - Depth: Warns against decreasing depth (audible and visual indications) -
Page 47: Selecting Alarm Handling Protocols
CVR–010 Basic Operating Instructions 7.8.2. Acknowledging Active Alarms (2/3) 7.8.2.2. Remote Acknowledgement by Software Commands (2/3) 7.8.2.2.1. Selecting Alarm Handling Protocols ・ Regarding alarm handling on the bridge, two IEC standard–based protocols are selectable: - Protocol based on IEC 61162–1 Ed. 5 (2016), initial setting - Protocol based on IEC 61162–1 Ed. -
Page 48: Alert Acknowledgement Using Iec 61162-1 Ed. 5 Format Commands
CVR–010 Basic Operating Instructions 7.8.2. Acknowledging Active Alarms (3/3) 7.8.2.2. Remote Acknowledgement by Software Commands (3/3) 7.8.2.2.3. Alert Acknowledgement Using IEC 61162–1 Ed. 5 Format Commands ・ A command format like the example below is used to acknowledge an active alert via one of the RS–422–A/B or I/O serial interface ports. -
Page 49: Depth Alarm
CVR–010 Basic Operating Instructions 7.8.3. Depth Alarm 7.8.3.1. Setting Alarm Depth ・ To utilize this function, you have to set the alarm depth first, via the following steps: Figure 7-31 Setting Alarm Depth – Example (1) Turn on the Variable Range Marker ... -
Page 50: Bottom-Missing Alarm
CVR–010 Basic Operating Instructions 7.8.4. Bottom–Missing Alarm ・ This alarm, available when the alarm handling protocol is optionally set to the IEC 61162–1 Ed. 4 standard, will be triggered when one of the following situations occurs and continues for 4 seconds or more, making it impossible for the equipment to register depth reliably: - no bottom echo is received;... -
Page 51: Power Failure/Low Voltage Alarm
CVR–010 Basic Operating Instructions 7.8.5. Power Failure/Low Voltage Alarm ・ If, for any reason, the voltage of the power source drops below the specified level (11.0V) , the power failure/ low voltage alarm will be triggered with the following audible and visual indications and digital output: - Audible: Beeps at approximately 1 second intervals. -
Page 52: Advanced Settings
CVR–010 Advanced Settings 8. Advanced Settings 8.1. Introduction ・ The following settings that affect the way the equipment operates can be made via a menu system consisting of a main menu (MAIN MENU) and a number of associated submenus accessible through main menu options: - settings that you do not have to change frequently, such as the transducer draft and echo threshold level, and - settings that should be made mainly at initial installation time, such as depth readout... -
Page 53: Draft Entry Procedure
CVR–010 Advanced Settings 8.2.2. Draft Entry Procedure Figure 8-2 Transducer Draft , displaying the (1) Press MAIN MENU. (2) Select “1:TRANSDUCER DRAFT ” by pressing (numeric key “1”) or by pressing first, followed by ・ This turns TRANSDUCER DRAFT... -
Page 54: Selecting Depth Reference Indications
CVR–010 Advanced Settings 8.3. Selecting Depth Reference Indications 8.3.1. Introduction ・ The CVR–010 navigation sounder is designed to indicate one of the following types of depth information at a time, depending on whether or not transducer–related settings (draft and keel offset entries) were made in advance: - Depth below Transducer face (DBT, initial setting) - Depth below Surface (DBS, depth below waterline, with transducer draft entered) -
Page 55: Echo Threshold Adjustment
CVR–010 Advanced Settings 8.4. Echo Threshold Adjustment 8.4.1. Introduction ・ When the echo display is set to show echoes in full colors, echoes including the bottom reflection are shown in up to seven different colors depending on their relative strengths. ・... -
Page 56: Reducing Noise Interference
CVR–010 Advanced Settings 8.5. Reducing Noise Interference ・ The effect of noise interference coming from other onboard electronics or nearby echo sounders can be reduced via the menu system in the following manner: Figure 8-9 Selecting Noise Reduction Levels (1) Press , displaying the MAIN MENU. -
Page 57: Adjusting White-Line Level
CVR–010 Advanced Settings 8.6.2. Adjusting White–Line Level , displaying the MAIN MENU. (1) Press (2) Select “5:WHITE LINE” by pressing (numeric key “5”) or by pressing followed by . This turns on the WHITE LINE submenu with a white line level entry field, and a color scale to the right. -
Page 58: Selecting Time Passage Scales
CVR–010 Advanced Settings 8.7. Selecting Time Passage Scales Figure 8-13 Selecting Time Scales ・ Selecting option “ 6:HISTORY” on the MAIN MAIN MENU MENU opens the HISTORY SCALE submenu 1:TRANSDUCER DRAFT as shown at right, allowing you to select the time 2:DEPTH REFERENCE passage scales (HISTORY scales) for reviewing 3:ECHO THRESHOLD... -
Page 59: Activating Echo Sounder Simulator
CVR–010 Advanced Settings 8.8. Activating Echo Sounder Simulator ・ An echo sounder simulator program is built in to simulate actual sounding operation, enabling you to learn how each control key or operating parameter affects the way the echogram is drawn without having to connect an underwater transducer. ・... -
Page 60: Selecting Types Of Echo Display
CVR–010 Advanced Settings 8.9. Selecting Types of Echo Display ・ Initially the equipment shows only the strongest part of the bottom echo in a single color (initially red) with most of other echoes including fish echoes suppressed. ・ If you wish to show all echoes in full colors, proceed as follows: ... -
Page 61: Installation Settings
CVR–010 Advanced Settings 8.10. Installation Settings 8.10.1. Introduction ・ The following settings that should be normally made after initial installation and does not have to be changed frequently during normal operation are placed under the MAIN MENU option “ 9:INSTALLATION SETTINGS.” - Changing echo color assignments (1:COLOR) - Selection of depth readout units (2:DEPTH UNIT) - Selection of echo dynamic ranges (3:DYNAMIC RANGE) -
Page 62: Changing Echo Color Assignments 8.10.2.1. Introduction
CVR–010 Advanced Settings 8.10.2. Changing Echo Color Assignments 8.10.2.1. Introduction ・ When the echo display is set to full color presentation, echoes will be displayed in up to seven different colors – initially, red, orange, yellow, green, yellowish green, light blue and blue in order of strength;... -
Page 63: Changing Assignments
CVR–010 Advanced Settings 8.10.2. Changing Echo Color Assignments (continued – 2/2) 8.10.2.2. Changing Assignments (1) Selecting option “ 1:ECHO COLORS ” opens the ECHO COLORS submenu with a color scale consisting of 10 color samples to the right, as in Figure 8–20. - The upper seven color samples on the scale represent the original assignments. -
Page 64: Selecting Depth Readout Units
CVR–010 Advanced Settings 8.10.3. Selecting Depth Readout Units ・ The on–screen depth readout is initially in meters (m) . ・ You can read depth in fathoms (FM) or feet (FT) via the steps described below. ・ However, depth information to be stored in memory for later off–line retrieval will be in meters regardless of the readout unit selected. -
Page 65: Selecting Echo Dynamic Ranges
CVR–010 Advanced Settings 8.10.4. Selecting Echo Dynamic Ranges 8.10.4.1. Introduction Figure 8-23 Initial Echo Dynamic Range ・ Echoes are displayed using up to seven different colors, depending their Weakest strengths. 3 dB ・ The colors that are currently used to show echoes are indicated in the form of a color scale at the screen’s left edge, with the 3 dB... -
Page 66: Entering Time Offset For Local Standard Time Readout
CVR–010 Advanced Settings 8.10.5. Entering Time Offset for Local Standard Time Readout 8.10.5.1. Introduction ・ The date and time readouts displayed at the screen’s upper left corner are initially UTC (Universal Time Coordinated) date and time. ・ To display the information referenced to your local standard time (LST) , enter the appropriate time offset (time difference between LST and UTC) via the procedure described in the next paragraph. -
Page 67: Setting Date And Time
CVR–010 Advanced Settings 8.10.6. Setting Date and Time ・ After deciding which time reference to display, UTC or LST (local standard time) , via the preceding procedure (paragraph 8.10.5) , set the date and time via the steps outlined below. <... -
Page 68: Making Transducer-Related Settings
CVR–010 Advanced Settings 8.10.7. Making Transducer–Related Settings 8.10.7.1. Introduction Figure 8-28 Accessing TRANSDUCER SETTINGS Submenu MAIN MENU ・ In order to read depth from the keel or to graphically indicate the relative location 9:INSTALLATION SETTINGS of the transducer, you must make the 1:ECHO COLORS following menu settings related to the 2:DEPTH UNIT... -
Page 69: Entering Keel Offset
CVR–010 Advanced Settings 8.10.7. Making Transducer–Related Settings (continued – 2/2) 8.10.7.3. Entering Keel Offset ・ To read depth from the keel, you must first register the keel offset (distance from the transducer face to the bottom end of the keel in the vertical plane, as defined in the example below). -
Page 70: Selecting Data Outputs
CVR–010 Advanced Settings 8.11. Selecting Data Outputs Figure 8-34 Accessing DATA OUTPUT PORT Submenu ・ You can select types of data, including MAIN MENU those from a GPS receiver, to be output 9:INSTALLATION SETTINGS via the rear–panel serial interface ports (RS–422–A/B, I/O connectors). -
Page 71: Enabling Bottom-Missing Alarm
CVR–010 Advanced Settings 8.12. Enabling Bottom–Missing Alarm ・ The bottom–missing alarm function (paragraph 7.8.4) is available when the alarm handling protocol is set to the IEC 61162–1 Ed. 4 standard (optional setting). Figure 8-35 Enabling Bottom–Missing Alarm ・ The alarm function is initially disabled so that no warning beeps will be heard and no MAIN MENU visual alarm indication available when the... -
Page 72: Selecting Depth Readout Response Times
CVR–010 Advanced Settings 8.13. Selecting Depth Readout Response Times 8.13.1. Introduction ・ The equipment sometimes fails to receive a solid bottom signal due to turbulence or a layer of bubbles covering the transducer or when traveling over a precipitously sloping bottom that returns the echo to directions other than the transducer. -
Page 73: Turning Off Keypress Beep
CVR–010 Advanced Settings 8.14. Turning off Keypress Beep Figure 8-37 Turning off Keypress Beep ・ Initially the unit responds to your MAIN MENU keypress with a beep. 9:INSTALLATION SETTINGS ・ If you wish to turn this sound off, follow 1:ECHO COLORS the steps below. -
Page 74: Making Settings Via System Menu
CVR–010 Making Settings via System Menu 9. Making Settings via SYSTEM MENU 9.1. Introduction ・ The following functions are available through a devoted menu called the SYSTEM MENU, which is accessible by turning the equipment on while holding down Figure 9-1 SYSTEM MENU - Selection of screen background colors SYSTEM MENU... -
Page 75: Performing Self-Diagnostic Function
CVR–010 Making Settings via System Menu 9.3. Performing Self–Diagnostic Function Figure 9-3 Initiating Self–Diagnostic Function – Example SYSTEM MENU ・ Selecting option “ 2:SYSTEM CHECK” ( by ) opens the SYSTEM CHECK pressing 1:BACKGROUND submenu, initiating self–diagnostic 2:SYSTEM CHECK function automatically, as in the example at 3:OUTPUT STORED DATA 2:SYSTEM CHECK... -
Page 76: Selecting Menu Languages
CVR–010 Making Settings via System Menu 9.6. Selecting Menu Languages Figure 9-6 Selecting Menu Languages – Example ・ Selecting option “5:LANGUAGE” displays the SYSTEM MENU languages that you can select to indicate various options in the menu system. 1:BACKGROUND 2:SYSTEM CHECK ・... -
Page 77: Selecting Auto Tvg Characteristics For 50 & 200 Khz Transducers
CVR–010 Making Settings via System Menu 9.8. Selecting AUTO TVG Characteristics for 50 & 200 kHz Transducers Figure 9-8 Selecting Auto TVG Characteristics – Example SYSTEM MENU ・ To take full advantage of the automatic TVG function, two sets of initial gain suppression 1:BACKGROUND curves (initial gain suppression level–versus–... -
Page 78: Outputting Stored Data For Pc-Based Applications
CVR–010 Outputting Stored Data for PC–Based Applications 10. Outputting Stored Data for PC–based Applications 10.1. Introduction ・ Various types of data stored in non–volatile memory can be output via the rear–panel connectors (RS–422–A/B and I/O serial interface ports) for processing or analysis in PC–based applications. -
Page 79: Outputting Stored Data
CVR–010 Outputting Stored Data for PC–Based Applications 10.3. Outputting Stored Data 10.3.1. Introduction Figure 10-2 SYSTEM MENU ・ The function outputting stored data SYSTEM MENU sentences can be initiated through the 1:BACKGROUND SYSTEM MENU described in Section 9 2:SYSTEM CHECK (Making Settings via SYSTEM MENU). -
Page 80: Uploading Stored Data
CVR–010 Outputting Stored Data for PC–Based Applications 10.3. Outputting Stored Data (continued – 2/2) 10.3.3. Uploading Stored Data ・ After choosing the desired output interval via the preceding procedure, activate the data uploading function in the following manner: Figure 10-4 Uploading Stored Data – Step (1) (1) Select “... -
Page 81: User-Level Trouble Shooting
CVR–010 User–Level Trouble Shooting 11. User–Level Trouble Shooting 11.1. Introduction ・ A list of common troubles the user may experience while operating the equipment is given below along with recommended remedies for such troubles. ・ If a problem persists, contact your dealer for assistance, giving as much information as possible about the symptom, operating frequency, control and menu settings used, serial number of, and firmware version installed in the equipment. -
Page 82: Automatic Range Selection
CVR–010 User–Level Trouble Shooting 11.2. Depth Readout (continued – 2/2) Symptom Suggested Solution ・ Symptom indicates that second bottom Depth readout is twice actual depth. echo is displayed at twice true depth, with second echo being locked onto for depth The digital depth indication is twice the measurement ( ref. -
Page 83: Alarms
CVR–010 User–Level Trouble Shooting 11.4. Bottom Echo Appearance (continued – 2/2) ・ Symptom indicates that small echo dynamic Most echoes are visible in strong range is selected. Check current setting colors. ( MAIN MENU → 9:INSTALLATION via path SETTINGS → 3:DYNAMIC RANGE) ref. -
Page 84: Settings Through Menu System
CVR–010 User–Level Trouble Shooting 11.7. Settings through Menu System Symptom Suggested Solution Operation does not reflect settings Press each time a setting is made, before made through menu system. closing current submenu ( ref. paragraph 8.1) 11.8. Date/Time Indication Symptom Suggested Solution ・... -
Page 85: User-Level Maintenance Instructions
CVR–010 User–Level Maintenance 12. User–Level Maintenance Instructions To ensure long–term trouble–free operation, the user should regularly follow the maintenance instructions described in this section. 12.1. Maintenance on the Equipment Cabinet ・ Keep the equipment away from sea splashes, direct sunlight and other heat–generating sources, and make sure that air around the cabinet is circulating freely. -
Page 86: Servicing The Equipment
CVR–010 User–Level Maintenance 12.4. Servicing the Equipment ・ If the equipment shows any sign of malfunction, contact your dealer for assistance. ・ High voltages are present inside the equipment cabinet. ・ Do not open the cabinet in an attempt to correct the problem. There are no user–serviceable parts inside. -
Page 87: Temporary Display Of A-Scope
CVR–010 User–Level Maintenance 12.6. Temporary Display of A–Scope ・ The A–scope is a format of echo presentation, showing various echo strength levels in the form of horizontal deflections, as well as in colors. ・ This function is provided mainly for ease of performance checks, maintenance or alignment by authorized service engineers and can be activated via the following keystrokes: (1) Turn the equipment off. -
Page 88: Installation Instructions
CVR–010 Installation Instructions 13. Installation Instructions 13.1. Display Cabinet Installation 13.1.1. General Precautions ・ The display cabinet is constructed to withstand the humid and corrosive marine environment, but is designed to be installed or operated inside the wheelhouse or chartroom. ・... - Page 89 CVR–010 Installation Instructions 13.1.2. Mounting (continued – 2/2) 13.1.2.1. Mounting the Display Cabinet (2/2) Figure 13-1 Installation Dimensions of Display Cabinet Dimensions in millimeters Cabinet Clamping Knob (2 pcs.) Part #: KG–B3/M8X15 (Mounting Bracket) - Weight: 1.6 kg (cabinet) + 0.55 kg (mounting bracket) ゚...
-
Page 90: Transducer Installation
CVR–010 Installation Instructions 13.2. Transducer Installation 13.2.1. General Precautions ・ The installation should be planned in advance, keeping in mind the standard cable length integrally connected to the transducer. ・ In an installation where a longer cable is required, it is recommended that the transducer be ordered with the desired cable length instead of extending the existing cable with an additional cable. -
Page 91: Matched Transducers
CVR–010 Installation Instructions 13.2.3. Matched Transducers ・ The equipment is designed to operate properly with one of the following BSH–approved transducers: - TOKIN TGM60–50 series 50 kHz transducers (600W , standard: 20m cable) - TOKIN TGM80–200 series 200 kHz transducers (600W , standard: 20m cable) ・... -
Page 92: Transducer Dimensions
CVR–010 Installation Instructions 13.2.5. Transducer Dimensions Figure 13-3 TOKIN TGM Series Transducer Dimensions Two–conductor shielded cable Jacket: Chloroprene Table 13-1 Installation Dimensions of TOKIN TGM Series Transducers Specifications TGM60–50 (50 kHz) TGM80–200 (200 kHz) Beam Width 33 degrees 7 degrees (@–3dB points) Cable Length (standard) - Page 93 CVR–010 Installation Instructions 13.2.5. Transducer Dimensions (continued – 2/2) Figure 13-4 Recommended Steel Housing (Blister) Structure – Example < CAUTIONS > Each housing must be approved in construction and material by the relevant ship’s classification society or EU notified body before it is permitted to be installed through the hull.
-
Page 94: Electrical Connections
CVR–010 Installation Instructions 13.3. Electrical Connections 13.3.1. Introduction Figure 13-5 Rear Panel Connectors ・ All electrical connections to the ⑦ ⑧ equipment are to be made via the connector receptacles (jacks) installed on the rear panel (illustrated at right) . ・... -
Page 95: Power Supply Connections
CVR–010 Installation Instructions 13.3.2. Power Supply Connections 13.3.2.1. Power Supply Requirements and Power Cord Routing ・ The equipment is powered by a DC power source (20–24V) , floating ground. The ship’s power source must be capable of continuously supplying at least or 3A at 24 VDC for proper start–up and reliable operation. -
Page 96: Grounding The Display Cabinet
CVR–010 Installation Instructions 13.3.2.4. Grounding the Display Cabinet Figure 13-8 Ground Terminal ・ The display cabinet, which is electrostatically coated inside, can be grounded to the ship’s earth ground without grounding the negative line of the power source. ・ In installations where it is required, or desirable, to ground the cabinet for safety reasons or EMC compliance, connect from the wing–nut–fitted ground terminal on the rear panel to the ship's nearest earth... - Page 97 CVR–010 Installation Instructions 13.3.3. Connections to Transducer (continued – 2/2) ・ The pin ID numbers are marked in raised letters on the face of the plug body. ・ Pins #1 and #3 are balanced, and may be reversed. ・ Care should be taken to ensure that no stray strands of wires or excess solder on any pin touches the inside wall of the plug shell when the plug is reassembled.
-
Page 98: Connections Through Digital I/O Interface Connectors
CVR–010 Installation Instructions 13.3.4. Connections through Digital I/O Interface Connectors 13.3.4.1. Introduction ・ The equipment is designed to interface with various external devices that output or accept digital data signals compliant with the IEC 61162–1 Ed. 5 or IEC 61162–1 Ed. 4 communications protocol. -
Page 99: Navigational Output Data Sentences
CVR–010 Installation Instructions 13.3.4.4. Navigational Output Data Sentences Realtime Depth Output Data (1/2) ・ The following IEC 61162–1/NMEA–0183 formatted depth data sentences can be output in real time at 4800 baud simultaneously via all serial interface ports (rear–panel RS–422–A/B and I/O connectors). ・... - Page 100 CVR–010 Installation Instructions 13.3.4.4. Navigational Data Sentences (continued – 2/3) Realtime Depth Output Data (2/2) 3. $SDDBT (depth below transducer) $SDDBT, x x, f , x < CR > < LF > ① ② ③ ④ ① Depth below transducer, in feet ②...
- Page 101 CVR–010 Installation Instructions 13.3.4.4. Navigational Data Sentences (continued – 3/3) On–demand Depth Output Data: ・ The following IEC 61162–1/ NMEA–0183 –compliant proprietary sentence can be output at 4800 baud on demand from the non–volatile (flash) memory. Refer to paragraph 10.2 for details.
-
Page 102: Alarm-Related Output Data Sentences
CVR–010 Installation Instructions 13.3.4.5. Alarm–Related Output Data Sentences 13.3.4.5.1. Introduction ・ Depending on the alarm handling protocol employed for your INS/BAM alarm management system, the following two types of alarm–related outputs are available via the rear–panel RS–422–A/B and I/O serial interface ports simultaneously. - IEC 61162–1 Ed. -
Page 103: Alarm Output Intervals For Iec 61162-1 Ed. 4 Alarm Handling Protocol
CVR–010 Installation Instructions 13.3.4.5. Alarm–Related Output Data Sentences (continued – 2/6) 13.3.4.5.3. Alarm Output Intervals for IEC 61162–1 Ed. 4 Alarm Handling Protocol (1) When none of the alarms is currently active: ・ The echo sounder will output the following sentences every 60 seconds: - $SDALR xxxxxx ECHO SOUNDER:Depth alarm... - Page 104 CVR–010 Installation Instructions 13.3.4.5. Alarm–Related Output Data Sentences (continued – 3/6) 13.3.4.5.3. Alarm Output Intervals for IEC 61162–1 Ed. 4 Alarm Handling Protocol – 2/2) (2) When an alarm condition occurs (2/2) ・ Low voltage/Power failure Alarm (local alarm # 003) - The instance the DC power source voltage falls to, or below, the factory–preset level (11.0V) , the sounder will output the following sentence: $SDALR...
-
Page 105: Output Sentences For Iec 61162-1 Ed. 5 Alert Handling Protocol
CVR–010 Installation Instructions 13.3.4.5. Alarm–Related Output Data Sentences (continued – 4/6) 13.3.4.5.4. Output Sentences for IEC 61162–1 Ed. 5 Alert Handling Protocol (1/3) ・ The following description applies if the receiver uses the default IEC 61162–1 Ed. 5 (2016) communications protocol standard for alert management. ・... - Page 106 CVR–010 Installation Instructions 13.3.4.5. Alarm–Related Output Data Sentences (continued – 5/6) 13.3.4.5.4. Output Sentences for IEC 61162–1 Ed. 5 Alert Handling Protocol (2/3) ・ $SDALF Alert Output Sentence (2/2) ・ When the above alert is acknowledged (manually by pressing ), the sentence format will change as in the example below.
- Page 107 CVR–010 Installation Instructions 13.3.4.5. Alarm–Related Output Data Sentences (continued – 6/6) 13.3.4.5.4. Output Sentences for IEC 61162–1 Ed. 5 Alert Handling Protocol (3/3) ・ $SDALC Cyclic Alert List Sentences (2/2) - When two alert conditions (alert ID 230=depth–below–keel alarm and alert ID 231=power failure alarm) simultaneously exist, a sentence like the following example format will be output: Figure 13-14 Format of ALC Sentence with Dual Alert Entries –...
-
Page 108: Connector Pin Assignments
CVR–010 Installation Instructions 13.3.4. Connections through Digital I/O Interface Connectors 13.3.4.6. Connector Pin Assignments ・ RS–422 Connector Pin Assignments - Connections from an INS/BAM terminal are to be plugged into this receptacle. - A D–sub 9 female–type plug mates with this connector. - The pin assignments are illustrated below. - Page 109 CVR–010 Installation Instructions 13.3.4. Connections through Digital I/O Interface Connectors 13.3.4.6. Connector Pin Assignments (continued – 2/2) ・ I/O Data Connector Pin Assignments - The eight pins are identified as illustrated below. - The mating plug (part # CP111–8P) is separately supplied as standard. Figure 13-19 I/O Data Connector Pin Assignments Pin #1 Pin #7...
-
Page 110: Connections To Alarm Ack Connector
CVR–010 Installation Instructions 13.3.5. Connections to ALARM ACK Connector ・ If you wish to acknowledge and reset an active alarm (DEPTH ALARM or POWER FAILURE/LOW VOLTAGE ALARM) with a switch located away from the equipment, connect a suitable single–pole–single–throw (SPST) switch to this connector so that the two pins on the connector get short–circuited together when the switch is turned on (or closed) . -
Page 111: Connections To Alarm Out Connector
CVR–010 Installation Instructions 13.3.6. Connections to ALARM OUT Connector ・ The ALARM OUT connector is provided to separately drive remotely mounted alarm condition indicating devices when either the POWER FAILURE/LOW VOLTAGE ALARM or the DEPTH ALARM becomes active, and to allow the user to acknowledge and reset the active alarm from such a location. -
Page 112: Recommended Spare Parts
CVR–010 Recommended Spare Parts Recommended Spare Parts ・ A list of the spare parts recommended for the maintenance and servicing for three to five years is given below. ・ Replacing parts should be done by your dealer or a qualified service engineer. ・...
Need help?
Do you have a question about the CVR-010 and is the answer not in the manual?
Questions and answers
the unit echo sounder black out / can't switch on , i already check fuse and electrical cable is good power inside from dc , what i can do could please advise