
Related Manuals for probst EASYFILL EF-H


Summary of Contents for probst EASYFILL EF-H
- Page 1 51700003 EF-H EF-H 5170.0003 EASYFILL EF-H Paver Jointing Device Operating Instructions Translation of original operating instructions EASYFILL EF-H Paver Jointing Device EF-H 5170.0003...
- Page 2 Bitte beachten Sie, dass das Produkt ohne vorliegende Betriebsanleitung in Landessprache nicht eingesetzt / in Betrieb gesetzt werden darf. Sollten Sie mit der Lieferung des Produkts keine Betriebsanleitung in Ihrer Landessprache erhalten haben, kontaktieren Sie uns bitte. In Länder der EU / EFTA senden wir Ihnen diese kostenlos nach.
-
Page 3: Table Of Contents
Chain tensioning ............................. 15 5.1.5 Tension of the V-belt ..........................16 Repairs ................................16 Change of brushes ............................17 Safety procedures ............................18 Hints to the identification plate........................19 Hints to the renting/leasing of PROBST devices ................... 19 2 / 19... -
Page 4: Ec-Declaration Of Conformity
Pos: 1.7 /02 Konformität serklärung/5 ne u_A nga be n zum Unterzeichner + Dokubev ollmächtigter @ 0\mod55_2. doc @ 5341 @ Authorized person for EC-dokumentation: Name: J. Holderied Address: Probst GmbH; Gottlieb-Daimler-Str. 6; D-71729 Erdmannhausen Signature, informations to the subscriber: Erdmannhausen, 09.05.2016................ -
Page 5: Safety
Safety Operatimg Instructions EF-H Pos: 2 /==== ===== ===== ===== ===== ===== == @ 0 \mod8_2. doc @ 5159 @ Pos: 3.1 /04 Sicher heitsbe stimmungen/KÜ_ Sicher heit @ 0\m od11_2.doc @ 5453 @ 1 Pos: 3.1 /04 Sicher heitsbe stimmungen/KÜ_ Sicher heit @ 0\m od11_1.doc @ 5452 Safety Pos: 3.2 /03 All gemeines/ 03 Techn. -
Page 6: Personal Safety Requirements
Safety Operatimg Instructions EF-H Pos: 3.5 / 04 Sicher heitsbe stimmunge n/01 Persönliche Sicher heitsma ßna hme n/Ü_Persönliche Sic herheitsmaßma ßna hmen @ 0\m od31_2. doc @ 6619 @ 2 Personal safety requirements Pos: 3.6 / 04 Sicherheitsbestimmungen/ 01 Per sönliche Sic herheitsmaßnahme n/ Per sönliche Sicher heit sbe stimmunge n @ 0\m od97_2. doc @ 6633 @ ●... -
Page 7: Authorized Use
General Operatimg Instructions EF-H Pos: 5 /03 All gemeines/ 01 Bestimmungsgemäßer Ei nsatz/ 01 Bestimmungsgemä ßer Einsatz (Pflicht-M odule) /x _KÜ_ All gemeines @ 0\mod14_2. doc @ 6409 @ 1 General Pos: 6 / 03 Allgem eine s/01 Be stimmungsgemäßer Einsatz/01 Be stimmungsgemäßer Einsatz (Pflicht-Modul e) /Ü_Bestimmungsgemä ßer Einsatz @ 0\mod350_2.doc @ 6437 @ Authorized use Pos: 7 /99 gerät espez. -
Page 8: Survey And Construction
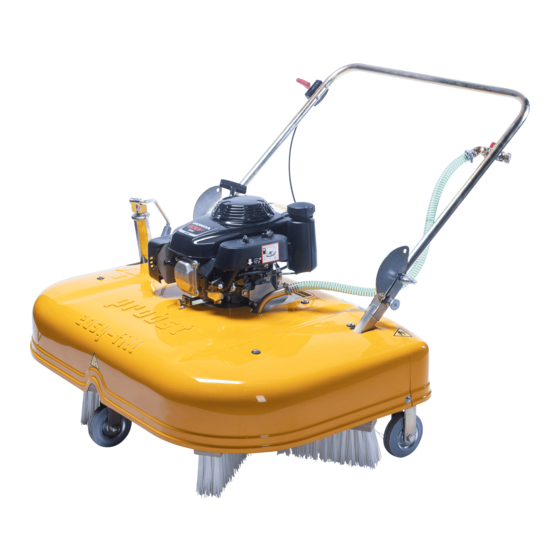
General Operatimg Instructions EF-H Survey and construction Pos: 10 / 99 geräte spez. Module /PG1 Pflasterverl ege syst eme/EF- H/A ufba u_EF- H @ 1\mod716_2.doc @ 13381 @ Pos: 8 / 99 geräte spez. Module /PG1 Pflasterv erlege syst eme/EF- H/A ufba u_EF- H @ 1\mod71 6_1.doc @ 13380 @ Water connection with water tap Oil drain Foldable handle... -
Page 9: Adjustments
Adjustments Operatimg Instructions EF-H Pos: 14 / 06 Be dienung/ 06 Be dienung u. Ei nst ellunge n/KÜ_Einstellar beiten @ 0\m od1 6_2.doc @ 5481 @ 1 Adjustments Pos: 15 /06 Bedi enung/06 Bedi enung u. Einstellungen/ Ü_All gemei n @ 1\mod261_2. doc @ 5 635 @ General Pos: 16 / 99 geräte spez. -
Page 10: Operation
Operation Operatimg Instructions EF-H Pos: 18 / 06 Be die nung/ 06 Be die nung u. Einst ellunge n/K Ü_Be dienung @ 0\m od376_2. doc @ 57 05 @ 1 Operation Pos: 19 / 06 Be die nung/ 06 Be die nung u. Einst ellunge n/ Ü_ Geräte be dienung @ 0\mod383_2.doc @ 5719 @ Device operation Pos: 20 / 99 geräte spez. - Page 11 Operation Operatimg Instructions EF-H ● By turning the handle on the spindle (1), the brushes should be lowered down, so they barely are touching the surface of the pavement. ● Then lock the spindle (1) in the lock (4) in order to avoid that the spindles are turning themselves and the brushes are lowered down too much (high wear on brushes)! ●...
- Page 12 Operation Operatimg Instructions EF-H ● To stop the engine, the throttle has to be moved completely to the rear position (6). Pos: 21 /===== ===== ===== ===== ===== ===== = @ 0\m od8_2. doc @ 515 9 @ 11 / 19...
-
Page 13: Maintenance And Care
Maintenance and care Operatimg Instructions EF-H Pos: 22 /07 Wart ung und Pfle ge/K Ü_ Wartung und Pflege @ 0 \mod17_2.doc @ 585 9 @ 1 Maintenance and care Pos: 23 /07 Wart ung und Pflege /01 Wart ung/ Ü_Wart ung+T ext allg. (nur mecha n. Geräte) @ 0\mod27_2. doc @ 7123 @ Maintenance To ensure the correct function, safety and service life of the device the following points must be executed in the maintenance interval. -
Page 14: Overload Protection
Maintenance and care Operatimg Instructions EF-H Minimum 1x per year ● Check of all the suspension parts, bolts and straps. Check for corrosion and safety (at rough conditions shorten the by an expert. interval) Picture2 5.1.2 Overload protection To be checked from time to time for function, on breakdown (spinning of overload protection (1) in Pic.2) during the operation) retighten the screws (turning moment maximal 25 Nm (Ruflex 011TF). -
Page 15: Counter Bearing Rollers
Maintenance and care Operatimg Instructions EF-H 5.1.3 Counter bearing rollers The correct setting of the counter bearing rollers (3) is responsible for creating the forward drive. The counter bearing rollers (3) are pre-set (by the manufacturer) to have a pretension of about 2-3 mmThe counter bearing rollers (3) (41700018) have to be checked from time to time, whether they are equally supporting the two large gear wheels (2) (41700019). -
Page 16: Chain Tensioning
Maintenance and care Operatimg Instructions EF-H 5.1.4 Chain tensioning ● The tension of the chain (4) has to be checked from time to time. If neccessary retighten. ● The V-belt pulley (3) and the chain (4) must be in the same horizontal level (parallel). ●... -
Page 17: Tension Of The V-Belt
Maintenance and care Operatimg Instructions EF-H 5.1.5 Tension of the V-belt The tension of the V-belt has to be checked from time to time and has to be retightened if necessary. ● Loosen all three screws (1) on the motor. ●... -
Page 18: Change Of Brushes
Maintenance and care Operatimg Instructions EF-H Pos: 27 /99 gerät espez. Modul e/PG1 Pflast erverlegesy steme/E F-H/B ürste nw echsel_EF- H @ 1\mod720_2. doc @ 13423 @ 2 Change of brushes General disassemble primary the protecting cap before making maintenance work. Unscrew the clamping bolts (see arrows on picture 1). -
Page 19: Safety Procedures
Pos: 30 / 08 Ersatzteile/ Type nsc hild/ 08 Ty pe nsc hild / ! Vermiet ung PROBST -Geräte /08 Typenschild / ! Vermietung PROBST-Gerät en/ 08 Type nsc hild / Vermietung PROBS T-Geräte n/ 08 Ty pe nschil d / Vermietung PROBST -Geräte... -
Page 20: Hints To The Identification Plate
Example: Hints to the renting/leasing of PROBST devices With every renting/leasing of PROBST devices the original operating instructions must be included unconditionally (in deviation of the users country's language, the respective translations of the original operating instructions must be delivered additionally)! === Ende der Liste für T extmarke Inhalt == =... - Page 21 (~1185) (~822) Bürstenverstellung (~70mm) (~744) (~1167) Bei Änderungungen Rücksprache TB ! Gewicht: 96 kg Schutzvermerk nach DIN 34 beachten! Nachdruck nur mit unserer Genehmigung! Benennung Datum Name EASY-FILL Erst. 19.4.2004 Rolf.Erath Pflasterverfugungsgerät EF-H Gepr. W A: Blatt Artikelnummer/Zeichnungsnummer D51700003 Kunde: Zust.
- Page 22 Blatt 5 Blatt 4 Blatt 2 Blatt 6 Blatt 3 Bei Änderungen Rücksprache TB ! Gewicht: 87,06 kg Schutzvermerk nach DIN 34 beachten! Nachdruck nur mit unserer Genehmigung! Benennung Datum Name EASY-FILL Erst. 4.5.2004 Rolf.Erath Pflasterverfugungsgerät EF-H Gepr. 30.11.2016 R.Hoffmann Blatt Artikelnummer/Zeichnungsnummer E51700003...
- Page 23 26000005 Laufachsstummel 41700003 rechts geschweißt 20020008 20100004 26000004 Laufachsstummel links geschweißt 20540024 20100016 20000237 20080014 41700018 27150020 siehe 20440003 27010021 Blatt 6 21600026 21050107 20100014 21050107 27200006 20000017 20000026 20100016 20100016 41700008 20100017 20100017 27110002 33500761 20000017 32330023 20000067 20000023 41700007 20100017 20080015...
- Page 24 21000188 20100017 21200025 32330024 20100016 41700019 20000028 41700002 Bei Änderungen Rücksprache TB ! Gewicht: 87,06 kg Schutzvermerk nach DIN 34 beachten! Nachdruck nur mit unserer Genehmigung! Benennung 20090030 Datum Name EASY-FILL Erst. 4.5.2004 Rolf.Erath Pflasterverfugungsgerät EF-H Gepr. 30.11.2016 R.Hoffmann Blatt Artikelnummer/Zeichnungsnummer E51700003 Kunde:...
- Page 25 26100011 32330026 20000046 20420002 20000006 21110016 20100015 20420002 32330025 21750009 20420006 20090032 21250010 21100009 20000026 21110017 20400004 20100017 21380002 33310008 21200006 Bei Änderungen Rücksprache TB ! 20420002 Gewicht: 87,06 kg Schutzvermerk nach DIN 34 beachten! Nachdruck nur mit unserer Genehmigung! 20000006 Benennung Datum...
- Page 26 41700014 20000002 20440003 24100177 41700015 20440003 20000002 24100177 20000127 20440003 Bei Änderungen Rücksprache TB ! Gewicht: 87,06 kg Schutzvermerk nach DIN 34 beachten! Nachdruck nur mit unserer Genehmigung! Benennung Datum Name EASY-FILL Erst. 4.5.2004 Rolf.Erath Pflasterverfugungsgerät EF-H Gepr. 30.11.2016 R.Hoffmann Blatt Artikelnummer/Zeichnungsnummer E51700003...
- Page 27 20000010 20100004 20100016 41700016 20100016 20000059 20440004 20000046 41700016 20000059 41700017 20000046 20440004 20440004 32330027 20100015 32330028 Bei Änderungen Rücksprache TB ! Gewicht: 87,06 kg Schutzvermerk nach DIN 34 beachten! Nachdruck nur mit unserer Genehmigung! Benennung Datum Name EASY-FILL 21840001 Erst.
- Page 28 A51700003 EF-H 29040221 29040340 29040297 29040624 29040666 29040547 29040056 29040297 Erstellt: Datum / Name Zuletzt geändert: Freigabe: Datum / Name 20.09.2016 / Krasnikov, Igor 22.09.2016 20.09.2016 / Krasnikov, Igor...
- Page 29 ® R U F L E X KTR-N 46010 E t o r q u e l i m i t e r sheet: m o u n t i n g i n s t r u c t i o n s edition: ®...
- Page 30 ® R U F L E X KTR-N 46010 E t o r q u e l i m i t e r sheet: m o u n t i n g i n s t r u c t i o n s edition: ®...
- Page 31 ® R U F L E X KTR-N 46010 E t o r q u e l i m i t e r sheet: m o u n t i n g i n s t r u c t i o n s edition: General hints of assembly ®...
- Page 32 ® R U F L E X KTR-N 46010 E t o r q u e l i m i t e r sheet: m o u n t i n g i n s t r u c t i o n s edition: Disk spring layer Table 3:...
- Page 33 ® R U F L E X KTR-N 46010 E t o r q u e l i m i t e r sheet: m o u n t i n g i n s t r u c t i o n s edition: Diagrams of adjustment slipping torque...
- Page 34 ® R U F L E X KTR-N 46010 E t o r q u e l i m i t e r sheet: m o u n t i n g i n s t r u c t i o n s edition: Diagrams of adjustment slipping torque...
- Page 35 ® R U F L E X KTR-N 46010 E t o r q u e l i m i t e r sheet: m o u n t i n g i n s t r u c t i o n s edition: Technical data ®...
- Page 36 HONDA Honda 5.5 OHV GXV 160...
- Page 37 2. SUMMARY 3. SAFETY MESSAGES 1. INTRODUCTION ........1 Your safety and the safety of others is very important.
-
Page 38: Safety Information
5. SAFETY INFORMATION 7. THROTTLE CABLE CONNECTION Understand the operation of all controls and learn how to stop the The throttle lever is provided with hole for attaching the throttle engine quickly in case of emergency. Make sure the operator cable. -
Page 39: Flywheel Brake
8. FLYWHEEL BRAKE (Models equipped) WARNING: operation inspection Read your equip ment user’s instruction before operating the engine 1.Release the flywheel brake lever (located on equipment) and verify 10. OPERATION that there is a strong resistance when pulling on the recoil starter. Starting Also, verify that the governor arm (1) 1.Turn the fuel shut-off valve:... -
Page 40: Stopping
11. MAINTENANCE 2.Using a tachometer, check the engine speed. If you can’t obtain the top no load engine speed specified, consult your Honda The importance of maintenance dealer. A well maintained engine is essential for safe, economical and Stopping trouble-free operation. It will also help reduce pollution. Model without flywheel brake: To help you correctly care for your engine, the following pages 1.Move the throttle control to the stop position. -
Page 41: Maintenance Safety
Maintenance safety Safety precautions This section includes instructions on some important maintenance WARNING: tasks. You can perform some of these tasks with basic hand tools if To prevent accidental start-up, shut off the engine and you have the necessary mechanical skills. disconnect the spark plug cap before carrying out any Other tasks that are more difficult and require special tools are best maintenance work. -
Page 42: Emission Control System
Tampering and altering Emission control system Source of emissions Tampering with or altering the emission control system may increase emissions beyond the legal limit. Among those acts that The combustion process produces carbon monoxide, oxides of constitute tampering are: nitrogen, and hydrocarbons. Control of hydrocarbons and oxides •... -
Page 43: Maintenance Schedule
Maintenance Schedule Fuel Use unleaded gasoline with a pump octane rating of 86 or higher. This engine is certified to operate on unleaded gasoline. Unleaded REGULAR SERVICE PERIOD (3) Each Every Every Every gasoline produces fewer engine and spark plug deposits and month year page... -
Page 44: Engine Oil
Oxygenated fuels Engine Oil Some conventional gasolines are being blended with alcohol or an Recommended oil ether compound. These gasolines are collectively referred to as Recommended oil for general, all oxygenated fuels. To meet clean air standards, some regions use temperature use: SAE 10W-30, oxygenated fuels to help reduce emissions. -
Page 45: Air Cleaner
Oil Change Air Cleaner Drain the engine oil when the engine is warm. Warm oil drains A dirty air cleaner will restrict air flow to the carburetor and cause quickly and completely. poor engine performance. Inspect the filter elements each time the engine is operated. -
Page 46: Spark Plug
Cleaning Spark Plug 1.Remove the air cleaner cover and foam filter element, as Recommended Spark Plugs: described in the inspection procedure. NGK: BPR5ES - NIPPONDENSO Co., Ltd.: W16EPR-U 2.Remove the paper element from the air cleaner base. The recommended spark plug is the correct heat range for normal 3.Paper element: engine operating temperatures. -
Page 47: Carburetor
Spark Arrester (optional equipment) 5.Install the spark plug carefully, by hand, to avoid cross-threading. After the spark plus is seated, tighten with the In some area, it is illegal to use an engine without a spark arrester. correct size spark plug wrench to compress the washer. The spark arrester must be serviced every 100 hours to keep it When installing a new spark plug, tighten ½... -
Page 48: Transporting
12. TRANSPORTING Fuel system damage or engine performance problems resulting from neglected storage preparation are not covered under Keep the engine level when transporting to reduce the possibility warranty. of fuel leakage. You can extend fuel storage life by adding a gasoline stabilizer that Turn the fuel valve to OFF position (GXV160K1). -
Page 49: Storage
Engine oil 1.Remove the carburetor drain bolt (1) with a 10 mm wrench, and 1.Change the engine oil (see page 19). drain the carburetor bowl fuel (2) into an approved gasoline container. 2.Remove the spark plug (see page 22), and pour a tablespoon (5 - 10 cc) of clean engine oil into the cylinder. -
Page 50: Troubleshooting
14. TROUBLESHOOTING 15. GENERAL SPECIFICATIONS ENGINE WILL NOT GXV140 POSSIBLE CAUSE CORRECTION START DIMENSIONS 1.Check throttle lever Throttle lever is wrong Move throttle lever to the choke position. position. position unless engine is warm (p.7). 400 x 355 x 323 Length x Width x Height (in.) (15.7 x 13.9 x 12.9) -
Page 51: Tuneup Specifications
16. TUNEUP SPECIFICATIONS GXV160K1 DIMENSIONS ITEM PECIFICATION PAGE A1S A15 N1C N15 N4C N45 N55 N65 N1F N5C N1E5 0.7 - 0.8 mm Spark plug gap (0.028 - 0.031 in) Length x Width x 415 x 359 x 354 Height Carburetor idle speed (16.3 x 14.1 x 13.9) 2,100 ±... - Page 52 After each completed performance of a maintenance interval the included form must be fill out, stamped, signed and send back to us immediately 1) via e-mail to service@probst-handling.de / via fax or post Operator: _ _ _ _ _ _ _ _ _ _ _ _ _ _ _ _ _...
- Page 53 After each completed performance of a maintenance interval the included form must be fill out, stamped, signed and send back to us immediately 1) via e-mail to service@probst-handling.de / via fax or post Operator: _ _ _ _ _ _ _ _ _ _ _ _ _ _ _ _ _...
- Page 54 After each completed performance of a maintenance interval the included form must be fill out, stamped, signed and send back to us immediately 1) via e-mail to service@probst-handling.de / via fax or post Operator: _ _ _ _ _ _ _ _ _ _ _ _ _ _ _ _ _...
Need help?
Do you have a question about the EASYFILL EF-H and is the answer not in the manual?
Questions and answers