VADDIO ConferenceSHOT FX Installation Manual
Usb 3.0 fixed camera
Hide thumbs
Also See for ConferenceSHOT FX:
- Integrator's complete manual (61 pages) ,
- Installation manual (16 pages)

Related Manuals for VADDIO ConferenceSHOT FX


Summary of Contents for VADDIO ConferenceSHOT FX
- Page 1 Installation Guide for the ConferenceSHOT FX USB 3.0 Fixed Camera Document 411-0015-31 Rev B October 2020...
-
Page 2: Table Of Contents
Initial Device Set-Up and System Administration Tasks Browser Support Initial Device Set-up Process Overview Initial Device Set-Up Using the Vaddio Device Controller Initial Device Set-Up Using the Vaddio Deployment Tool Manual Access and Initial Device Set-Up Getting the Camera's IP Address for Access via Browser If the Camera Is At 169.254.1.1... -
Page 3: Overview
Overview This guide covers the ConferenceSHOT FX USB 3.0 fixed camera, worldwide part numbers 999-20000-000 (black) and 999-20000-000W (white). What's in this Guide This guide covers: Unpacking the camera Tips for a successful installation Instructions for installing the camera mount... -
Page 4: Unpacking The Camera
Installation Guide for the ConferenceSHOT FX USB 3.0 Fixed Camera Unpacking the Camera Make sure you received all the items you expected. Caution: Use the power supply shipped with or recommended for the camera. Using a different power supply may create an unsafe operating condition or damage the camera, and will void the warranty. -
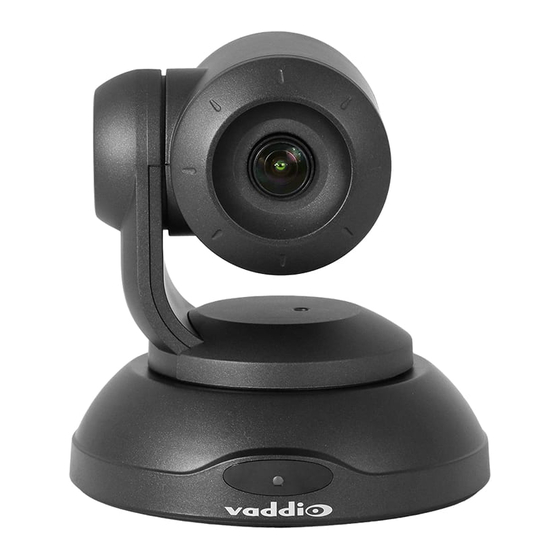
Page 5: A Quick Look At The Camera
This section covers the physical features of the camera. Front of the Camera Camera and zoom lens – The ConferenceSHOT FX camera features a 3X optical zoom lens. IR sensor – Receives signals from the IR remote. Make sure there's nothing directly in front of the camera base, and point the remote at the camera. -
Page 6: Back Of The Camera
Installation Guide for the ConferenceSHOT FX USB 3.0 Fixed Camera Back of the Camera 12 VDC, 1.5 A – EIAJ-04 jack. Connect only the power supply shipped with the camera or approved replacement 12 VDC, 3A power supply. USB 3.0 – USB Type B connector. Connect to a computer for use with soft conferencing applications. -
Page 7: Installation
Installation Guide for the ConferenceSHOT FX USB 3.0 Fixed Camera Installation This section covers: Selecting the location for the camera Installing the mount Connection diagrams Mounting the camera Don’t Void Your Warranty! Caution Always support the camera's body when lifting or moving it. Lifting the camera by its head or mounting arm will damage it. -
Page 8: Installing The Wall Mount
Installation Guide for the ConferenceSHOT FX USB 3.0 Fixed Camera Installing the Wall Mount The camera is shipped with a wall mount. Other mounting options are available as well. Contact us if you don’t have the camera mount you need. -
Page 9: Camera Behavior Settings
Installation Guide for the ConferenceSHOT FX USB 3.0 Fixed Camera Camera Behavior Settings The camera uses DIP switches to determine certain camera functions. Note When the camera is not inverted, DIP switches are in their default positions when they are up. -
Page 10: Rs-232 Connector Pin-Out
Cabling Notes Caution When building cables for Vaddio products, do not use pass-through RJ-45 connectors. If they are crimped incorrectly, they can cause intermittent connections and degrade signal quality. Incorrectly crimped pass-through connectors can also damage the connectors on the product, which will void your warranty. -
Page 11: Basic Connections
Installation Guide for the ConferenceSHOT FX USB 3.0 Fixed Camera Basic Connections Here is an example of how the camera might be set up in a conference room. In this setup, a computer uses a unified communications conferencing application with the camera and a conference phone. -
Page 12: Installing The Camera
Installation Guide for the ConferenceSHOT FX USB 3.0 Fixed Camera Installing the Camera Caution Before you start, be sure you can identify all cables correctly. Connecting a cable to the wrong port can result in equipment damage. Caution Check your cables. Connecting a cable to the wrong port or using the wrong pin-out can result in equipment damage and will void the warranty. -
Page 13: Powering Up The Camera
Installation Guide for the ConferenceSHOT FX USB 3.0 Fixed Camera Powering Up the Camera Connect camera power. The status light illuminates purple as the camera initializes. When the camera is ready and a video stream is available, the light changes to blue. -
Page 14: Initial Device Set-Up And System Administration Tasks
Vaddio devices. Select the desired device and exit to the device's web interface to complete the initial device set-up. Locate and set up the camera using the Vaddio Deployment Tool – This tool is available as a free download at https://info.legrandav.com/VaddioDeploymentTool. The tool scans the network for Vaddio devices, lists them by model and IP address, identifies all devices that are not set up, provides the controls to complete the initial device set-up, and provides links to each device's web interface. -
Page 15: Initial Device Set-Up Using The Vaddio Device Controller
No annoying messages about HTTPS connections - you automatically connect via HTTPS. Unlike the Vaddio Deployment Tool, it does not need to be updated to support new products. For detailed instructions on installation and use, refer to the Vaddio Device Controller's manual. -
Page 16: Initial Device Set-Up Using The Vaddio Deployment Tool
Organize devices into groups – for example, by product type or physical location. Note Be sure you have the current version of the Vaddio Deployment Tool. If it notifies you that an update is available, install the update. This ensures that you have access to the full capabilities of the tool. - Page 17 To complete the initial device set-up with the Vaddio Deployment Tool: 1. Download and install the Vaddio Deployment Tool if you have not done so already, then open it. 2. Power up the camera and other devices if you have not done so already.
-
Page 18: Manual Access And Initial Device Set-Up
Getting the Camera's IP Address for Access via Browser If you are not using the Vaddio Deployment Tool or the Vaddio Device Controller to locate and work with the camera, you will need to know its IP address so you can browse to it. -
Page 19: If The Camera Is At 169.254.1.1
Installation Guide for the ConferenceSHOT FX USB 3.0 Fixed Camera If the Camera Is At 169.254.1.1 This is the camera's default IP address. This means one of these things: The camera is not connected to the network. The network does not automatically assign IP addresses, and you need to configure the camera for the network. - Page 20 Installation Guide for the ConferenceSHOT FX USB 3.0 Fixed Camera Expect a security warning from your browser the first time you access the device's web interface. Different browsers will respond with different messages and options. Your browser will probably present a...
-
Page 21: Completing The Initial Device Set-Up
Installation Guide for the ConferenceSHOT FX USB 3.0 Fixed Camera Completing the Initial Device Set-up If the device has never been in service, or if factory defaults have been restored, the web interface opens to the initial device set-up page. -
Page 22: Next Steps
Installation Guide for the ConferenceSHOT FX USB 3.0 Fixed Camera Next Steps The camera is now ready to configure and use. This information is available in the Complete Manual for the ConferenceSHOT FX USB 3.0 Fixed Camera. Operation, Storage, and Care For smears or smudges on the product, wipe with a clean, soft cloth. -
Page 23: Compliance And Conformity Statements
Installation Guide for the ConferenceSHOT FX USB 3.0 Fixed Camera Compliance and Conformity Statements Compliance testing was performed to the following regulations: FCC Part 15 (15.107, 15.109), Subpart B Class A ICES-003, Issue 54: 2012 Class A EMC Directive 2014/30/EU... -
Page 24: European Compliance
Installation Guide for the ConferenceSHOT FX USB 3.0 Fixed Camera European Compliance This product has been evaluated for Electromagnetic Compatibility under the EMC Directive for Emissions and Immunity and meets the requirements for a Class A digital device. In a domestic environment this product may cause radio interference in which case the user may be required to take adequate measures. ... -
Page 25: Photo Credits
Installation Guide for the ConferenceSHOT FX USB 3.0 Fixed Camera Photo Credits This guide may include some or all of these photos. European Space Agency (ESA) astronaut Samantha Cristoforetti, a Flight Engineer with Expedition 42, photographs the Earth through a window in the Cupola on the International Space Station By NASA - https://blogs.nasa.gov/ISS_Science_Blog/2015/03/06/women-in-space-part-two-whats-... -
Page 26: Index
5 meaning of colors 11 status light 11 initial device set-up 12-13, 15-17, 19 meanings of colors 11 using the Vaddio Device Controller 13, 19 storage environment 20 using the web interface 16-17, 19 using Vaddio Deployment Tool 15... - Page 27 Installation Guide for the ConferenceSHOT FX USB 3.0 Fixed Camera supported web browsers 12 switch location 4 switch settings 6-7 camera ID (DIP switch) 7 image flip (DIP switch) 7 tablet 13 temperature, operating and storage 20 third-party control 7...
- Page 28 ©2020 Legrand AV Inc. Vaddio is a registered trademark of Legrand AV Inc. All other brand names or marks are used for identification purposes and are trademarks of their respective owners. All patents are protected under existing designations. Other patents pending.
Need help?
Do you have a question about the ConferenceSHOT FX and is the answer not in the manual?
Questions and answers