Advertisement
Quick Links
TuBAR
Retrofit for
®
Dresser Wayne
Vista 2 & 3
Copyright © 2009 CompX Security Products. Any companies and/or products referred to herein are marks or registered trademarks of their respective companies owners and/or mark holders.
1
TuBAR Retrofit for Vista 2-3 RevE
Advertisement

Related Manuals for COMPX TuBAR Retrofit for Dresser Wayne Vista 2 & 3 CAT Door


Summary of Contents for COMPX TuBAR Retrofit for Dresser Wayne Vista 2 & 3 CAT Door
- Page 1 Retrofit for ® Dresser Wayne Vista 2 & 3 Copyright © 2009 CompX Security Products. Any companies and/or products referred to herein are marks or registered trademarks of their respective companies owners and/or mark holders. TuBAR Retrofit for Vista 2-3 RevE...
-
Page 2: Parts Listing
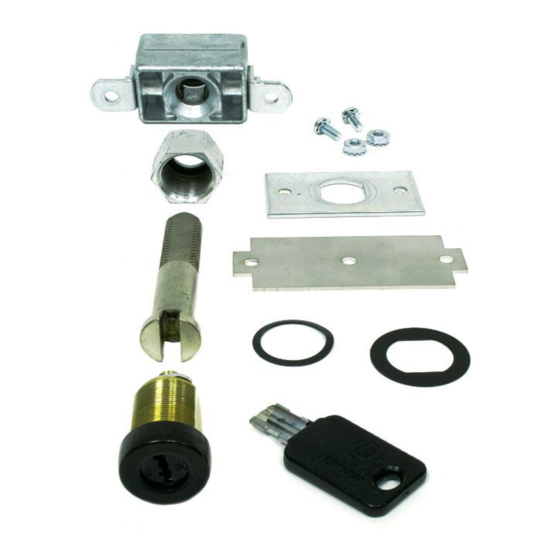
TuBAR CAT Door ® Retrofit: Vista 2 & 3 Part # DWC-V23-1 Parts Listing A. Quick Nut Assembly B. Steel Nut C. Steel Stud D. TuBAR Lock Assembly ® E. Quick Nut Mounting Screws F. Lock Mounting Plate G. Drill Template (Sold Separately) H. - Page 3 TuBAR CAT Door ® Retrofit: Vista 2 & 3 Part # DWC-V23-1 Instructions Use Template (G) to drill Ø3/16”center pilot hole only in panel at desired lock location (Fig 1). Drill Ø3/4”hole through pilot hole (Fig 2). Install Lock (D) through Gasket (H) and Ø3/4” Panel hole (Fig 3). Assemble Mounting Plate (F) and Stud (C) and secure with Nut (B) (Fig 4).
- Page 4 TuBAR CAT Door ® Retrofit: Vista 2 & 3 Part # DWC-V23-1 Drill Ø3/16”center pilot hole in Panel in location shown. Drill only center hole. Figure 1 TuBAR Retrofit for Vista 2-3 RevE...
- Page 5 TuBAR CAT Door ® Retrofit: Vista 2 & 3 Part # DWC-V23-1 Drill Ø3/4” hole thru pilot hole. Do Not drill hole oversize. Figure 2 TuBAR Retrofit for Vista 2-3 RevE...
- Page 6 TuBAR CAT Door ® Retrofit: Vista 2 & 3 Part # DWC-V23-1 Install TuBAR Lock (D) ® thru Gasket (H) and into Ø3/4” Panel hole. Figure 3 TuBAR Retrofit for Vista 2-3 RevE...
- Page 7 TuBAR CAT Door ® Retrofit: Vista 2 & 3 Part # DWC-V23-1 Install Mounting Plate (F), Stud(C) and Nut (B). Tighten Nut securely. Stud should have slight “wobble” after nut is securely tightened. Figure 4 TuBAR Retrofit for Vista 2-3 RevE...
- Page 8 TuBAR CAT Door ® Retrofit: Vista 2 & 3 Part # DWC-V23-1 Rotate door up to header. Tip of Stud (C) should line up with existing hole in header. Place center hole of Template (G) against existing hole in header and mark (2) screw hole locations on header.
- Page 9 TuBAR CAT Door ® Retrofit: Vista 2 & 3 Part # DWC-V23-1 Drill center hole in header Ø7/8”- Ø1.0” Drill (2) Ø3/16” screw holes in header at marks. Mount Quick Nut Assembly (A) to back side of header Figure 7 using (E)(2) #8-32 Screws &...
- Page 10 Do not unscrew upper Star Screws before unlocking the TuBAR® Lock. Doing so could result in damaged door, pump frame, lock assembly or broken keys. CompX Security Products is not responsible for damage that has occurred as a result of incorrect operation.
Need help?
Do you have a question about the TuBAR Retrofit for Dresser Wayne Vista 2 & 3 CAT Door and is the answer not in the manual?
Questions and answers