Table of Contents
Advertisement
150 Series
CompX refrigerator eLock Instructions
Thank you for purchasing the CompX eLock. The
information contained in these instructions is intended
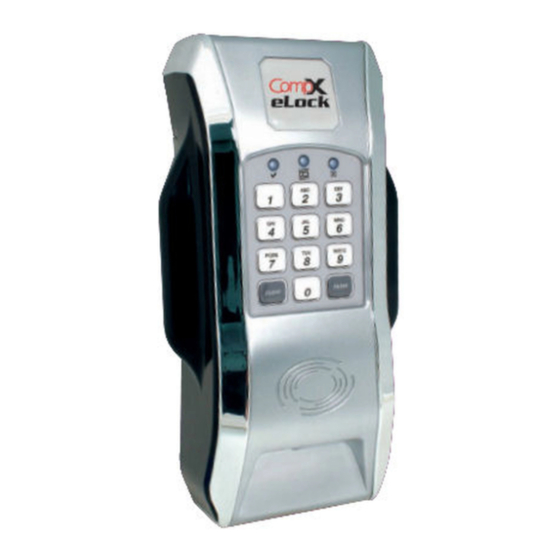
150 series refrigerator eLock
Unit Features:
w Each eLock can hold any combination of up to 250
Supervisors and Users
w Choose a model to use existing HID Prox or HID iCLASS
credentials that can be programmed to operate each eLock
w Spring bolt latching mechanism provides automatic relocking
w Door position switch input (requires additional hardware)
w Membrane keypad provides durable performance and easy
cleaning
What's in the box?
w 1 – eLock
w 1 – eLock mounting plate
w 1 – strike plate
w 1 – strike plate cover
w 8 – #8 x 3/8" Phillips flat head sheet metal screw (mounting
plate)
w 2 – #8 x 1/2" pin-in Torx pan head sheet metal screw (strike
plate)
w 2 – #8 x 1/2" pin-in Torx flat head machine screw (strike
plate cover)
w 1 – 7" foam tape (strike plate)
w 2 – 5" foam tape (mounting plate)
w 1 – battery compartment
w 1 – warranty card
w 1 – serial code sticker set (keep in a secure location)
w 1 – in-box instructions
150 Series — CompX refrigerator eLock Instructions
to serve as a guide so as to allow the eLock to be quickly
and easily put into service.
eLock controller
1.
Low battery
indicator (yellow
LED)
2.
Red LED
3.
Green LED
4.
Alpha-numeric
keypad
5.
"ENTER" button
6.
"CLEAR" button
1
2
3
4
5
6
7
8
9
7.
HID Prox or HID
iCLASS reader
location
(if equipped)
8.
USB Port for direct
connection to
LockView software
9.
AA Battery pack
– 6 (BATTERIES NOT
INCLUDED)
1
Advertisement
Table of Contents

Related Manuals for COMPX eLock 150 Series


Summary of Contents for COMPX eLock 150 Series
- Page 1 150 Series CompX refrigerator eLock Instructions Thank you for purchasing the CompX eLock. The to serve as a guide so as to allow the eLock to be quickly information contained in these instructions is intended and easily put into service.
- Page 2 There are 2 levels of credential: User / Supervisor. 4. Input the new PIN (4 digit min) and press “ENTER” or present Only a Supervisor credential(s) is allowed to manually NEW card program 150 Series — CompX refrigerator eLock Instructions...
- Page 3 2. Press and hold “CLEAR” until beeping stops For complete details on how to build a database of users 3. Enter slot number to be cleared and press “ENTER” (example: and eLocks, see the CompX LockView Software Instruction to clear slot 6 type 006) Manual.
- Page 4 Remove backer. Line up strike with line on at least 4” from the non-hinged edge of from the front of the door and at least 4" refrigerator; apply pressure to seal it on. the refrigerator. from the non-hinged edge. 150 Series — CompX refrigerator eLock Instructions...
- Page 5 ® Drilling Installation The CompX eLock can be mounted to the front of the refrigerator by using the provided foam tape or by drilling holes and using screws a. Cut a 3” piece of double- (provided).
- Page 6 Along the non-hinged side of the Install plastic strike cover on metal strike. refrigerator, make a mark 6-7/8” from Proceed to step 3. 150 Series — CompX refrigerator eLock Instructions...
- Page 7 ® Drilling Installation The CompX eLock can be mounted to the front of the refrigerator by using the provided foam tape or by drilling holes and using screws a. Cut a 3” piece of double-sided foam tape and attach it to the (provided).
- Page 8 Part #: 334008-0000-00 Copyright 2017 © CompX Security Products / 847.752.2500 / compx.com / 715 Center St., Grayslake, IL 60030 Any companies and/or products referred to herein are marks or registered trademarks of their respective companies, owners and/or mark holders.
Need help?
Do you have a question about the eLock 150 Series and is the answer not in the manual?
Questions and answers