Olimpia splendid SHERPA AQUADUE OS-CEBSH24EI Instructions For Installation, Use And Maintenance Manual
Hide thumbs
Also See for SHERPA AQUADUE OS-CEBSH24EI:
Table of Contents
Advertisement
Available languages
Available languages
Advertisement
Chapters
Table of Contents

Related Manuals for Olimpia splendid SHERPA AQUADUE OS-CEBSH24EI


Summary of Contents for Olimpia splendid SHERPA AQUADUE OS-CEBSH24EI
- Page 5 > 30 cm > 60 c m > 60cm > 30cm > 15 cm > 30 cm RISCALDAMENTO ACS/HEATING DHW RAFFREDDAMENTO/COOLING ACS/DHW ODT °C ODT °C...
- Page 7 ∆p-v (variable) ∆p-v (variable) ∆p-c (constant) ∆p-c (constant) ∆p-v (variable) ∆p-v (variable) p/kPa p/kPa p/kPa p/kPa p/kPa p/kPa lo-Stratos-Para Wilo-Stratos-Para Wilo-Yonos PARA RS Wilo-Stratos-Para Wilo-Stratos-Para Wilo-Yonos PARA RS p/kPa p/kPa p/kPa p/kPa Wilo-Stratos-Para Wilo-Stratos-Para Wilo-Stratos-Para Wilo-Stratos-Para /1-8,30/1-8 25/1-8,30/1-8 15/6, 25/6, 30/6 25/1-8,30/1-8 25/1-8,30/1-8 15/6, 25/6, 30/6...
- Page 8 21 20...
- Page 9 OS-CEBSH24EI OS-CEBCH36EI OS-CEINH48EI OS-CETNH48EI OS-CEINH60EI OS-CETNH60EI V/ph/Hz 220-240/1/50 220-240/1/50 220-240/1/50 380-415/3+N/50 220-240/1/50 380-415/3+N/50 13,5 8,15 11,5 U.I.SHERPA AQUADUE SMALL U.I.SHERPA AQUADUE BIG V/ph/Hz 220-240/1/50 220-240/1/50 4,05 7,05...
-
Page 15: Table Of Contents
GENERALITÁ INFORMAZIONI GENERALI SIMBOLOGIA 1.2.1 Pittogrammi redazionali 1.2.2 Pittogrammi relativi alla sicurezza AVVERTENZE REGOLE FONDAMENTALI DI SICUREZZA RICEVIMENTO E DISIMBALLO UNITÀ ESTERNA UNITÀ INTERNA ELENCO DEI COMPONENTI PRINCIPALI UNITÀ INTERNA ELENCO COMPONENTI A CORREDO UNITÀ INTERNA E DESCRIZIONI DELLE PARTI INSTALLAZIONE INSTALLAZIONE DELL’UNITÀ... - Page 16 3.1.13 PARAMETRI 3.1.14 FIRMWARE 3.1.15 DISPLAY 3.1.16 FUNZIONI SPECIALI 3.1.17 POMPE 3.1.18 RATING 3.1.19 DIAGNOSTICA GESTIONE RESISTENZE ELETTRICHE UNITA' INTERNA CONTROLLO REMOTO CONTROLLI DELLA POMPA DI CIRCOLAZIONE GESTIONE SORGENTE DI CALORE ESTERNA AUSILIARIA PRODUZIONE ACQUA CALDA SANITARIA PROTEZIONE ANTIGELO DISATTIVAZIONE E SPEGNIMENTO PER LUNGHI PERIODI PULIZIA 3.10 MANUTENZIONE PERIODICA...
-
Page 17: Generalitá
Le pompe di calore aria-acqua NON DEVONO essere installate in ambienti con presenza di gas infiammabili, gas esplosivi, in ambienti molto umidi (lavanderie, serre, ecc.), o in locali dove sono presenti altri macchinari che generano una forte fonte di calore. In caso di sostituzione di componenti utilizzare esclusivamente ricambi originali OLIMPIA SPLENDID. -
Page 18: Simbologia
IMPORTANTE! Per prevenire ogni rischio di folgorazione è indispensabile staccare gli interruttori generali prima di effettuare collegamenti elettrici ed ogni operazione di manutenzione sugli apparecchi. Rendere note a tutto il personale interessato al trasporto ed all’installazione della macchina le presenti istruzioni. SMALTIMENTO Il simbolo sul prodotto o sulla confezione indica che il prodotto non deve essere considerato come un normale rifiuto domestico, ma deve essere portato nel punto di raccolta appropriato per il riciclaggio di apparecchiature elettriche ed elettroniche. -
Page 19: Regole Fondamentali Di Sicurezza
• L’installazione degli apparecchi OLIMPIA SPLENDID deve essere effettuata da impresa abilitata che a fine lavoro rilasci al responsabile dell’impianto una dichiarazione di conformità in ottemperanza alle Norme vigenti ed alle indicazioni fornite dalla OLIMPIA SPLENDID nel presente libretto. •... -
Page 20: Unità Interna
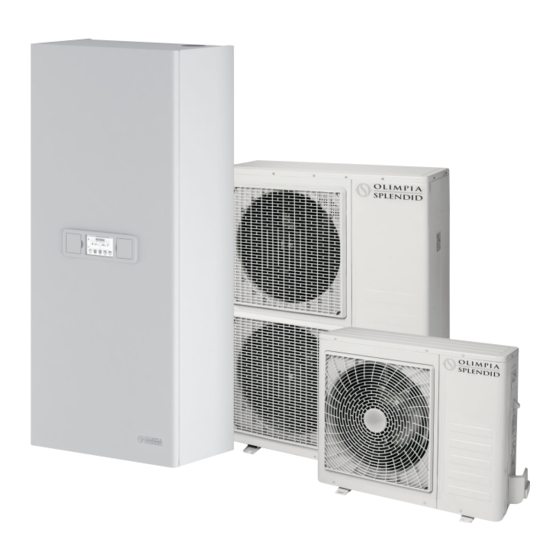
UNITÀ INTERNA (fig. 2) L’unità interna (fig. 2) è disponibile in sei modelli. Sherpa Sherpa Aquadue Small Aquadue Larghezza mm Profondità Altezza mm 1116 Peso kg Peso in uso kg Le unità OS-CEBSH24EI e OS-CEBCH36EI si abbinano all'unità Sherpa Aquadue Small, le unità... -
Page 21: Installazione
La mancata applicazione delle norme indicate, che può causare mal funzionamento delle apparecchiature, sollevano la ditta OLIMPIA SPLENDID da ogni forma di garanzia e da eventuali danni causati a persone, animali o cose. È importante che l’impianto elettrico sia eseguito secondo le norme vigenti, rispetti i dati riportati nel capitolo Caratteristiche tecniche e sia costituito da una corretta messa a terra. -
Page 22: Limiti Di Funzionamento
Prevedere: • dei blocchetti antivibranti • un’alimentazione elettrica conforme, nelle vicinanze dell’unità esterna A corredo dell’unità esterna viene fornita una rete di copertura della batteria di scambio termico; questa è prevista per installazioni accessibili al pubblico. Il montaggio della rete potrebbe causare, in caso di elevata umidità a bassa temperatura (nebbia) o neve, l’accumulo di ghiaccio sulla batteria con riduzione delle prestazioni del sistema. -
Page 23: Prove E Verifiche
2.4.1 Prove e verifiche (figg. 13-14) Ultimati i collegamenti dei tubi occorre eseguire una verifica sulla perfetta tenuta dell’impianto frigorifero. Per eseguire le operazioni di seguito descritte è necessario utilizzare un gruppo manometrico specifico per R410A ed una pompa del vuoto con portata minima di 40 l/min: Svitare il tappo di chiusura del raccordo di servizio della linea del gas (fig. -
Page 24: Pompe Di Circolazione
Il diametro nominale minimo delle tubazioni idrauliche di collegamento deve essere di 1”. Per consentire le operazioni di manutenzione o riparazione è indispensabile che ogni allacciamento idraulico sia dotato delle relative valvole di chiusura manuali. La tabella sottostante mostra le caratteristiche che deve avere l’impianto idraulico. OS-CEBSH24EI OS-CEBCH36EI OS-CEINH48EI... -
Page 25: Circuito Idraulico
2.5.2 Circuito idraulico (fig. 19) Lo schema idraulico della fig. 19 rappresenta le parti principali dell’unità interna ed un circuito idraulico tipico. Ritorno acqua impianto Valvola di sicurezza (3 bar) Manometro Sonda temperatura ritorno acqua impianto T1 Scambiatore a piastre Sonda temperatura mandata acqua impianto T2 Flussostato Vaso di espansione... -
Page 26: Allarme Pompa Circolazione
ALLARME POMPA CIRCOLAZIONE Se durante le prima accensione, dopo l’avvio del circolatore compare sul display del pannello di controllo A6, controllare che le valvole dell’impianto siano aperte, che ci sia almeno un’utenza con il circuito aperto, che il filtro a setaccio esterno non sia ostruito, che non vi siano bolle d’aria all’interno del circuito, che la pressione idrica dell’impianto sia corretta e che il circolatore non sia bloccato. -
Page 27: Cavi Di Collegamento
2.9.2 Cavi di collegamento La tabella seguente riassume i cavi da utilizzare. Cavo comunicazione ODU/IDU Per la comunicazione utilizzare un cavo multipolare, numero poli 2 x sezione 0,34- 0,50mm2, schermato, idoneo alla trasmis- sione dati (tipo LiYCY o equivalente). Cavo sonda ACS e aria esterna H03RN-F 2 G 0,5 / H03VV-F 2 G 0,5 UNITÀ... -
Page 28: Controlli Di Installazione
2.10 CONTROLLI DI INSTALLAZIONE (figg. 9, 14) 2.10.1 Preparazione alla prima messa in servizio (fig. 14) La prima messa in servizio della pompa di calore aria-acqua deve essere effettuata dal personale tecnico qualificato. Prima di mettere in servizio le pompe di calore aria-acqua accertarsi che: •... -
Page 29: Uso E Manutenzione
USO E MANUTENZIONE PANNELLO DI COMANDO DELL’UNITÀ INTERNA (fig. 24) Sul pannello frontale è posto il pannello comandi; aprendo lo sportello sinistro si accede all'interruttore generale (fig. 24 rif. A), al centro è posizionato il pannello di controllo touch-screen da 4.3" (fig. 24 rif.B) ed aprendo lo sportello destro si accede alla vite di fissaggio del pannello frontale (fig. -
Page 30: Timers
3.1.5 TIMERS (fig. 29) Toccando nella pagina principale l’icona Timers , per visualizzare i Timers disponibili. I timer disponibili sono: • Timer riscaldamento/raffreddamento • Timer ACS • Timer notturno • Holidays Usando una qualsiasi delle suddette icone, si accede alla finestra di impostazione del Timer selezionato. Toccando l’icona “Timer Riscald./Raffr.”... -
Page 31: Allarmi
3.1.9 ALLARMI (fig. 40) Con l' icona Allarmi si accede alla finestra che mostra gli allarmi attivi, overrides attivi e lo storico degli allarmi. Per cancellare gli allarmi attivi premere l'icona Reset e confermare. Per azzerare lo storico degli allarmi, premere l’icona Reset, quindi inserire la password Service e confermare. Allarmi unità... -
Page 32: Sistema
Allarmi display unità esterna Sulla scheda di controllo dell’unità esterna è presente un display a due digit che mostra gli allarmi quando presenti. La tabella sottostante mostra gli allarmi dell’unità esterna. Codice errore Descrizione allarme Malfunzionamento EEPROM Errore di comunicazione tra unità esterna ed unità interna Errore di comunicazione scheda esterna Guasto sensore di temperatura unità... - Page 33 NOME PARAMETRO CAMPO DI IMPOSTAZIONE COMMENTI REGOLAZIONE DI FABBRICA "Se T4<valore impostato e la sorgente di calore esterna è attivata il contatto relè ai contatti in uscita 14 e 15 della Temp. esterna per atti- scheda sono chiusi. -15 20°C 2°C vaz.
-
Page 34: Firmware
NOME PARAMETRO CAMPO DI IMPOSTAZIONE COMMENTI REGOLAZIONE DI FABBRICA Isteresi T3 per selezione 0°C-5°C 2°C modo ACS Protezione temp.com- 100°C-160°C 130°C pressore ACS Se ON e la pompa è spenta, essa verrà accesa con Attivazione antiblocco ON, OFF intervallo e durata impostata tramite i due parametri pompa ACS successivi Intervallo antiblocco... -
Page 35: Gestione Resistenze Elettriche Unita' Interna
La finestra è divisa in tre zone • Stato di attivazione dei componenti collegati alla scheda dell’unità interna (modificabile solo se il sistema è in stand-by): • Pompa di circolazione principale • Pompa ACS • Heater 1 (Riscaldatore elettrico1) • Heater 2 (Riscaldatore elettrico 2) •... -
Page 36: Controlli Della Pompa Di Circolazione
modo riscaldamento morsetto 3: secondo set point ECO mode: con contatto pulito aperto il Set point selezionato è a secondo del modo selezionato il "Set point raffreddamento" o il "Set point riscaldamento"; con contatto chiuso il Set point selezionato è a secondo del modo selezionato il "Set point raffreddamento ECO" o il "Set point riscaldamento ECO"... -
Page 37: Protezione Antigelo
Essa può essere effettuata con periodicità, dal Servizio Tecnico di Assistenza, che è tecnicamente abilitato e preparato e può inoltre disporre, se necessario, di ricambi originali. Il piano di manutenzione che il Servizio Tecnico di Assistenza OLIMPIA SPLENDID o il manutentore deve osservare, con periodicità annuale, prevede le seguenti operazioni e controlli: •... - Page 39 GENERAL GENERAL INFORMATION SYMBOLS 1.2.1 Editorial pictograms 1.2.2 Safety pictograms WARNINGS ESSENTIAL SAFETY REGULATIONS RECEPTION AND UNPACKING EXTERNAL UNIT INTERNAL UNIT LIST OF INTERNAL UNIT MAIN COMPONENTS LIST OF COMPONENTS PROVIDED AND DESCRIPTION OF PARTS INSTALLATION INTERNAL UNIT INSTALLATION 2.1.1 Removing the front panel 2.1.2 Access to internal components...
- Page 40 3.1.13 PARAMETERS 3.1.14 FIRMWARE 3.1.15 DISPLAY 3.1.16 SPECIAL FUNCTIONS 3.1.17 PUMPS 3.1.18 RATING 3.1.19 DIAGNOSTICS INTERNAL UNIT ELECTRICAL HEATER ELEMENTS MANAGEMENT REMOTE CONTROL CIRCULATION PUMP CHECKS AUXILIARY EXTERNAL HEAT SOURCE MANAGEMENT DOMESTIC HOT WATER PRODUCTION FROST PROTECTION DEACTIVATION AND SHUTDOWN FOR LONG PERIODS CLEANING 3.10 SCHEDULED MAINTENANCE...
-
Page 41: General
Air-water heat pumps MUST NEVER be installed in rooms where there is inflammable gas, explosive gas, a high level of humidity (laundry rooms, greenhouses etc.), or in rooms where there are other machines generating a lot of heat. Should components need replacing, always use OLIMPIA SPLENDID original spare parts. -
Page 42: Symbols
IMPORTANT! To prevent any risk of electric shock, the master switches must be disconnected before making electrical connections and carrying out maintenance on the appliances. Make sure that all personnel responsible for transport and installation of the appliance are aware of these instructions. DISPOSAL The symbol on the product or on the packaging indicates that the product must not be considered as normal domestic refuse but it must be taken to an appropriate disposal point for recycling electrical and electronic appliances. -
Page 43: Essential Safety Regulations
• OLIMPIA SPLENDID appliances must be installed by an authorised installer who, on completion of the work, will release a declaration of conformity to the client in compliance with current regulations and with the indications given by OLIMPIA SPLENDID in this booklet. -
Page 44: Internal Unit
INTERNAL UNIT (fig. 2) The internal unit (fig. 2) is available in six models. Sherpa Sherpa Aquadue Small Aquadue Width mm Depth mm Height mm 1116 Weight kg Weight in use kg The OS-CEBSH24EI and OS-CEBCH36EI units are designed for the Sherpa Aquadue Small unit, the OS-CEINH48EI, OS-CETNH48EI, OS-CEINH60EI and OS-CETNH60EI units are designed for the Sherpa Aquadue Big unit. -
Page 45: Installation
Follow the instructions given in this manual closely in order to achieve a successful installation and optimum performance. Failure to apply the indicated regulations, which may cause the appliance to malfunction, relieves OLIMPIA SPLENDID of any form of warranty and of any damage caused to persons, animals or property. -
Page 46: Operating Limits
The external unit is supplied with a mesh for covering the heat exchange battery; this is envisaged for installations accessible to the public. Fitting the mesh may cause, in the event of high humidity at low temperature (fog) or snow, a build-up of ice on the battery with reduced system performance. -
Page 47: Tests And Checks
2.4.1 Tests and checks (fig. 13, 14) Once the pipes are connected, check the refrigerant circuit is perfectly sealed. To perform the operations described below, use a manometric unit specific for R410A and a vacuum pump with minimum flow rate of 40 l/min: Unscrew the cap on the gas line union (fig. -
Page 48: Circulation Pumps
The minimum nominal diameter of the hydraulic connecting pipes must be 1”. To allow the maintenance and repair operations it is indispensable that each hydraulic connection is fitted with respec- tive manual closing valves. The table below shows the characteristics the hydraulic system must have. OS-CEBSH24EI OS-CEBCH36EI OS-CEINH48EI... -
Page 49: Hydraulic Circuit
2.5.2 Hydraulic circuit (fig. 19) The hydraulic diagram in fig. 19 shows the main parts of the internal unit and a typical hydraulic circuit. System water return Safety valve (3 bar) Pressure gauge System water return temperature probe T1 Plate heat exchanger System water flow temperature probe T2 Flow switch Expansion vessel... -
Page 50: Circulation Pump Alarm
CIRCULATION PUMP ALARM If during initial start-up, AL6 appears on the control panel display after starting the circulator, check that the system valves are open, that there is at least one utility with the circuit open, that the external sieve filter is not clogged, that there are no air bubbles in the circuit, that the system water pressure is correct and that the circulator is not blocked. -
Page 51: Connecting Cables
2.9.2 Connecting cables The following table summarises the cables to be used. ODU/IDU communication cable For communication use a multi conduc- tor cable, number of cores 2 x section 0,34-0,50mm2, shielded, suitable for data transmission (type LiYCY or equivalent). DHW and outside air probe cable H03RN-F 2 G 0,5 / H03VV-F 2 G 0,5 INTERNAL UNIT SHERPA AQUADUE SMALL... -
Page 52: Checks During And After Initial Start-Up
• If a boiler is fitted in the system, check that check valves have been installed on the water inlets on the heat pump and on the boiler to prevent loss of water flow in the system and excessively hot water entering the heat pump. •... -
Page 53: Use And Maintenance
USE AND MAINTENANCE INTERNAL UNIT CONTROL PANEL (fig. 24) The control panel is on the front panel; opening the left door will give access to the master switch (fig. 24 ref. A), in the centre is the 4.3" touch-screen display panel (fig. 24 ref.B) and opening the right door gives access to the front panel fixing screws (fig. 24 ref. -
Page 54: Timers
3.1.5 TIMERS (fig. 29) Touching the Timers XXX icon on the main page displays the Timers available. The timers available are: • Heating/cooling timer • DHW timer • Night timer • Holidays Touching one of the above icons calls up the window for setting the Timer selected. Touching the “Heating/Cooling Timer”... -
Page 55: Alarms
3.1.9 ALARMS (fig. 40) The Alarms icon calls up the window that shows the current alarms, current overrides and the alarms history. To cancel the current alarms press the Reset icon and confirm. To reset the alarms history, press the Reset icon, then enter the Service password and confirm. Alarms on internal unit display Table shows the alarms or overrides that can appear on the control panel display. -
Page 56: System
Alarms on external unit display The external unit control board has a two-digit display that shows any active alarms. The table below shows the external unit alarms. Error code Alarm Description EEPROM malfunction Communication error between external unit and internal unit External board communication error External unit temperature sensor faulty Compressor power voltage protection... - Page 57 PARAMETER NAME RANGE DEFAULT COMMENTS "If T4<select value and bc=ON the relay contact at board Outdoor temp. For aux outputs 14 and 15 is closed. -15 to 20°C 2°C heaters If T4<select value, bc=ON and AEH>0 the additional electric heaters can be energized" Water temp.
-
Page 58: Firmware
PARAMETER NAME RANGE DEFAULT COMMENTS If ON and the DHW pump is OFF, it will be switched ON Periodic DHW pump ON, OFF with interval and duration defined by the following two activation parameters DHW pump activation 0 -100 hours interval DHW pump activation 0 –... -
Page 59: Internal Unit Electrical Heater Elements Management
The window is divided into three sections • Activation status of the components connected to the internal unit board (can only be changed only if the system is in standby mode): • Main circulation pump • DHW pump • Heater 1 (Electric heater 1) •... -
Page 60: Circulation Pump Checks
terminal 3: second ECO mode set point: with the clean contact open the Set point selected is, depending on the mode selected, the "Cooling set point" or the "Heating set point"; with the contact closed the Set point selected is, depending on the mode selected, the "ECO cooling set point"... -
Page 61: Frost Protection
This can be carried out periodically by the Technical Service Department, which has the necessary technical capability and can also provide original spare parts if necessary. The maintenance plan that the OLIMPIA SPLENDID service technician or the maintenance engineer must adhere to, on an annual basis, includes the following operations and checks: •... - Page 63 ALLGEMEINES ALLGEMEINE INFORMATIONEN SYMBOLGEBUNG 1.2.1 Redaktionelle Piktogramme 1.2.2 Piktogramme bezüglich der Sicherheit WARNHINWEISE GRUNDLEGENDE SICHERHEITSREGELN ERHALT UND AUSPACKEN AUSSENEINHEIT INNENEINHEIT LISTE DER HAUPTKOMPONENTEN DER INNENEINHEIT VERZEICHNIS DER MITGELIEFERTEN KOMPONENTEN UND BESCHREIBUNG DER TEILE INSTALLATION INSTALLATION DER INNENEINHEIT 2.1.1 Entfernung der Vorderblende 2.1.2 Zugriff auf die Innenkomponenten INSTALLATION DER AUSSENEINHEIT...
- Page 64 3.1.13 PARAMETER 3.1.14 FIRMWARE 3.1.15 DISPLAY 3.1.16 SONDERFUNKTIONEN 3.1.17 PUMPEN 3.1.18 RATING 3.1.19 DIAGNOSTIK VERWALTUNG DER ELEKTRISCHEN WIDERSTÄNDE INNENEINHEIT FERNSTEUERUNG KONTROLLEN DER UMLAUFPUMPE VERWALTUNG EINER EXTERNEN HILFSWÄRMEQUELLE PRODUKTION VON HEISS-SANITÄRWASSER FROSTSCHUTZ DEAKTIVIERUNG UND ABSCHALTUNG FÜR LANGE ZEITRÄUME REINIGUNG 3.10 PROGRAMMIERTE WARTUNG...
-
Page 65: Allgemeines
Die Luft-Wasser-Wärmepumpen DÜRFEN NICHT in Umgebungen mit Vorkommen entflammbarer oder explosiver Gase, in sehr feuchten Umgebungen (Wäschereien, Treibhäusern usw.) oder in Räumen, in denen sich weitere starke Wärme abgebende Maschinen befinden, betrieben werden. Bei Auswechselung von Komponenten verwenden Sie ausschließlich Originalersatzteile von OLIMPIA SPLENDID. -
Page 66: Symbolgebung
WICHTIG! Zur Vorbeugung jeglicher Stromschlaggefahr ist unbedingt der Hauptschalter abzustellen, bevor irgendwelche elektrischen Anschlüsse hergestellt oder Wartungsarbeiten an den Geräten durchgeführt werden. Machen Sie diese Anweisungen dem gesamten in den Transport und die Installation der Maschine einbezogenen Personal bekannt. ENTSORGUNG Das Symbol auf dem Produkt oder auf der Packung zeigt an, dass das Produkt nicht als normaler Hausabfall zu betrachten, sondern einer für das Recycling elektrischer und elektronischer Geräte zuständigen Stelle zu übergeben ist. -
Page 67: Grundlegende Sicherheitsregeln
• Die Installation der OLIMPIA SPLENDID Geräte ist durch eine Fachfirma auszuführen, die bei Abschluss der Arbeiten dem Verantwortlichen der Anlage eine Erklärung zur Konformität mit den geltenden Vorschriften und den von OLIMPIA SPLENDID in diesem Handbuch festgesetzten Anweisungen übergibt. -
Page 68: Inneneinheit
INNENEINHEIT (Abb. 2) Die Inneneinheit (Abb. 2) ist in sechs Modellen erhältlich. Sherpa Sherpa Aquadue Small Aquadue Breite mm Tiefe mm Höhe mm 1116 Gewicht kg Gewicht in Gebrauch kg Die Einheiten OS-CEBSH24EI und OS-CEBCH36EI werden mit der Einheit Sherpa Aquadue Small kombiniert. Die Einheiten OS-CEINH48EI, OS-CETNH48EI, OS-CEINH60EI und OS-CETNH60EI werden mit der Einheit Sherpa Aquadue Big kombiniert. -
Page 69: Installation
Zur Gewährleistung einer einwandfreien Installation und optimaler Betriebsleistungen sind die Anweisungen in diesem Handbuch strikt zu befolgen. Die nicht erfolgte Anwendung der angegebenen Vorschriften kann Betriebsstörungen an den Geräten verursachen und entbindet die Firma OLIMPIA SPLENDID aus jeder Form der Gewährleistungspflicht sowie der Haftung für eventuelle Schäden an Personen, Tieren oder Gegenständen. -
Page 70: Betriebsgrenzen
• eine konforme elektrische Stromversorgung in der Nähe der Außeneinheit Zum Lieferumgang der Außeneinheit gehört ein Abdecknetz für die Wärmeübertragungsbatterie. Diese Vorrichtung ist für öffentlich zugängliche Installationen vorgesehen. Die Montage des Netzes könnte im Fall hoher Luftfeuchtigkeit bei niedrigen Temperaturen (Nebel) oder Schnee die Ansammlung von Eis unter der Batterie mit Annahme der Systemleistungen verursachen. -
Page 71: Prüfungen Und Kontrollen
2.4.1 Prüfungen und Kontrollen (Abb. 13, 14) Nach Fertigstellung der Rohrverbindungen ist eine Überprüfung der einwandfreien Dichtigkeit der Kühlanlage durchzuführen. Zur Durchführung der nachstehend beschriebenen Arbeitsschritte ist die Verwendung einer spezifischen Manometer-Gruppe für R410A sowie einer Vakuumpumpe mit einer Mindestförderleistung von 40 l/min erforderlich: Lösen Sie die Verschlusskappe des Service-Fittings der Gasleitung (Abb. -
Page 72: Umlaufpumpen
Der Mindest-Nenndurchmesser der Wasseranschlussrohrleitungen muss 1” betragen. Um Wartungs- oder Reparaturarbeiten möglich zu machen, ist es unverzichtbar, dass jeder Wasseranschluss mit den entsprechenden Handsperrventilen ausgestattet ist. Die untenstehende Tabelle zeigt die Eigenschaften, die für die Wasseranlage vorgeschrieben sind. OS-CEBSH24EI OS-CEBCH36EI OS-CEINH48EI OS-CETNH48EI OS-CEINH60EI OS-CETNH60EI Einheit Inneneinheit SHERPA Inneneinheit SHERPA BIG... -
Page 73: Wasserkreis
2.5.2 Wasserkreis (Abb. 19) Der Wasserplan der Abb. 19 stellt die Hauptteile der Inneneinheit und einen typischen Wasserkreis dar. Wasserrücklauf Anlage Sicherheitsventil (3 bar) Manometer Temperatursonde Wasserrücklauf Anlage T1 Plattenwärmeübertrager Temperatursonde Wasserzuleitung Anlage T2 Flusswächter Expansionsgefäß Kollektor für elektrische Widerstände 10 Automatischer Luftauslass 11 Umlaufpumpe 12 3-Weg-Ventilweiche (integriert an Bord der Maschine auf Version 3W) -
Page 74: Alarm Umlaufpumpe
ALARM UMLAUFPUMPE Wenn während des ersten Einschaltens, nach dem Start der Umlaufpumpe, der Alarm AL6 erscheint, stellen Sie sicher, dass die Ventile in der Anlage geöffnet sind, dass mindestens ein Verbraucher mit offenen Kreis vorhanden ist, dass das externe Filtersieb nicht verstopft ist, dass keine Luftblasen im Innern des Kreises auftreten, dass der Wasserdruck in der Anlage korrekt ist und dass die Umlaufpumpe nicht blockiert ist. -
Page 75: Anschlusskabel
2.9.2 Anschlusskabel Die nachstehende Tabelle liefert eine Übersicht der zu verwendenden Kabel. Kommunikationskabel ODU/IDU Verwenden Sie für die Kommunikation ein Mehrpolkabel, Anzahl Pole 2 für Quersch- nitt 0,34-0,50 mm2, abgeschirmt, geeignet für die Datenübertragung (Typ LiYCY oder gleichwertig) Sondenkabel ACS und Außenluft H03RN-F 2 G 0,5 / H03VV-F 2 G 0,5 INNENEINHEIT SHERPA AQUADUE SMALL... -
Page 76: Kontrollen Der Installation
2.10 KONTROLLEN DER INSTALLATION (Abb. 9, 14) 2.10.1 Vorbereitung zur ersten Inbetriebnahme (Abb. 14) Die erste Inbetriebnahme der Luft-Wasser-Wärmepumpe ist von qualifiziertem Technikpersonal durchzuführen. Vor der ersten Inbetriebnahme der Luft-Wasser-Wärmepumpe sind folgende Bedingungen sicherzustellen: • Alle Sicherheitsvorgaben wurden eingehalten. • Die Luft-Wasser-Wärmepumpe wurde auf geeignete Weise an der Standfläche befestigt. -
Page 77: Bedienung Und Wartung
BEDIENUNG UND WARTUNG BEDIENTAFEL DER INNENEINHEIT (Abb. 24) An der Vorderblende befindet sich die Bedientafel. Beim Öffnen der linken Klappe erfolgt der Zugriff auf den Hauptschalter (Abb. 24 Pos. A). In der Mitte befindet sich die 4.3" Touchscreen-Bedientafel (Abb. 24 Pos. B). Beim Öffnen der rechten Klappe erfolgt der Zugriff auf die vordere Tafel (Abb. -
Page 78: Timer
3.1.5 TIMER (Abb. 29) Berühren Sie das Icon Timer , auf der Hauptseite, um die verfügbaren Timer anzuzeigen. Folgende Timer stehen zur Verfügung: • Timer Heizung/Kühlung • Timer ACS • Timer Nacht • Holidays Bei Berührung eines beliebigen der oben bezeichneten Icons erfolgt der Einstieg in das Fenster zur Einstellung des gewählten Timers Bei Berührung des Icons “Timer Heizung/Kühlung”... -
Page 79: Alarme
3.1.9 ALARME (Abb. 40) Mit dem Icon Alarme erfolgt der Einstieg in das Fenster mit Anzeige der aktiven Alarme, der aktiven Overrides und der Alarmhistorie. Zum Löschen der aktiven Alarme drücken Sie das Reset-Icon und bestätigen Sie. Zur Nullstellung der Alarmhistorie drücken Sie das Reset-Icon, geben Sie das Passwort Service ein und bestätigen Sie. Alarme Display Inneinheit Die Tabelle zeigt die Alarme oder Overrides, die auf dem Display der Bedientafel darstellbar sind. -
Page 80: System
Alarme Display Außeneinheit Auf der Kontrollkarte der Außeneinheit befindet ein Zwei-Digit-Display, das vorhandene Alarme gegebenenfalls anzeigt. Die untenstehende Tabelle zeigt die Alarme der Außeneinheit. Fehlercode Alarmbeschreibung Funktionsbeschreibung EEPROM Fehler in der Kommunikation zwischen der Außeneinheit und der Inneneinheit Fehler in der Kommunikation mit externer Karte Defekt Sensor Temperatur Außeneinheit Schutz Versorgungsspannung Kompressor Schutz des Moduls PFC (nur für 36K &... - Page 81 NOME PARAMETRO CAMPO DI IMPOSTAZIONE COMMENTI REGOLAZIONE DI FABBRICA "Se T4<valore impostato e la sorgente di calore esterna è attivata il contatto relè ai contatti in uscita 14 e 15 della Temp. esterna per atti- scheda sono chiusi. -15 20°C 2°C vaz.
-
Page 82: Firmware
NOME PARAMETRO CAMPO DI IMPOSTAZIONE COMMENTI REGOLAZIONE DI FABBRICA Isteresi T3 per selezione 0°C-5°C 2°C modo ACS Protezione temp.com- 100°C-160°C 130°C pressore ACS Se ON e la pompa è spenta, essa verrà accesa con Attivazione antiblocco ON, OFF intervallo e durata impostata tramite i due parametri pompa ACS successivi Intervallo antiblocco... -
Page 83: Verwaltung Der Elektrischen Widerstände Inneneinheit
Das Fenster ist in drei Bereiche gegliedert: • Status der Aktivierung den an die Karte der Inneneinheit angeschlossenen Komponenten (modifizierbar nur dann, wenn das System auf Stand-by geschaltet ist): • Hauptumlaufpumpe • ACS-Pumpe • Heater 1 (Elektrische Heizung 1) • Heater 2 (Elektrische Heizung 2) •... -
Page 84: Kontrollen Der Umlaufpumpe
Klemme 2: ON Heizung: bei offenem potentialfreiem Kontakt läuft das System in Stand-by, bei geschlossenem Kontakt läuft das System im Heizmodus. Klemme 3: Zweiter Setpoint ÖKO-Modus: bei offenem potentialfreiem Kontakt ist der gewählte Setpoint je nach dem gewählten Modus der "Setpoint Kühlung" oder der "Setpoint Heizung". bei offenem potentialfreiem Kontakt ist der gewählte Setpoint je nach dem gewählten Modus der "Setpoint Kühlung ÖKO"... -
Page 85: Frostschutz
Der Eingriff kann in regelmäßigen Abständen vom Technischen Kundendienst durchgeführt werden, der technisch ausgebildet ist und gegebenenfalls Ersatzteile einsetzen kann. er Wartungsplan, den der Technische Kundendienst OLIMPIA SPLENDID oder der Kühltechniker zu beachten hat, sieht folgende jährlich durchzuführenden Eingriffe und Kontrollen vor: •... - Page 88 www.olimpiasplendid.it info@olimpiasplendid.it...
Need help?
Do you have a question about the SHERPA AQUADUE OS-CEBSH24EI and is the answer not in the manual?
Questions and answers