
Related Manuals for Peiying PY0019


Summary of Contents for Peiying PY0019
- Page 1 CAR DVR PY0019 Bedienungsanleitung Owner’s manual Instrukcja obsługi Manual de utilizare...
- Page 3 Bedienungsanleitung SICHERHEITSANWEISUNGEN Lesen Sie sorgfältig diese Bedienungsanleitung vor der er- sten Benutzung und behalten Sie für späteres nachschla- gen. Der Hersteller ist nicht verantwortlich für Beschädi- gungen, hervorgerufen durch unsachgemäße Benutzung und Umgang mit dem Gerät. • Schützen Sie das Produkt vor Wasser, Feuchtigkeit und andere Flüssigkeiten.
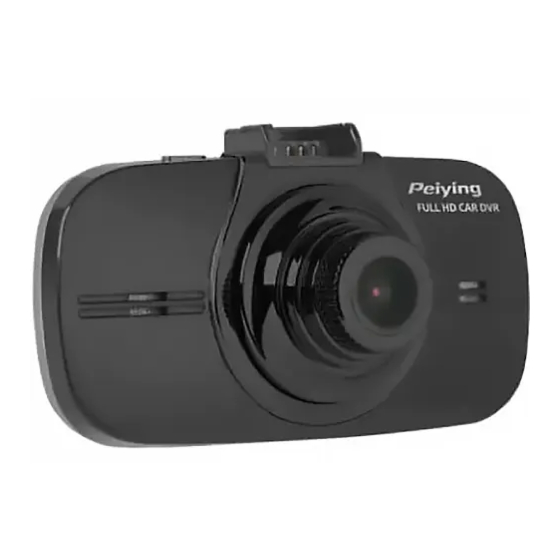
- Page 4 Bedienungsanleitung PRODUKTBESCHREIBUNG...
- Page 5 Bedienungsanleitung 1. Integriertes Mikrofon 2. HDMI Ausgang 3. AV Ausgang 4. Mikro SD Kartensteckplatz 5. Display 6. Ladeanzeige 7. Betriebsanzeige 8. Taste MODUS [MODE]: • Drücken um den Modus zu wechseln (Aufnehmen/ Kamera/ Wiedergabemodus) • Drücken um das Menü zu verlassen 9.
- Page 6 Bedienungsanleitung • Drücken für Video Wiedergabe /Pause im Wiederga- bemodus 13. Richtungstaste: Abwärts 14. Mini USB Steckplatz 15. Halterungsbefestigung 16. Taste Ein/Aus • Drücken um das Gerät einzuschalten. • Drücken und halten um das Gerät auszuschalten 17. Linsen EINLEGEN DER MIKRO SD KARTE 1.
- Page 7 Bedienungsanleitung AV/ HDMI AUSGANG Verbinden Sie ein Ende des AV/ HDMI Kabels mit dem zu- gehörigen Anschluss am Gerät; verbinden Sie das andere Kabelende mit dem TV AV/ HDMI Eingang um durch die Dateien zu blättern. BEDIENUNG EIN-/AUSSCHALTEN Drücken Sie die Taste Ein/Aus um das Gerät einzuschalten. Drücken und halten der Taste Ein/Aus um das Gerät au- szuschalten.
- Page 8 Bedienungsanleitung 5. Recycle (Schleifenaufnahme): Wählen Sie die Video-Da- teien im Zyklus von 2 Min. /5 Min. /10 Min. pro Abschnitt zu Speichern. Wenn Sie diese Option deaktivieren, wer- den Videos von 30 Min. pro Abschnitt gespeichert wer- den, bis die Speicherkarte voll ist. 6.
- Page 9 Bedienungsanleitung 4. LCD aus: der Bildschirm schaltet sich automatisch aus nach einer bestimmten Zeit (Aus/ 1 Min/ 3 Min / 5 Min). 5. Format: Mikro SD Karte formatieren. 6. Werkseinstellungen: auf Werkseinstellungen zurück- setzen. 7. Version: Information Softwareversion. AUFNAHMEMODUS Drücken Sie die Taste OK oder verbinden das Gerät mit dem Auto-Ladegerät um in den Aufnahmemodus zu gelan- gen.
-
Page 10: Usb Modus
Bedienungsanleitung Aufnehmen/Kamera um die gewünschte Datei auszu- wählen. Drücken Sie die Taste Aufnehmen/Kamera für Video Wiedergabe/Pause. Drücken Sie die Taste Menü um dass Löschmenü aufzurufen. Benutzen Sie die Rich- tungstasten um auszuwählen: Einzeln löschen oder alles löschen. Drücken Sie die Taste Kamera zum bestätigen. USB MODUS Verbinden Sie den DVR mit dem PC über das USB Kabel. -
Page 11: Fehlerbehebung
Bedienungsanleitung ZURÜCKSETZEN Wenn anormale Zustände während der Benutzung des Gerätes auftreten, drücken Sie die Taste Reset (Zurücksetzen). FEHLERBEHEBUNG Problem Mögliche Lösung • Batterie ist zu schwach Kann Gerät nicht • Es ist Feuchtigkeit im Gerät einschalten • Das Gerät ist am PC angeschlos- •... -
Page 12: Technische Daten
Bedienungsanleitung Kann keine • Überprüfen Sie die Verbindung Verbindung mit des DVR mit dem PC dem PC herstellen • Überprüfen Sie die Einstellungen Vertikale Streifen • Position des Gerätes einstellen am Display • Das Gerät ist möglicherweise direktem Sonnenlicht ausge- Bild ist nicht klar setzt;... - Page 13 Bedienungsanleitung • Unterstützte Betriebssysteme: Windows XP, Windows 7, MAC OS x 10.3.6 oder • Bildauflösung: 4M • Bildformat: JPEG • Videoauflösung: 1080 FHD/30 fps (1920x1080 px); 2K (2:1)/30 fps (2560x1080 px); 2K (16:9)/30 fps (2304x1296 px); FDH/45 fps (1920x1080 px); FDH/30 fps (1920x1080);...
- Page 14 Bedienungsanleitung Die Spezifikationen können ohne Ankündigung geändert werden. “Hiermit erklär die Firma Lechpol Electronics dass sich das Gerät PY0019 im Einklang mit den grundlegenden Anforderungen und anderen relevanten. Bestimmungen der Richtlinie 2014/53/UE befindet. Konformitätserklärung zum Download auf www.lechpol.eu” Deutsch Korrekte Entsorgung dieses Produkts (Elektromüll)
-
Page 15: Safety Instructions
Owner’s manual SAFETY INSTRUCTIONS Read the instruction manual carefully before first use and keep it for future reference. Producer is not responsible for damages caused by inappropriate handling and use of the device. • Protect this product from moisture, humidity, water and any other liquid. -
Page 16: Product Description
Owner’s manual PRODUCT DESCRIPTION... - Page 17 Owner’s manual 1. Built-in microphone 2. HDMI output 3. AV output 4. microSD card slot 5. Display 6. Charging indicator 7. Power indicator 8. MODE button: • press to switch modes (Recording/ Camera/ Play- back mode) • press to exit menu 9.
-
Page 18: Installation Of Microsd Card
Owner’s manual 13. Direction button: go down 14. miniUSB port 15. Bracket port 16. Power button: • press to turn on the device • press and hold to turn off the device 17. Lens INSTALLATION OF MICROSD CARD 1. Insert the microSD card to the corresponding slot of the device. -
Page 19: Recording Mode Menu
Owner’s manual OPERATION TURNING ON/OFF Press Power button to turn on the device. Press and hold Power button again to turn off the device. RECORDING MODE MENU 1. Video resolution: set video resolution (1080 FHD/30 fps (1920x1080 px); 2K (2:1)/30 fps (2560x1080 px); 2K (16:9)/30 fps (2304x1296 px);... -
Page 20: Camera Mode Menu
Owner’s manual CAMERA MODE MENU 1. Light frequence: 50 Hz/ 60 Hz 2. White balance: choose between Auto/ Sunny/ Cloudy/ Fluorescent/ Tungsten. 3. AE meter: Center/ Spot 4. AE bias: -2.0, -1.7, -1.3, -1.0, -0.7, -0.3, 0, 0.3, 0.7, 1.0, 1.3, 1.7, 2.0 SYSTEM MODE MENU 1. -
Page 21: Camera Mode
Owner’s manual Note: • Insert microSD card before using. The recorded videos will be saved on it. • During recording, press direction button [go up] button to turn on/off microphone. CAMERA MODE Firstly, turn on the DVR. Then press MODE button to enter photo taking mode. -
Page 22: Usb Charging
Owner’s manual USB CHARGING 1. Using built-in rechargeable lithium battery: Charge the built-in battery by connecting to car charger or to the compatible PC USB port. Note: • When the device is charging, red charging indicator is on. • When the battery is fully charged, charging indicator turns off. -
Page 23: Troubleshooting
Owner’s manual TROUBLESHOOTING Problem Solution • Battery level is too low • There is moisture inside the Cannot turn on device • The device is connected to the PC • Check the if the device is connected correctly with the Cannot charge charger •... - Page 24 Owner’s manual • The device can be exposed to Display is not clear direct light; adjust the position of the device Wrong date or time • Check if there is correct date/ on the images time set in the system settings •...
- Page 25 Owner’s manual • Video format: MOV/ H.264 • Video output: AV / HDMI • Lens: 170º wide angle lens • Lens resolution: 3.0 Mpx • Recording mode: loop recording (Off/2 mins/5 mins/10 mins) / motion detection • Memory card slot: microSD card (up to 64 GB, class 10 and above) •...
- Page 26 Owner’s manual Specifications are subject to change without prior notice. “The Lechpol Electronics company declares that product PY0019 is consistent with the essential requirements and other relevant provisions of directive 2014/53/UE. The proper declaration for download from www.lechpol.eu” English Correct Disposal of This Product (Waste Electrical &...
- Page 27 Instrukcja obsługi KWESTIE BEZPIECZEŃSTWA Przed użyciem należy dokładnie zapoznać się z treścią instrukcji obsługi oraz zachować ją w celu późniejszego wykorzystania. Producent nie ponosi odpowiedzialności za nieprawidłowe użycie produktu. • Urządzenie należy chronić przed wilgocią, wodą oraz innymi płynami. Nie należy używać ani przechowywać urządzenia w zbyt wysokich temperaturach.
-
Page 28: Opis Produktu
Instrukcja obsługi OPIS PRODUKTU... - Page 29 Instrukcja obsługi 1. Wbudowany mikrofon 2. Wyjście HDMI 3. Wyjście AV 4. Slot na kartę microSD 5. Wyświetlacz 6. Wskaźnik ładowania 7. Wskaźnik zasilania 8. Przycisk MODE (Tryb): • należy nacisnąć ten przycisk, aby zmienić tryb (tryb nagrywania/ aparatu/ przeglądarka plików) •...
-
Page 30: Instalacja Karty Microsd
Instrukcja obsługi • nacisnąć, aby zapisać ustawienia/ przejść do podmenu • nacisnąć, aby odtworzyć/ wstrzymać wideo w trybie przeglądania plików 13. Przycisk kierunkowy: w dół 14. Port miniUSB 15. Mocowanie uchwytu 16. Przycisk zasilania: • należy nacisnąć ten przycisk, aby włączyć urządzenie •... - Page 31 Instrukcja obsługi WYJŚCIE AV/HDMI Należy połączyć jeden koniec kabla AV/HDMI do odpowied- niego portu urządzenia, następnie połączyć drugi koniec z wejściem AV/HDMI telewizora, aby móc przeglądać pliki. OBSŁUGA WŁĄCZANIE/ WYŁĄCZANIE Należy nacisnąć przycisk zasilania, aby włączyć urządzenie. Należy ponownie nacisnąć i przytrzymać przycisk zasilania, aby wyłączyć...
- Page 32 Instrukcja obsługi 6. Czujnik ruchu: Nagrywanie jedynie w przypadku wykrycia ruchu (wł./wył.). 7. Audio: włączenie/wyłączenie dźwięku podczas nagrywania. MENU TRYBU APARATU 1. Częstotliwość: 50 Hz/ 60 Hz 2. Balans bieli: opcje do wyboru to Auto/ Słonecznie/ Pochmur- no/ Żarówka. 3. Pomiar światła: Centralny/ Punktowy 4.
-
Page 33: Tryb Nagrywania
Instrukcja obsługi TRYB NAGRYWANIA Należy nacisnąć przycisk REC lub podłączyć urządzenie do ładowarki samochodowej, aby wejść w tryb nagrywania. Urządzenie rozpocznie automatyczne nagrywanie. Uwaga: • Przed użyciem, należy umieścić kartę microSD w od- powiednim slocie urządzenia. Karta będzie traktowana jako miejsce zapisu plików. •... - Page 34 Instrukcja obsługi TRYB USB Należy podłączyć rejestrator do komputera za pomocą kabla USB. Komputer powiadomi cię o nowym urządzeniu. Teraz możliwe jest przeglądanie plików na komputerze. ŁADOWANIE USB 1. Wbudowana bateria: Należy podłączyć rejestrator do gniazda ładowarki samo- chodowej lub do kompatybilnego portu USB komputera. Uwaga: •...
-
Page 35: Rozwiązywanie Problemów
Instrukcja obsługi ROZWIĄZYWANIE PROBLEMÓW Problem Rozwiązanie • Niski poziom baterii Nie można włączyć • Wilgoć dostała się do systemu urządzenia • Urządzenie podłączone jest do komputera • Należy sprawdzić czy urządzenie jest poprawnie podłączone do Urządzenie nie ładowarki ładuje się •... - Page 36 Instrukcja obsługi Pionowe pasy • Należy dostosować pozycję na wyświetlaczu urządzenia Obraz na • Należy dostosować pozycję wyświetlaczu jest urządzenia niewyraźny • Należy sprawdzić czy ustawio- Nieprawidłowa data na jest poprawna data/czas lub czas na zdjęciach w ustawieniach systemowych urządzenia Brak obrazu •...
- Page 37 Instrukcja obsługi • Rozdzielczość wideo: 1080 FHD/30 fps (1920x1080 px); 2K (2:1)/30 fps (2560x1080 px); 2K (16:9)/30 fps (2304x1296 px); FDH/45 fps (1920x1080 px); FDH/30 fps (1920x1080); HD/60 fps (1280x720 px) • Format wideo: MOV/H.264 • Wyjście wideo: AV/ HDMI •...
- Page 38 Instrukcja obsługi Specyfikacja produktu może ulec zmianie bez powiadomienia. „Niniejszym firma Lechpol Electronics oświadcza, że urządzenie PY0019 jest zgodne z zasadniczymi wymaganiami oraz innymi stosownymi postanowieniami dyrektywy 2014/53/UE. Właściwa deklaracja do pobrania na stronie www.lechpol.eu” Poland Prawidłowe usuwanie produktu (zużyty sprzęt elektryczny i elektroniczny) Oznaczenie umieszczone na produkcie lub w odnoszących się...
-
Page 39: Instructiuni Privind Siguranta
Manual de utilizare INSTRUCTIUNI PRIVIND SIGURANTA Cititi cu atentie manualul inainte de a folosi aparatul si pastrati-l pentru referinte ulterioare. Producatorul nu este responsabil pentru daunele cauza- te de utilizarea necorespunzatoare. • Pastrati aparatul departe de surse de caldura, apa, umi- ditate sau de lumina directa a razelor solare. -
Page 40: Descrierea Produsului
Manual de utilizare DESCRIEREA PRODUSULUI... - Page 41 Manual de utilizare 1. Microfon incorporat 2. Iesire HDMI 3. Iesire AV 4. Slot card microSD 5. Ecran 6. Indicator incarcare 7. Indicator pornire 8. Buton MOD: • Apasati pentru a schimba intre moduri (Inregistrare/ Camera/ Redare) • Apasati pentru a iesi din meniu 9.
- Page 42 Manual de utilizare 13. Buton directie: in jos 14. Port miniUSB 15. Bracket port- Orificiu de montare 16. Buton pornire: • Apasati pentru a porni dispozitivul • Apasati si tineti apasat pentru a opri dispozitivul 17. Lentile INSTALAREA CARDULUI MICROSD 1.
- Page 43 Manual de utilizare FUNCTIONARE PORNIRE/OPRIRE DVR Apasati butonul Pornire pentru a porni dispozitivul. Apasati si tineti apasat butonul Pornire pentru a opri dispozitivul. SETAREA OPTIUNILOR VIDEO 1. Rezolutie video: setare rezolutie video (1080 FHD/30 fps (1920x1080 px); 2K (2:1)/30 fps (2560x1080 px); 2K (16:9)/30 fps (2304x1296 px);...
- Page 44 Manual de utilizare MOD CAMERA: 1. Frecventa cadre: 50Hz/60Hz 2. Balans alb: alegeti intre Auto/Soare / Noros/ Fluore- scent/ Tungsten. 3. AE meter: Center/ Spot 4. AE bias: -2.0, -1.7, -1.3, -1.0, -0.7, -0.3, 0, 0.3, 0.7, 1.0, 1.3, 1.7, 2.0 MENIU SISTEM 1.
- Page 45 Manual de utilizare Nota: • Introduce cartela microSD inainte de a utiliza. Videocli- purile inregistrate vor fi salvate pe ea. • In timpul inregistrarii, apasați pe butonul de direcție [in sus] pentru a porni/opri microfonul. MOD CAMERA Porniti DVR-ul. Apoi apasati butonul MOD pentru a intra in modul de fotografiere.
- Page 46 Manual de utilizare INCARCARE USB 1. Aparatul utilizeaza o baterie reincarcabila de litiu-ion. Incarcați bateria incorporata prin conectarea la un incarca- tor de masina sau la portul USB la PC. Nota: • Atunci cand dispozitivul se incarca, indicatorul rosu de in- carcare este aprins.
- Page 47 Manual de utilizare DEPANARE Problema Solutia posibila • Baterie descarcata Dispozitivul nu • Exista umiditate in interiorul porneste dispozitivului • Dispozitivul este conectat la PC • Verificati daca dispozitivul este Dispozitivul nu conectat corect cu incarcatorul se incarca • Verificati bateria •...
- Page 48 Manual de utilizare • Dispozitivul poate fi expus la Afisarea nu este clara lumina directa; reglați poziția dispozitivului • Verificați daca data/ora este Data sau ora setata corect in setarile de gresita pe imagini sistem Nici o imagine la • Verificați conexiunea cablului televizor AV / HDMI Funcționarea...
- Page 49 Manual de utilizare (1920x1080); HD/60 fps (1280x720 px) • Format video: MOV/ H.264 • Iesire video: AV / HDMI • Lentile: unghi vizualizare 170º • Rezolutie lentile: 3.0 Mpx • Mod de inregistrare: inregistrare bucla (Oprire/2 mins/5 mins/10 mins) / detectare miscare •...
- Page 50 Manual de utilizare Specificatiile sunt supuse schimbarilor fara notificare prealabila. „Compania Lechpol declară că produsul PY0019 este în conformitate cu cerințele esențiale şi alte prevederi relevante ale Directivei 2014/53/UE. Declarația pentru descărcare este postata pe site-ul www.lechpol.eu” Romania Reciclarea corecta a acestui produs...
- Page 52 www.peiying.pl...
Need help?
Do you have a question about the PY0019 and is the answer not in the manual?
Questions and answers