Table of Contents
Advertisement
Quick Links
DEALER This manual must be given to
the user of the wheelchair.
USER Before using this wheelchair read
this entire manual and save it for
future reference.
Class 1 Medical Device
UDI-DI: B829111
Description: Eclipse
Document: 16062
ECLIPSE
Owner's Operation and Maintenance Manual
Attendant/Assistants: Before assisting
the user of this wheelchair, read this
manual and save for future reference.
For more information regarding PDG
products, parts and service, please visit
www.pdgmobility.com
Rev: 1
MANUAL WHEELCHAIR
Date: 2020 Jul 14
Advertisement
Table of Contents

Related Manuals for PDG Mobility ECLIPSE


Summary of Contents for PDG Mobility ECLIPSE
- Page 1 USER Before using this wheelchair read this entire manual and save it for For more information regarding PDG future reference. products, parts and service, please visit www.pdgmobility.com Class 1 Medical Device UDI-DI: B829111 Description: Eclipse Document: 16062 Rev: 1 Date: 2020 Jul 14...
-
Page 2: Introduction
INTRODUCTION Thank you for purchasing a PDG mobility wheelchair. Please do not operate this equipment without first reading and understanding this manual. If you are unable to understand the warnings and instructions, contact a health care professional such as an Assistive Technology Practitioner (ATP), clinical professional or therapist who is familiar with this type of product before attempting to use this equipment. -
Page 3: Table Of Contents
PAGE 3 Table of Contents INTRODUCTION ........................2 SPECIAL NOTES ......................... 5 SAFETY SUMMARY ........................6 Operating Information Warning ..................6 Weight Training ......................7 Weight and Age Limitations ..................7 SAFETY/HANDLING OF WHEELCHAIRS ..................8 Stability and Balance ..................... 8 Coping with Everyday Obstacles .................. - Page 4 PAGE 4 12.3 Armrests ........................26 12.4 Seat Depth ........................27 12.5 Backrest ........................28 12.6 Reclining Backrest (Not compatible with removeable backrest) ......... 29 12.7 Rear Wheels ........................ 30 12.8 Anti-Tip Tubes ......................31 12.9 Front Casters ....................... 32 12.10 Wheel Locks ......................
-
Page 5: Special Notes
NOTE – THE INFORMATION CONTAINED IN THIS DOCUMENT IS SUBJECT TO CHANGE WITHOUT NOTICE. An updated version of this owner’s manual may be available at www.PDGMobility.com INDICATIONS FOR USE – The Eclipse Manual Wheelchair is intended to provide mobility to persons restricted to a seated position. -
Page 6: Safety Summary
PAGE 6 SAFETY SUMMARY Operating Information Warning To determine and establish particular safety limits, practice bending, reaching and transferring activities in several combinations in the presence of a qualified health professional BEFORE attempting active use of the wheelchair. DO NOT attempt to reach objects if you have to move forward in the seat. ... -
Page 7: Weight Training
The Eclipse Wheelchair has weight limitations of 600lbs (272kg) and 1000lbs (453kg), depending on configuration selected. Unless otherwise specified by PDG. The maximum user weight is shown on the product order form. Further, the Eclipse is not to be used by persons under the age of 12 years. -
Page 8: Safety/Handling Of Wheelchairs
PAGE 8 SAFETY/HANDLING OF WHEELCHAIRS “Safety and Handling” of the wheelchair requires the close attention of the wheelchair user as well as the assistant. This manual points out the most common procedures and techniques involved in the safe operation and maintenance of the wheelchair. It is important to practice and master these safe techniques until you are comfortable in maneuvering around frequently encountered architectural barriers. -
Page 9: Tilting
PAGE 9 Tilting WARNING: DO NOT tilt the wheelchair without assistance. When tilting the wheelchair, an assistant should grasp the back of the wheelchair on a non- removable (non-detachable) part. Inform the wheelchair occupant before tilting the wheelchair and remind him/her to lean back. Be sure the occupant’s feet and hands are clear of all wheels. Tilting –... -
Page 10: Stairways And Escalators
PAGE 10 Stairways and Escalators WARNING – DO NOT use an escalator to move a wheelchair between floors. Serious bodily injury may occur. WARNING – DO NOT attempt to lift a wheelchair by lifting on any removable (detachable) parts. Lifting by means of any removable (detachable) parts of a wheelchair may result in injury to the user or damage to the wheelchair. -
Page 11: Transferring To And From Other Seats
PAGE 11 Transferring to and from Other Seats WARNING — BEFORE attempting to transfer in or out of the wheelchair, every precaution should be taken to reduce gap distance. Turn both casters toward the object you are transferring onto. Also be certain the wheel locks are engaged to help prevent wheels from moving. -
Page 12: Reaching, Leaning, And Bending Forward
PAGE 12 5.8 Reaching, Leaning, and Bending Forward Functional Reach from a Wheelchair Proper positioning is essential for your safety. When reaching, leaning, bending forward, it is important to use the front casters as a tool to maintain stability and balance. Bending Forward Figure 5.6: Forward reach in wheelchair WARNING —... -
Page 13: Environmental Conditions
PAGE 13 ENVIRONMENTAL CONDITIONS Warning Use extra care if you must ride your chair on a wet or slick surface. If you are in doubt, ask for help. Contact with water or excess moisture may cause your chair to rust or corrode. This could cause your chair to fail. -
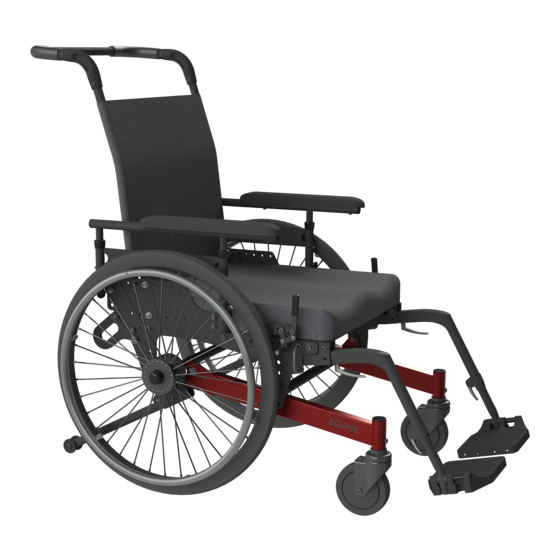
Page 14: Standard Features
PAGE 14 STANDARD FEATURES Figure 7.1: Eclipse Wheelchair Standard Features Lower Frame Rear Axles Upper Seat Frame Wheel locks Removable – Adjustable Backrest Height Armrest – Dual Post 10. Easy-out 60° Front Rigging Front Casters 11. Composite Foot Plate Rear Wheels 12. -
Page 15: Unpacking And Assembly
Storage Store the repackaged PDG Eclipse in a dry area and DO NOT place other objects on top of the repackaged wheelchair. Class 1 Medical... -
Page 16: Safety Inspection Checklist
PAGE 16 SAFETY INSPECTION CHECKLIST NOTE — Twice a year take your wheelchair to a qualified dealer for a thorough inspection and servicing. Regular cleaning will reveal loose or worn parts and enhance the smooth operation of your wheelchair. To operate properly and safely, your wheelchair must be cared for just like any other vehicle. -
Page 17: Troubleshooting
PAGE 17 replaced when necessary. ITEM Initially Inspect/Adjust Inspect/Adjust Inspect/Adjust Weekly Monthly Every 6 Months TIRES Inspect for flat spots and × × wear. If pneumatic tires, check × × for proper installation. Inspect rear tires for × × cracks and wear. CAUTION: Wheels and ×... -
Page 18: Maintenance
11.3 Suggested Maintenance Procedures Before using your Eclipse wheelchair, make sure all nuts and bolts are tight. Check all parts for damage or wear and replace them if necessary. Check all parts for proper adjustment. -
Page 19: Set Up & Adjustments
WARNING – After making adjustments, always make sure that parts are properly replace and tightened BEFORE using the wheelchair. NOTE: the Front Rigging Receiver on the Eclipse Wheelchair is positioned at 10°. As a result the chair will be provided with a 70°... - Page 20 PAGE 20 Standard Front Rigging (Legacy) – Swing-Away 60° Installation: Orient the footrest at approximately 45° outboard of the wheelchair as shown in Figure 12.2 Insert footrest mounting pin into the mounting tube of the hanger. Rotate the footrest inboard until it locks into place.
- Page 21 PAGE 21 Standard Front Rigging - Swing Away Elevating Legrest (ELR) Installation and Removal: 1. The installation and removal of the Elevating Legrest is the same as the Swing-Away Front Rigging. Refer to the instruction for the Swing-Away front rigging. Footrest Height adjustment: Figure 12.4: Swing-Away Elevating Legrest Loosen and remove the ¼-20 x 1-3/4”...
- Page 22 PAGE 22 Easy-Out Plug in 60° Front Rigging Footrest Installation and Removal To mount the easy out plug-in front rigging, activate the lever located under the plug-in and slide the front rigging into the open square tube receiver (seat rail). The Front rigging will lock into position when the lever snaps through hole located on the bottom of the square receiver tube.
- Page 23 PAGE 23 Easy-Out Adjustable Knee Angle Front Rigging Installation and Removal Installation and Removal of this option is the same as the Easy-out Plug-in 70° Front Rigging. To adjust the Knee Angle Front Rigging: Remove the plastic cover on the side by prying it off by hand.
-
Page 24: Foot Plates
PAGE 24 12.2 Foot Plates Composite Footplates The default foot plates for the Eclipse are the composite footplates. These composite footplates offer flip-up functionality. To flip up the footplate simply pull upwards on the footplate. Adjustable Angle Footplates (Optional) Angle adjustable footplates allow the depth and the angle of the footplate to be adjusted. - Page 25 PAGE 25 One Piece Footplate (Optional) One piece footplates come in two types: fixed and flip-up (See Figure 12.12and Figure 12.11). To flip up the one piece flip-up footplate, simply pull upwards on the footplate. NOTE- When adjusting interlocking footplates, ensure they are locked together. Figure 12.12: One Piece Fixed Footplates Figure 12.11: One Piece Flip-up Footplates...
-
Page 26: Armrests
PAGE 26 12.3 Armrests Adjusting Armrest Height (Dual Post Arms) Unlock the arm by depressing the black release button on the upper front of the armrest while moving the armrest up or down (Refer to Figure 12.13). Adjust armrest to desired height. -
Page 27: Seat Depth
WARNING – After making adjustments, always make sure that parts are properly tightened BEFORE using the wheelchair. The seat depth on the Eclipse can be adjusted from 16” to 22”, depending on the position of the backrest post receivers. Seat depths 23” and 24” are achieved through a new seat pan. -
Page 28: Backrest
PAGE 28 12.5 Backrest WARNING – After making adjustments, always make sure that parts are properly tightened BEFORE using the wheelchair. Removeable Backrest (Standard) Removing the backrest Remove the ¼” pin from each side of the back of the backrest Slide the backrest vertically until it is clear of the wheelchair Re-installing the backrest Slide the backrest in vertically to the backrest receivers until the ¼”... -
Page 29: Reclining Backrest (Not Compatible With Removeable Backrest)
12.6 Reclining Backrest (Not compatible with removeable backrest) The Eclipse wheelchair is available with the option of a manual reclining backrest that allows for up to 30 of backrest recline. It is not compatible with the backrest extension and is 1” narrower than the seat width. -
Page 30: Rear Wheels
PAGE 30 12.7 Rear Wheels Removing/Installing the Rear Wheels/Axles The Eclipse wheelchair is only available with quick-release axles. To remove the wheel, push on the quick-release button and it should release the axle pins allowing for the axle and rear wheel to slide out of the axle receiver. -
Page 31: Anti-Tip Tubes
PAGE 31 The axle receiver and camber bar can be adjusted forwards or backwards in one of four positions on the lower frame Remove the rear wheel. Unfasten the axle receiver using a 1” wrench. There is a radial through hole present on the camber bar to facilitate axle receiver removal. -
Page 32: Front Casters
PAGE 32 12.9 Front Casters WARNING – After making adjustments, always make sure that parts are properly replaced and tightened BEFORE using the wheelchair. Installing/Replacing Caster Forks Remove the M8 bolt Slide out caster fork assembly. Reassemble by reversing steps 1-3. Test the wheelchair for maneuverability. -
Page 33: 12.10 Wheel Locks
PAGE 33 12.10 Wheel Locks WARNING – Never attempt to engage wheel locks while the chair is in motion as it could cause you to lose control. Wheel locks lock the rear wheels and prevent any undesirable movement of the wheelchair. Wheel lock operation To engage the push to lock wheel lock (see Figure 12.23), push the lever forward, away from the wheel, until it locks into place. -
Page 34: 12.11 Seat-To-Floor Height
BEFORE using the wheelchair. The seat to floor height on the Eclipse can be adjusted 14” to 18”, and up to 20” with a seat height extension. The front and rear seat heights can be adjusted independently and the front can be upto 2”... -
Page 35: Adjustable Angle Push Bar Handle (Optional)
PAGE 35 12.12 Adjustable Angle Push Bar Handle (Optional) The Eclipse may be purchased with an adjustable angle push bar handle. This handle allows an attendant to change the position of the push bar handle grip, depending on the wheelchair’s original configuration. -
Page 36: Headrest (Optional)
PAGE 36 12.15 Headrest (Optional) If your chair does not have a rigid backrest cushion, it may be fitted with a head rest mounting on the push bar handle. Otherwise, the head rest will be mounted directly to the rigid backrest. Removing the Headrest Loosen the “Headrest Height Adjustment Set Screw”... -
Page 37: Postural Support Devices Or Lap Belts (Optional)
PAGE 37 12.16 Postural Support Devices or Lap Belts (Optional) WARNING- The lap belt is intended for use ONLY as a positioning aid for simple positioning needs, such as posterior pelvic tilt. This belt will not be sufficient for persons with more involved positioning needs. Only your health care advisor can determine the proper positioning products for your situation. -
Page 38: Motor Vehicle Use
Systems (WTORS) and a properly equipped motor vehicle, that have all complied with the standards mentioned in this section, should be in place before using a Eclipse wheelchair equipped with the Transit Tiedown System as a seat in a motor vehicle. - Page 39 -- Wheelchair tiedown and occupant-restraint systems -- Part 1: Requirements and test methods for all systems. The Eclipse Transit Tiedown System is designed for a four-point (two in the front, two rear) strap-type tiedown system (Figure 13.2). Attach the WTORS in accordance with the manufacturer’s instructions and RESNA WC-4:2012, Section 18 or ISO 10542-1:2012- Part 1.
-
Page 40: Contacting Your Supplier To Obtain Service
Service agent will provide specific instructions for packaging and shipping your wheelchair. Alternatively, Qualified Service Agent may arrange for pick-up. ISO 7176-15 TEST INFORMATION DISCLOSURE Table 16.1: Eclipse Wheelchair Test Configuration Seat Width 605mm Seat Depth... - Page 41 Requirements and test methods for static, impact and fatigue (ISO 7176-8) Requirements for resistance to ignition in accordance with (ISO 7176-16) The Eclipse wheelchair conforms to the test methods for static, impact and fatigue strength as required by ISO 7176-8.
-
Page 42: Limited Warranty
PAGE 42 LIMITED WARRANTY PLEASE NOTE – THE WARRANTY BELOW HAS BEEN DRAFTED TO COMPLY WITH FEDERAL LAW APPLICABLE TO PRODUCTS MANUFACTURED AFTER JULY 4 , 1975. This warranty is extended only to the original purchaser/user of our products. This warranty gives you specific legal rights and you may also have other legal rights, which vary from state to state. -
Page 43: European Union Regulatory Information
PAGE 43 EUROPEAN UNION REGULATORY INFORMATION Authorized Representative: Advena Ltd Tower Business Centre, 2nd Flr, Tower Street, Swatar, BKR 4013 Malta CE Certificate Number: CE/CAN/2001/05/03 UDI-DI for the Eclipse: B829111 Class 1 Medical Rev. 1... - Page 44 PDG PRODUCT DESIGN GROUP INC. #103- 318 East Kent Avenue South, Vancouver, BC V5X 4N6 Ph: (604) 323-9220 Fax: (604) 323-9097 E-mail: info@pdgmobility.com www.pdgmobility.com Class 1 Medical Rev. 1...
Need help?
Do you have a question about the ECLIPSE and is the answer not in the manual?
Questions and answers