Table of Contents
Advertisement
Quick Links
HDMI H.264 IP MATRIX DECODER/ENCODER
OVER CAT/X WITH CEC & AUDIO SUPPORT
© 2015 Avenview Inc. All rights reserved.
The contents of this document are provided in connection with Avenview Inc. ("Avenview") products. Avenview makes no representations or
warranties with respect to the accuracy or completeness of the contents of this publication and reserves the right to make changes to specifications
and product descriptions at any time without notice. No license, whether express, implied, or otherwise, to any intellectual property rights is granted
by this publication. Except as set forth in Avenview Standard Terms and Conditions of Sale, Avenview assumes no liability whatsoever, and claims any
express or implied warranty, relating to its products are is strictly prohibited.
Control Your Video
VIDEO WALLS
VIDEO PROCESSORS
VIDEO MATRIX SWITCHES
EXTENDERS
SPLITTERS
CABLES & ACCESSORIES
Model #: HDM-C6MXIP-SET
WIRELESS
Advertisement
Table of Contents

Related Manuals for Avenview HDM-C6MXIP-SET


Summary of Contents for Avenview HDM-C6MXIP-SET
- Page 1 No license, whether express, implied, or otherwise, to any intellectual property rights is granted by this publication. Except as set forth in Avenview Standard Terms and Conditions of Sale, Avenview assumes no liability whatsoever, and claims any...
- Page 2 Product Application & Market Sectors Corporate House Of Worship Military Residential Education Industrial Medical Aviation www.avenview.com...
-
Page 3: Table Of Contents
2.4.2 REAR PANEL (SENDER/ENCODER, HDM-C6MXIP-S) ............6 2.4.3 SOURCE SWITCH VALUE ......................7 2.4.2 FROT PANEL (RECEIVER/DECODER, HDM-C6MXIP-R) .............8 2.4.2 FRONT PANEL (RECEIVER/DECODER, HDM-C6MXIP-R) ..........8 INSTALLATION (HDM-C6MXIP-SET) ....................9 3.1 APPLICATION ............................9 3.1.1 SOURCE SELECTION ......................9 3.1.2 IP MATRIX ..........................9 PC CONFIGURATOR ........................10 4.1 USING MAINTAIN TOOL FOR UPGRADING................14... -
Page 4: Getting Started
• Removal, installation, and set-up service charges. SAFETY INSTRUCTIONS The Avenview HDM-C6MXIP-SET, HDMI H.264 IP Matrix Decoder/Encoder has been tested for conformance to safety regulations and requirements, and has been certified for international use. However, like all electronic equipments, the HDM-C6MXIP-SET should be used with care. -
Page 5: Regulatory Notices Federal Communications Commisiion (Fcc)
DO NOT TAMPER WITH THE UNIT. DOING SO WIll VOID THE WARRANTY AND CONTINUED USE OF THE PRODUCT THE VIDEO BOARDS ARE VERY SENSITIVE TO STATIC. PLEASE ENSURE IF RACK MOUNTED OR INSTALLED ON A SURFACE, IT SHOULD BE IN A GROUNDED ENVIROMENT. www.avenview.com Page 2... -
Page 6: Introduction
The Avenview HDM-C6MXIP-SET, HDMI H.264 IP Matrix Decoder/Encoder delivers end-to-end streaming media over IP networks. The HDM-C6MXIP-SET is composed of two units a Decoder and an Encoder. The Decoder H.264/MPEG-4 AVC video compression format, it receives the encoded IP signal through LAN port and decodes video/audio signal out through HDMI interface, it also supports stereo de-embeding and streaming resolutions up to 1920 x 1200@60Hz. -
Page 7: Package Contents
PACKAGE CONTENTS Before you start the installation of the HDMI Extender, please check the package contents. HDM-C6MXIP-SET HDM-C6XIP-S) (HDM-C6XIP-R) Power Brick (+12V DC 1A) + Power Cord Available on Request for International Power 1 x Right and Left Ear Rack Sets HDMI to DVI Adapter Phoenix Connector (Male, 3.5 mm, 3 pins) -
Page 8: Application Diagram
APPLICATION DIAGRAM www.avenview.com Page 5... -
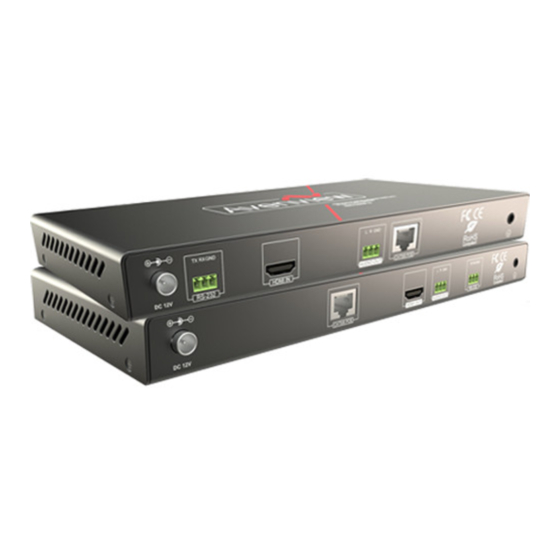
Page 9: Panel Description
Stereo Audio OUT: Connects to an audio output HDMI IN: Connect to HDMI/DVI Source. device such as an amplifier for audio de-embedding. Ground Screw: Ground connection prevent device LAN: Used for media streaming linking to Decoder damage. www.avenview.com Page 6... -
Page 10: Source Switch Value
Indicates CVBS source input is selected, which is required when connecting to a CVBS video source. The other switch values are reserved. If they are selected, DVI source input is used as the video source. Note: By default, the source switch position is 000. www.avenview.com Page 7... -
Page 11: Frot Panel (Receiver/Decoder, Hdm-C6Mxip-R)
Stereo Audio OUT: Connects to an audio output HDMI OUT: Connect to HDMI Display. device such as an amplifier for audio de-embedding. Ground Screw: Ground connection prevent device RS 232 1 : Debugging Connector. damage. RS 232 2: Provides serial communication with the Decoder. www.avenview.com Page 8... -
Page 12: Installation (Hdm-C6Mxip-Set)
INSTALLATION (HDM-C6XIP-SET) To setup Avenview HDM-C6MXIP-SET please follow these steps for connecting to a device: 1. Turn off all devices including monitors / TV. 2. Connect an HDMI source (Via DVI port) (such as a Blu-Ray Disc player or pC) to the Encoder HDM-C6XIP-S. -
Page 13: Pc Configurator
IPE1000 or IPD1000's LAN (POE) port's IP address is 169.254.1.1 and subnet mask 255.255.0.0, you can set your computer's IP address as 169.254.X.X and subnet mask as 255.255.0.0. A computer running Windows 7 is used as an example to configure its static IP address. www.avenview.com Page 10... - Page 14 Click Start. Choose Control Panel > Network and Internet > Network and Sharing Center > Change Adapter Settings, right click Local Area Connection, and then choose Properties. Double-click Internet Protocol Version 4 (TCP/IPv4). www.avenview.com Page 11...
- Page 15 Method 1 You can configure the firewall in the Windows Firewall panel on your computer, for example select both Home/Work (Private) and Public for Maintain tool for IP & Matrix. For more information, see "Troubleshooting" section. www.avenview.com Page 12...
- Page 16 You can also configure the firewall in the Windows Security Alert window. When starting MaintainTool, the Windows Security Alert may display. use the administrator privileges to select a network you allow this software to communicate on, for example select both private and public networks, and then click Allow access. www.avenview.com Page 13...
-
Page 17: Using Maintaintool For Upgrading
Set a static IP on your computer and configure your operating system firewall. For more information, see "Setting a Static IP on Your Computer" and "Configuring Your Operating System Firewall". Double click MaintainTool.exe. Select English for Language, and then click Network. www.avenview.com Page 14... - Page 18 2. Loading an upgrading file. 1) Click Search. 2) Click Upgrade. www.avenview.com Page 15...
- Page 19 If you want to upgrade a device removed manually, drag it from the Devices list to the Devices to be Upgraded area box. If you want MS300 to reboot automatically after upgrading is finished, select Auto Reboot After Upgraded. www.avenview.com Page 16...
- Page 20 When MS300 is rebooting, the device information disappears from the Devices list, Upgrade Module area box and Devices to be Upgraded area box. After rebooting is finished, you can click Search to make MS300 display again. www.avenview.com Page 17...
-
Page 21: Specifications
800@60Hz,1280 x 1024@60Hz,1360 x 768@60Hz,1366 x 768@60Hz, 1400 x 1050@60Hz,1440 x 900@60Hz,1680 x 1050@60Hz,1080i@50Hz,1080i @60Hz, 1080p@24Hz,1080p@25Hz,108 0p@30Hz, 1080p@50Hz, 1080p@60Hz, 1920 x 1200@60Hz VGA: 640 x 480@60Hz,800 x 600@60Hz 1024 x 768@60Hz,1280 x 1024@60Hz,1280 x 720@60Hz,1280 x 768@60Hz, www.avenview.com Page 18... - Page 22 32˚ ~ 104˚F (0˚ to 40˚C) 32˚ ~ 104˚F (0˚ to 40˚C) OPERATING TEMPERATURE -4˚ ~ 140˚F (-20˚ ~ 60˚C) -4˚ ~ 140˚F (-20˚ ~ 60˚C) STORAGE TEMPERATURE 20~90% RH (no condensation) 20~90% RH (no condensation) RELATIVE HUMIDITY www.avenview.com Page 19...
-
Page 23: Troubleshooting
"Top Panel" section of IPE1000. Check that each video port of YPbPr and CVBS is connected properly when using YPbPr and CVBS as the video sources. Check that the displays work properly, and that source devices have normal signals output. www.avenview.com Page 20... - Page 24 PC configurator. 10. Check that no compatibility issues exist between the A/V devices and IPE1000/IPD1000. If so, replace the A/V devices with other models. 11.Check that switch is configured properly, and that IGMP snooping is enabled. www.avenview.com Page 21...
- Page 25 NSHIEl DED (u Tp) ✶✶✶ ✶✶✶✶ ✶✶✶✶ SOLID SHIEl DED (STp) ✶✶✶ ✶✶✶✶ ✶✶✶✶✶ u NSHIEl DED (u Tp) ✶ ✶✶ ✶✶ STRANDED SHIEl DED (STp) ✶ ✶ ✶✶ TERMINATION PLEASE USE EIA/TIA-568-B TERMINATION (T568B) AT ANY TIME www.avenview.com Page 22...
- Page 26 NOTES www.avenview.com Page 23...
- Page 27 PARTS: During the Warranty Period of of THREE (3) YEARS, Avenview will supply new or rebuilt replacements in exchange for defective parts of the product(s) at no cost if the product(s) is determined to have abide by Avenview’s published guidelines. Cost of Parts applicable to product(s) after Warranty Period. For part(s) costs, please contact support@avenview.com.
- Page 28 Disclaimer While every precaution has been taken in the preparation of this document, Avenview Inc. assumes no liability with respect to the operation or use of Avenview hardware, software or other products and documentation described herein, for any act or omission of Avenview concerning such products or this documentation, for any interruption of service, loss or interruption of business, loss of anticipatory profits, or for punitive, incidental or consequential damages in connection with the furnishing, performance, or use of the Avenview hardware, software, or other products and documentation provided herein.
Need help?
Do you have a question about the HDM-C6MXIP-SET and is the answer not in the manual?
Questions and answers