Table of Contents

Related Manuals for Wood master 3300


Summary of Contents for Wood master 3300
- Page 1 OUTDOOR WOOD FURNACE OWNER’S MANUAL 3300 4400 HEAVY DUTY 5500 HEAVY DUTY 6500 HEAVY DUTY IN THE U.S., THIS APPLIANCE IS FOR NON-RESIDENTIAL Retain this manual/ APPLICATIONS ONLY Conserver ce manuel WoodMaster.com (p/n 9000804 - REV. A) - AUG-2020...
- Page 2 WoodMaster, Inc. • 600 Polk Ave. SW • Red Lake Falls, MN 56750 WoodMaster.com For parts and accessories, service or repairs, call your authorized WoodMaster dealer or heating contractor. Record the information below for future reference. Model Serial Number Installation Date Dealership Name Phone Number Owner Name...
-
Page 3: Table Of Contents
Contents How to Use This Guide Labeling and Terminology . . . . . . . . . . . . . . . . . . . . . . . . . . . . . . . . . . . . . . . 1 Safety - Important Safety Instructions . - Page 4 WOODMASTER OUTDOOR FURNACES • OWNER'S MANUAL OUTDOOR WOOD FURNACE BEST BURN PRACTICES Read and follow all operating instructions supplied by the manufacturer. FUEL USED: Burn only split and seasoned wood with 25% moisture content or less. DO NOT burn green wood. Never use the following: trash, plastics, gasoline, rubber, naphtha, household garbage, material treated with petroleum products (particle board, railroad ties and pressure treated wood), leaves and cardboard.
-
Page 5: Labeling And Terminology
WOODMASTER OUTDOOR FURNACES • OWNER'S MANUAL Labeling and Terminology The outdoor furnace and this installation guide use the following terms and symbols to bring attention to the presence of hazards of various risk levels and important information concerning the use and maintenance of the outdoor furnace. -
Page 6: Safety - Important Safety Instructions
WOODMASTER OUTDOOR FURNACES • OWNER'S MANUAL Safety - Important Safety Instructions Be sure to read carefully and understand these precautions before, during and after the installation, operation and maintenance of the furnace. NOTE: READ ALL INSTRUCTIONS BEFORE INSTALLATION . CAUTION Pre-Installation Precautions Only responsible adults should operate your furnace . - Page 7 WOODMASTER OUTDOOR FURNACES • OWNER'S MANUAL IMPORTANTS INSTRUCTIONS DE SECÛRITÉ PRECAUTIONS A PRENDRE L’opération de la chaudière doit être restreinte aux adultes LISEZ TOUT CES INSTRUCTIONS AVANT L’INSTALLATION . responsable . Si la chaudière n’est pas operé proprement, Precautions a prendre avant l’installation elle risque d’être endommagé...
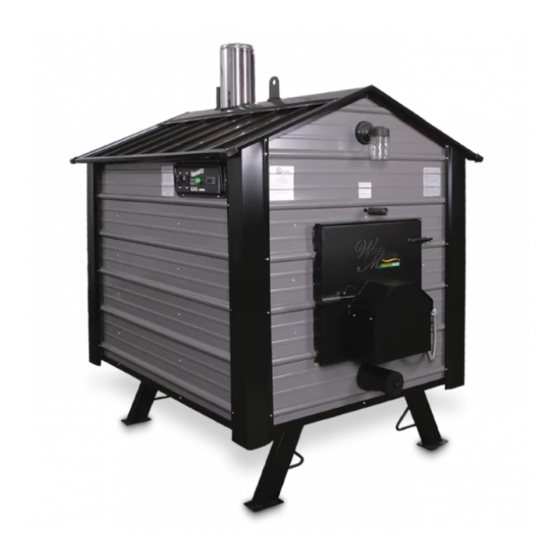
- Page 8 WOODMASTER OUTDOOR FURNACES • OWNER'S MANUAL Front View (4400 Shown) Chimney Hanger Strap Vent Pipe Utility Light ETC System (Electronic Heat Baffle Instructions Temperature Control) Serial/Model Number Operating Instructions Fuel Door Baffle Bypass Draft Fan Assembly (Inside Shroud) Optional Ash Auger Port Rear Panel (4400 Shown) Main Power Junction Box Cold Water Return Valve...
-
Page 9: Planning The Location
WOODMASTER OUTDOOR FURNACES • OWNER'S MANUAL Planning the Location When selecting a suitable location, carefully consider each of the following: • The WoodMaster is designed for outdoor use. We do not recommend installing in a building. When installing your WoodMaster, keep in mind the direction of the winds during heating months. -
Page 10: Block Or Pad Supports
. Foundations may consist of concrete, crushed rock or patio blocks . Slab Dimensions / Furnace Dimensions 6" 96" 84" 54" 42" 14" 14" 12" 16" SUPPLY RETURN 3300 4400 60" 60" 48" Furnace Footprint 48" Furnace Footprint RETURN RETURN SUPPLY 16" SUPPLY 16"... -
Page 11: Digging The Trench
WOODMASTER OUTDOOR FURNACES • OWNER'S MANUAL Digging the Trench Before digging, be sure to call for utility locator service . The trench depth for ThermoPEX should be between 10" and 28" (25 and 71 ThermoPEX Advantage ® cm). ThermoPEX is flexible pre- insulated piping that is ideal for use with outdoor wood furnaces. -
Page 12: Supply And Return Lines
WOODMASTER OUTDOOR FURNACES • OWNER'S MANUAL Supply and Return Lines Determine the configuration of the supply and return lines from the outdoor furnace to where the supply and return lines will connect to the existing heating system. WoodMaster recommends using the ThermoPEX® piping system. -
Page 13: Mounting The Pump
WOODMASTER OUTDOOR FURNACES • OWNER'S MANUAL Mounting the Pump Attach the 1" x 2" Black Nipple (0020-250) and one half of the flanges from the 1" Cast Iron Pump Flange Kit (194) to one of the hot water supply valves on back of furnace. Locate one of the black rubber gaskets and place it between the pump and the mounted flange;... -
Page 14: Wiring The Pump
WOODMASTER OUTDOOR FURNACES • OWNER'S MANUAL Cold Water Return Valve Cold Water Return Valve Hot Water Supply Valve Hot Water Supply Valve Wiring the Pump CAUTION Never run the pumps dry! The furnace Remove the cover on the pump. must be full of water and the valves Using an approved wire, connect the ground wire to the green ground must be open . -
Page 15: Entering The Building
WOODMASTER OUTDOOR FURNACES • OWNER'S MANUAL Entering the Building Entering the building with water lines can be done underground or over the sill plate. Once inside the building the typical hookup would run first to the domestic hot water supply and next to an existing heating system such as a forced air furnace or a hot water heating system. -
Page 16: Existing Hot Water Heat
WOODMASTER OUTDOOR FURNACES • OWNER'S MANUAL Existing Forced Air Cold Water Return to Outdoor Furnace A water-to-air heat exchanger is inserted in the existing plenum. In most cases the heat exchanger is placed in a horizontal position, keeping all four sides level. The air must be forced through the finned area of the heat exchanger evenly. -
Page 17: Optional Auger Assembly
WOODMASTER OUTDOOR FURNACES • OWNER'S MANUAL Optional Auger Assembly Place the auger carriage in the furnace, insert the center auger through the auger tube and align with the stub shaft on the back of the carriage. Place the auger cap over the auger tube and align the center auger shaft with the hole in the auger cap. -
Page 18: Water Quality And Maintenance
8.0 and 9.5. The recommended initial treatment rate for the outdoor furnace is specified by units. One unit of MolyArmor 350 is a 1-gallon (3.78-liter) container. MOLYARMOR 350 TREATMENT AMOUNTS 3300 1/2 unit (gallon) 4400 1 unit (gallon) -
Page 19: Filling With Water
WOODMASTER OUTDOOR FURNACES • OWNER'S MANUAL Add the recommended amount of MolyArmor 350 to the outdoor furnace. NOTE: If the system has a larger than normal water capacity, more MolyArmor 350 should be added at a recommended rate of 6 .5 oz . (190 ml) per 10 gallons (37 .8 liters) of system water . -
Page 20: Test The Treated System Water
WOODMASTER OUTDOOR FURNACES • OWNER'S MANUAL NOTE: It is important to bring the water in the system up to operating temperature (i.e., 170˚F or 76˚C) immediately after filling the system. This also applies any time water is added to the system . NOTE: The sight gauge valve should always be closed except when checking water level . -
Page 21: Adding Antifreeze To Outdoor Furnace System
WOODMASTER OUTDOOR FURNACES • OWNER'S MANUAL Adding Antifreeze to Outdoor Furnace System Most outdoor furnaces are installed without antifreeze when an existing heating system is in place and there is no anticipation of leaving the outdoor furnace unattended for extended periods of time (10 days or more). If the building being heated has an alternate heat source, system water may be kept from freezing by running the circulating pump(s) and drawing heat from the existing furnace or boiler in the building. -
Page 22: Wood Selection And Preparation
WOODMASTER OUTDOOR FURNACES • OWNER'S MANUAL Wood Selection and Preparation For the best results, it is best to burn seasoned split wood. However, it may be possible to burn some unsplit wood with the split wood depending on quality, size, moisture content and wood type. Properly seasoned wood has a moisture content of 20% or less. -
Page 23: Operating Instructions
WOODMASTER OUTDOOR FURNACES • OWNER'S MANUAL Before You Start Operating Your Operating Instructions WoodMaster Outdoor Wood Furnace Firing the Furnace Be sure to read carefully and observe all of the information in the entire Owner's Manual. Paper and kindling should be used for starting the fire. Build a small fire, then add wood as needed. -
Page 24: Loading The Furnace
WOODMASTER OUTDOOR FURNACES • OWNER'S MANUAL Loading the Furnace Before opening the firebox door, pull the bypass baffle rod out to the first stop point to vent the furnace. Use caution when opening the fuel door since fire and high temperatures may be present. When loading your furnace, it is recommended that you stack your wood lengthwise in two rows as shown below. -
Page 25: Maintenance
WOODMASTER OUTDOOR FURNACES • OWNER'S MANUAL Maintenance SERVICE INTERVAL Check water level. Remove ash. Completely remove ash. Inspect chimney, door, vent seals. Inspect chimney and chimney connector for creosote. Clean out Baffle Bypass. Stir ash and pull hot coals to front of firebox. Scrape bottom of firebox. -
Page 26: Routine Maintenance
WOODMASTER OUTDOOR FURNACES • OWNER'S MANUAL ROUTINE MAINTENANCE CAUTION Use only genuine WoodMaster Parts and Accessories if it ever becomes necessary to replace any component of the outdoor furnace . Routine inspections and maintenance are essential to the proper operation and longevity of the outdoor furnace. - Page 27 WOODMASTER OUTDOOR FURNACES • OWNER'S MANUAL With your Ash Hoe, pull the hot coals from the back of the furnace to the front. Load the back of the furnace first, stacking the wood as shown in the previous section. Then fill the front of the furnace. When needed, scrape the bottom of the firebox to remove any deposits or ash buildup.
- Page 28 WOODMASTER OUTDOOR FURNACES • OWNER'S MANUAL M-4. Creosote - Formation and Need for Removal When wood is burned slowly, it produces tar and other organic vapors, which combine with expelled moisture to form creosote. The creosote vapors condense in the relatively cool chimney flue of a slow-burning fire. As a result, creosote residue accumulates on the flue lining.
-
Page 29: Troubleshooting
WOODMASTER OUTDOOR FURNACES • OWNER'S MANUAL TROUBLESHOOTING A . BUILDING IS LOSING TEMPERATURE Out of wood - Check firebox to see if fire is out. Add wood as necessary. Use good quality wood since poor quality wood will have very short burn times. Circulation valve(s) closed - Be sure all valves in the system are open. - Page 30 WOODMASTER OUTDOOR FURNACES • OWNER'S MANUAL 12. Poor water quality - Water with high amounts of solids, sand or dirt can create deposits inside the wall of heat exchanger components, reducing the amount of heat output. If this condition is suspected, contact your WoodMaster dealer.
- Page 31 WOODMASTER OUTDOOR FURNACES • OWNER'S MANUAL Poor water quality - Water with high amounts of solids, sand or dirt can cause frequent pump failure. Use softened and/or filtered water. E . ERRATIC TEMPERATURE READING ON GAUGE Return water too cold - Water circulation may be too slow. The return water should be no more than 20°F-25°F less than the hot supply water.
-
Page 32: Electronic Temperature Control (Etc) Guide
WOODMASTER OUTDOOR FURNACES • OWNER'S MANUAL Electronic Temperature Control (ETC) Guide Function: • The ETC monitors and controls the WoodMaster water temperature by controlling the draft and draft fan. • During normal operation (adequate wood supply) the controller will turn off the draft and draft fan when the water reaches 170°F (Set) and will turn on the draft and draft fan when the water falls 10°F (Hy). -
Page 33: Etc Reference
WOODMASTER OUTDOOR FURNACES • OWNER'S MANUAL Parameter Description and Factory Settings: • Set (set point) - 170°F • Hy (Differential) - 10°F • ALL (Low Alarm) - 120°F How To: • View Set Point — Push and immediately release the set key, display will indicate set point and will return to water temperature after 5 seconds. - Page 34 WOODMASTER OUTDOOR FURNACES • OWNER'S MANUAL 1.2 SAFETY PRECAUTIONS • Check the supply voltage is correct before connecting the instrument. • Do not expose to water or moisture; use the controller only within the operating limits avoiding sudden temperature changes with high atmospheric humidity to prevent formation of condensation.
- Page 35 WOODMASTER OUTDOOR FURNACES • OWNER'S MANUAL 4. FRONT PANEL COMMANDS SET: Displays the target set point; selects and confirms a parameter in the programming mode. Also used in conjunction with (UP) and (DOWN) to view the Min and Max recorded temperatures and to reset the stored temperatures.
- Page 36 WOODMASTER OUTDOOR FURNACES • OWNER'S MANUAL 5. TEMPERATURE ALARM AND ITS DURATION 5.1 HOW TO SEE THE ALARM DURATION AND MAX (MIN) TEMPERATURE If the alarm LED is on, an alarm has taken place. To see the kind of alarm, the max (min) reached temperature and alarm duration do as follows: Push the UP or DOWN key.
- Page 37 WOODMASTER OUTDOOR FURNACES • OWNER'S MANUAL 6.2 HOW TO CHANGE THE SETPOINT Push the SET key for more than 2 seconds to change the Set point value. The value of the set point will be displayed and the ˚F starts blinking. To change the Set value push the UP or DOWN arrows within 10s.
- Page 38 WOODMASTER OUTDOOR FURNACES • OWNER'S MANUAL DISPLAY CF Temperature measurement unit: To change from ˚F to ˚C, contact your WoodMaster dealer. ALARM ALL Minimum temperature alarm: (120°F) when this temperature is reached the alarm is enabled and fan will shut off. AFH Differential for alarm recovery: (1˚F ÷...
-
Page 39: Changing Etc Settings
WOODMASTER OUTDOOR FURNACES • OWNER'S MANUAL Fig. 1 Changing ETC Settings NOTE: The procedures are the same whether you are using degrees (F) or degrees (C). Changing the Set Point Press and hold the set button for 3 seconds or until the °F is flashing. The number that appears is the Set Point (Fig. -
Page 40: Wiring Diagrams
WOODMASTER OUTDOOR FURNACES • OWNER'S MANUAL WIRING DIAGRAMS AQUASTAT HARNESS - 02/07/2008 BROWN BLUE 8(3)A250V 20(8)A250V VIEW SHOWS WIRE SIDE OF PLUG 14 SENSOR - - - - BROWN 15 SENSOR - - - - BLUE BLOWER - - - - ORG 12 SNAP DISC JUMPER --- ORG HOT - - - - - - - BLK FLOAT HOT - - BLK... -
Page 41: Technical Specifications
WOODMASTER OUTDOOR FURNACES • OWNER'S MANUAL Technical Specifications Specification 3300 4400 5500 6500 Water Capacity (gal.) Amp Draw* @ 120V Max. - 6 A Max. - 6.9 A Max. - 7.5 A Max. - 19.8 A AC, 60 Hz Idle - 0.5 A Idle - 0.5 A... - Page 42 WOODMASTER OUTDOOR FURNACES • OWNER'S MANUAL Notes...
-
Page 43: Limited Lifetime Warranty
WOODMASTER OUTDOOR FURNACES • OWNER'S MANUAL Limited Lifetime Warranty WoodMaster Limited Lifetime Warranty 3300/4400/5500/6500 WOODMASTER, INC. 600 Polk Ave. SW – Red Lake Falls, MN 56750 Toll free (800) 932-3629 Limited Lifetime Warranty on Firebox and Water Jacket WoodMaster, Inc. warrants material and labor on any defects in workmanship on the firebox and water jacket for a period of ten years from the purchase date to the original owner only. - Page 44 ©2020 WoodMaster Printed in U.S.A. (p/n 9000804 - REV. A) - AUG-2020...
Need help?
Do you have a question about the 3300 and is the answer not in the manual?
Questions and answers