Arjo MAA2080M Instructions For Use Manual
Amputee slings
Hide thumbs
Also See for MAA2080M:
- Instructions for use manual (20 pages) ,
- Instructions for use manual (96 pages) ,
- Instructions for use manual (60 pages)
Chapters
Table of Contents

Related Manuals for Arjo MAA2080M


Summary of Contents for Arjo MAA2080M
- Page 1 INSTRUCTIONS FOR USE Amputee Slings EN · ZH · DE · FR · IT · NL ·Bedienungsanleitung · Notice d’utilisation · Istruzioni per l’uso · Gebruiksaanwijzing 04.SA.0 0-INT · 2018...
-
Page 2: Table Of Contents
NSTRUCTIONS Contents Detach the Clips (3 steps) ........8 Foreword .............2 Loop Attachment & Detachment ......8 Customer Support ........... 2 De nitions in this IFU ..........2 Attach the Loops (5 Steps) ........8 Detach the Loops (2 steps) ........9 Intended Use ............3 Applying the Sling ..........9 Patient/Resident Assessment ......... -
Page 3: Intended Use
Safe Working Load (SWL) for Amputee Sling: Products made of All Day Mesh and All Day • MAA2050M, MAA2080M: 190 kg (418 lbs); materials are suitable to sit on longer periods. Article • MAA2090M, MAA2091M, MAA4040M, MAA2091M enables toileting. -
Page 4: Safety Instructions
Safety Instructions WARNING WARNING To avoid injury, make sure that the patient is To avoid injury, only store the equipment for not left unattended at any time. a short period of time. If stored longer than stated in the IFU, it can cause weakness and breakage in the material. -
Page 5: Parts Designation
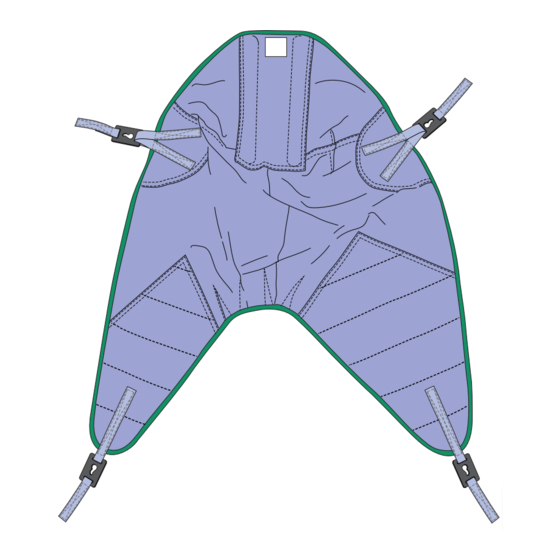
Parts Designation 1. Sling label (located on the outside of the sling) 9. Shoulder strap 2. Stiffener pocket 10. Head section 3. Stiffener 11. Hook and loop fl ap 4. Attachment clip (shoulder) 12. Attachment loop (shoulder) 5. Leg strap 13. -
Page 6: Select Sling Size
One leg amputee: Use a Right/Left Amputee sling (depending on amputee) or Hammock Amputee. Transfer/Bathing Article Safe Working Product Description Size number Load MAA2080M 190 kg (418 lbs) Double Amputee All Day Mesh S, M, L, LL MAA7090M 272 kg (600 lbs) Double Amputee Mesh M, L, XL... -
Page 7: Allowed Combinations
190 kg (418 lbs) S, M, L, LL, XL S, M, L, LL S, M, L, LL S, M, L, LL, XL MAA2080M 190 kg (418 lbs) S, M, L, LL, XL S, M, L, LL S, M, L, LL... -
Page 8: Clip Attachment & Detachment
MAA4070M 272 kg (600 lbs) - M, L, LL M, L, LL, XL L, LL, XL M, L, LL, XL MAA4080M 272 kg (600 lbs) - M, L, LL M, L, LL, XL L, LL, XL M, L, LL, XL Maxi Sky Maxi Sky Lift... -
Page 9: Detach The Loops (2 Steps)
Detach the Loops (2 steps) Method 2 1. Pull one side of the loop over the hook and spring Make sure that the weight of the resident is taken up loaded latch.(See Fig. 7 ) by the receiving surface before removing the loop. 2. -
Page 10: In Chair/ Wheelchair (22 Steps)
19. Make sure that: 9. Place the leg fl ap(s) underneath the patient’s leg(s)/ • All clips/loops are securely attached limb(s). (See Fig. 13 ) (See Fig. 4 ) and (See Fig. 6 ) 10. If using a loop sling, cross the legs straps. Pull one strap through the other. -
Page 11: On Floor (32 Steps)
19. If an adjustment is needed, lower the patient and 11. Place the folded sling over the patient’s side. Make make sure that the weight of the patient is taken up sure that the centre line is aligned with the patient’s by the receiving surface before removing the clip/ spine, starting at the coccyx. -
Page 12: Removing The Sling
22. Attach the shoulder clips/loops. 27. Make sure that all clips/loops are attached securely 23. Lift the patient’s head up slightly. Adjust the and the patient lays comfortably in the sling. Adjust spreader bar DPS/loop to a seated position. The if necessary. -
Page 13: Cleaning And Disinfection
4. If using a loop sling: push the sling, not the 7. Detach the sling. 8. Move the lift away from the patient patient, towards the back of the chair/wheelchair 9. Pull out the leg fl aps from under the patient’s for better positioning. -
Page 14: Care And Preventive Maintenance
Care and Preventive Maintenance When Soiled or Stained and Between WARNING Patients To avoid injury to both patient and caregiver, never modify the equipment or Clean/Disinfect use incompatible parts. The caregiver should make sure that the sling is cleaned according to “Cleaning and Disinfection” on Before and After Every Use page 13, when it is soiled or stained and between patients. -
Page 15: Troubleshooting
Troubleshooting Problem Action • Make sure the clip/loop straps are not twisted. The patient is not positioned correctly in • Make sure the patient is seated on the inside of the the sling (e.g. one strap is shorter than the sling. -
Page 16: Label On The Sling
Label on the Sling Care and Washing Symbols Article Number Article number with -X refers to Machine wash 70°C (158°F) XXXXXX-X the sling size. No bleaching allowed If the article number is stated without the size letter at the end, XXXXXXX No tumble drying allowed it means the sling is a One Size. -
Page 17: 客户支持
使用说明书 目录 前言 ..............17 连接与拆除环 .............23 客户支持 ..............17 连接环(5 个步骤) ..........23 本 IFU 中的定义 ............ 17 拆除环(2 个步骤) ..........24 既定用途 ............18 应用吊兜 ............24 患者/病人评估 ............18 在床上(24 个步骤) ..........24 预计使用寿命 ............18 在座椅/轮椅上(22 个步骤) ......... 25 在地板上(32 个步骤)... -
Page 18: 既定用途
既定用途 患者/病人评估 预计使用寿命... -
Page 19: 安全说明
安全说明 警告 警告 为避免人身伤害,仅应短期存储设备。如果存储 为避免人身伤害,应始终有专人看护患者。 时间超过 IFU 中规定的时间,则会导致材料断 裂和强度变弱。 警告 警告 为避免人身伤害,应在使用前始终对患者状况进 行评估。 为避免人身伤害,请避免阳光/紫外光照射到设 备。暴露于阳光/紫外光会降低材料强度。 警告 安全规范 为避免摔倒,患者体重不得超出所用产品及附件 的总安全工作负荷。 警告 为避免人身伤害,切勿在使用吊兜时让患者吸 烟。吊兜会导致火灾。... -
Page 20: 部件名称
部件名称 使用准备 初次使用前(6 个步骤) 警告 为 避 免 人 身 伤 害 , 请 始 终 确 保 在 使 用 前 检 查 设备。 注意 ArjoHuntleigh 建议将患者姓名标注在吊兜保养 标牌上,避免患者之间交叉感染。 每次使用前(5 个步骤) 警告 为了预防交叉感染,必须遵守本 IFU 中的消毒 警告 说明。 为避免患者坠落,请确保根据 IFU 选择正确的 吊兜尺寸。... -
Page 21: 选择吊兜规格
37.6 39.5 41.5 45.2 吊兜选择 根据患者的截肢情况选择吊兜 转运/洗浴 商品编号 安全承重 产品说明 规格 All Day 网状双侧截肢病人专用吊兜 S, M, L, LL MAA2080M 190 kg (418 lbs) MAA7090M 272 kg (600 lbs) 网状双侧截肢病人专用吊兜 M, L, XL 转运/运输 商品编号 安全承重 产品说明 规格 All Day 双侧截肢病人专用吊兜... -
Page 22: 允许组合
190 kg (418 lbs) S, M, L, LL, XL S, M, L, LL S, M, L, LL S, M, L, LL, XL MAA2080M 190 kg (418 lbs) S, M, L, LL, XL S, M, L, LL S, M, L, LL... -
Page 23: 连接与拆除卡扣
Maxi Sky Maxi Sky 移位机 Maxi Move 125 kg 200 kg 272 kg 227 kg (500 lbs) (275 lbs) (440 lbs) (600 lbs) 两点式 四点式 吊架 两点式中号 两点式环状 固定式 两点式中号 小号 环状 吊兜 规格 规格 规格 规格 规格 规格 MLA7000 272 kg (600 lbs) S, M S, M, L, XL S, M, L, XL M, L, XL, S, M, L, XL S, M, L, XL MLA7000A... -
Page 24: 拆除环(2 个步骤
拆除环(2 个步骤) 方法 2 (请见图 7 ) 方法 1 (请见图 8) 应用吊兜 在床上(24 个步骤) (请见图 10 ) (请见图 11 ) 警告 警告 为避免人身伤害,确保患者手臂放在吊兜内。 为避免侧翻过程中出现人身伤害,确保有另一位 护理员在场和/或在另一侧使用床栏。 警告 为避免伤害患者,在降低或调整吊架时要小心。 (请见图 12 ) (请见图 9 ) 警告 为避免患者坠落,在吊升之前和之中都要确保吊 兜连接件牢靠连接。 图 7 图 8 图... -
Page 25: 在座椅/轮椅上(22 个步骤
(请见图 4 )和(请见 图 6 ) 警告 如果使用的是卡扣式吊兜: 为避免人身伤害,确保患者手臂放在吊兜内。 如果使用的是环状吊兜: 警告 为避免伤害患者,在降低或调整吊架时要小心。 在座椅/轮椅上(22 个步骤) 说明 请勿在座椅/轮椅上使用 吊床吊兜 或 带搭扣皮瓣 (请见图 14 ) 的双侧截肢病人专用吊兜 。请在床上使用这些 装置。 警告 建议将所有双侧截肢患者从平坦表面转运。 为避免患者坠落,在吊升之前和之中都要确保吊 兜连接件牢靠连接。 (请见图 4 )和(请见 图 6 ) (请见图 13 ) (请见图 10 ) 图... -
Page 26: 在地板上(32 个步骤
(请见图 17 ) 警告 警告 确保吊带未套在轮椅或移位机脚轮上。 为避免人身伤害,确保患者手臂放在吊兜内。 在地板上(32 个步骤) (请见图 15 ) (请见图 18 ) (请见图 10 ) 警告 如果患者能够坐起,请继续执行下一步。如果 无法坐立,请执行第 9 步操作。 为避免伤害患者,在降低或调整吊架时要小心。 患者能够坐起: 继续 执行第 16 步操作。 患者无法坐起: (请见图 16 ) 图 15 图 16 图 17 图 18... -
Page 27: 拆除吊兜
(请见图 19 ) 警告 为避免患者坠落,在吊升之前和之中都要确保吊 兜连接件牢靠连接。 拆除吊兜 在床上(12 个步骤) (请见图 20 ) (请见图 21 ) 警告 为避免伤害患者,在降低或调整吊架时要小心。 在座椅/轮椅上(13 个步骤) (请见图 22 ) (请见图 17 ) 警告 为避免侧翻过程中出现人身伤害,确保有另 一位护理员在场和/或在另一侧使用床栏。 图 19 图 20 图 21... -
Page 28: 清洁和消毒
如果使用的是环状吊兜: 如果使用的是卡扣式吊兜: (请见图 23 ) 警告 为避免伤害患者,在降低或调整吊架时要小心。 图 22 图 23 清洁和消毒 ° ° 警告 为了预防交叉感染,必须遵守本 IFU 中的消毒 ° ° 说明。 警告 为避免材料损坏和人身伤害,请按照本 IFU 进 行清洁和消毒。 • 不得使用其它化学品。 • 切勿用氯进行清洁。 • 氯将会损坏材料表面。 警告 为避免人身伤害,请务必在对移位机消毒前拆除 吊兜。 清洁用化学品 清洁说明(7 个步骤) 消毒... -
Page 29: 保养和防护性维护
保养和防护性维护 变脏/染污或用于其他患者时 警告 清洁/消毒 为避免伤害患者和护理人员,切勿改装设备或使 用不兼容的部件。 每次使用前后 贮存 目视检查所有外露部件 保养和维护 技术规格 基本信息 安全承重 (SWL)=最大总承重 请参阅 ”允许组合” on page 22 All day 吊兜 1.5 年* 使用寿命 – 建议使用期 其他吊兜均为 2 年* * 请参考”预计使用寿命” on page 18 。 保质期 – 存储新的未开封产品的最长时间 5 年 请参阅... -
Page 30: 故障排除
故障排除 故障 措施 • 确保卡扣式/环状带未扭曲。 患者在吊兜内的位置不正确(例如: • 确保患者坐在吊兜内。外部带有供参考的标牌。 一根吊带比另外一根短)。 • 确保患者位于吊兜中央。 患者坐在吊兜中时腿部感觉不适。 确保吊兜腿皮瓣上无褶皱。 吊兜难以使用(例如:在侧翻时)。 按照 IFU 中的说明使用 ArjoHuntleigh 床单式移位易/环管。 • 将患者放到床上或地板上,使其尽可能保持坐姿。将枕头 放置在患者的颈部/背部后方(放在吊兜之外)。 • 升高床的靠背(如有)。 使用肩部卡扣/环时有难度。 • 确保卡扣式吊带未被夹在移位机卡钉和卡扣连接件之间。 • 如有可能,使用拉手将吊兜放置到更理想的位置。 • 将吊架尽可能地调节至后仰位置。注意患者头部。 • 弯曲患者双腿,或者将枕头置于患者膝下。如果在地板上 使用吊兜,请将患者的双腿放置在护理人员的膝盖上。 使用腿带/连接环时有难度。 • 确保卡扣式吊带未被夹在移位机卡钉和卡扣连接件之间。 • 将吊架尽可能地调节至坐立位置。 仅按照 ”允许组合” on page 22 一节中所述的组合方式使 难以将吊兜同移位机和吊架组合使用。... -
Page 31: 吊兜上的标牌
吊兜上的标牌 保养和洗涤标志 商品编号 70°C (158°F) 机洗 带有 -X 的商品编号指吊兜规格。 XXXXXX-X 不可漂白 如果商品编号末尾未注明尺寸字 母,则表示吊兜为一号。 XXXXXXX 不可滚转干燥 纤维成分 烘干 聚酯 聚乙烯 不可熨烫 聚氨酯 聚酰胺 不可干洗 其他符号 证书/标记 安全承重 (SWL) 符合医疗设备指令 93/42/EEC 的 CE 标志。设备经过测试,满足所有必需 要求。 患者姓名标志 关于卡扣与环的标志 记录标志 使用卡扣吊架。 使用前阅读 IFU 商品编号 使用环状吊架。... -
Page 32: Vorwort
EDIENUNGSANLEITUNG Inhalt Abnehmen der Ösen (3 Schritte) ......38 Vorwort ..............32 Befestigen und Abnehmen der Schlaufen ..38 Kundendienst ............32 Begriffsbestimmungen zu dieser Befestigen der Schlaufen (5 Schritte) ....38 Bedienungsanleitung ..........32 Nehmen Sie die Schlaufen ab (2 Schritte) .... 39 Verwendungszweck ...........33 Anlegen des Gurts ..........39 Patienten-/Bewohner-Beurteilung ...... -
Page 33: Verwendungszweck
Safe Working Load (Sichere Arbeitslast) für den Gurt für Produkte aus Tagesgurt-Netzmaterialien oder Tagesgurt- Beinamputierte: Materialien eignen sich für längeres Sitzen. Artikel • MAA2050M, MAA2080M: 190 kg (418 lbs); MAA2091M ermöglicht einen Toilettengang. • MAA2090M, MAA2091M, MAA4040M, MAA4070M, Der Gurt für Beinamputierte darf nur von Pfl egepersonal MAA4080M, MLA7000, MLA7000A, MAA7090M: 272 kg verwendet werden, das ausreichend geschult ist und über... -
Page 34: Sicherheitsvorschriften
Sicherheitsvorschriften WARNUNG WARNUNG Lagern Sie die Ausrüstung nur über einen kurzen Lassen Sie den Pfl egebedürftigen zu keiner Zeit Zeitraum, um Verletzungen zu vermeiden. Wird sie unbeaufsichtigt, um Verletzungen oder Stürze o.ä. länger als in der Bedienungsanleitung angegeben, zu vermeiden. gelagert, kann dies zu Materialschwäche und Brüchen des Materials führen. -
Page 35: Komponentenbezeichnungen
Komponentenbezeichnungen 1. Gurtetikett (an der Außenseite des Gurtes) 9. Schultergurt 2. Tasche für Versteifungselement 10. Kopfabschnitt 3. Versteifungselement (Kunststoffstreben) 11. Klettverschluss 4. Befestigungsclip (Schulter) 12. Befestigungslasche (Schulter) 5. Beingurt 13. Gurtband 6. Befestigungsclip (Bein) 14. Befestigungsöse (Bein) 7. Beinlasche 15. Zughebel 8. -
Page 36: Auswahl Der Gurtgröße
Einbeinig Amputierter: Verwenden Sie einen Gurt für rechts/links Beinamputierte (je nach Amputation) oder einen Hängemattengurt für Beinamputierte. Transfer/Baden Sichere Artikelnummer Produktbeschreibung Größe Arbeitslast (SAL) MAA2080M 190 kg (418 lbs) All Day-Netz für beidbeinig Amputierte S, M, L, LL MAA7090M 272 kg (600 lbs) Netz für beidbeinig Amputierte M, L, XL... -
Page 37: Zulässige Kombinationen
190 kg (418 lbs) S, M, L, LL, XL S, M, L, LL S, M, L, LL S, M, L, LL, XL MAA2080M 190 kg (418 lbs) S, M, L, LL, XL S, M, L, LL S, M, L, LL... -
Page 38: Befestigen Und Abnehmen Der Ösen
Maxi Sky Maxi Sky Lifter Maxi Move 125 kg 200 kg 272 kg 227 kg (500 lbs) (275 lbs) (440 lbs) (600 lbs) 2-Punkt- Vierpunkt- Zweipunkt Zweipunkt Zweipunkt Aufhängung Schlaufen- Schlaufen- (klein) (mittelgroß) (mittelgroß) aufhängung aufhängung Gurt Größe Größe Größe Größe Größe Größe... -
Page 39: Nehmen Sie Die Schlaufen Ab (2 Schritte)
Nehmen Sie die Schlaufen ab Möglichkeit 1 1. Drücken Sie die Federverriegelung auf. (2 Schritte) 2. Entnehmen Sie die Schlaufe. Kontrollieren Sie vor dem Entfernen der Schlaufe, ob Möglichkeit 2 das Gewicht des Pfl egebedürftigen von der Oberfl äche 1. Ziehen Sie eine Seite der Schlaufe über den Haken und die aufgenommen wird. -
Page 40: In Einem Stuhl/Rollstuhl (22 Schritte)
19. Stellen Sie Folgendes sicher: 8. Lehnen Sie den Patienten/Bewohner nach hinten. • alle Befestigungsösen/Schlaufen sind sicher befestigt 9. Platzieren Sie die Beinlasche(n) unter dem/den Bein(en)/ (Siehe Abb. 4 ) und (Siehe Abb. 6 ) unter der/den Extremität(en) des Patienten/Bewohners. (Siehe Abb. -
Page 41: Auf Dem Boden (32 Schritte)
19. Wenn Einstellungen vorgenommen werden müssen, 11. Platzieren Sie den zusammengefalteten Gurt seitlich über kontrollieren Sie vor dem Entfernen der Öse/Schlaufe, ob das dem Patienten/Bewohner. Stellen Sie sicher, dass die Gewicht des Patienten/Bewohners auf der Oberfl äche ruht. Mittellinie an der Wirbelsäule des Patienten/Bewohners 20. -
Page 42: Abnehmen Des Gurts
22. Bringen Sie die Schulterclips/Schlaufen an. 27. Vergewissern Sie sich, dass alle Ösen/Schlaufen sicher 23. Heben Sie den Kopf des Patienten/Bewohners leicht befestigt sind und der Patient/Bewohner bequem im Gurt an. Bringen Sie die DPS-Aufhängung/Schlaufe in eine liegt. Passen Sie diese gegebenenfalls an. Sitzposition. -
Page 43: Reinigung Und Desinfektion
4. Bei Verwendung eines Schlaufengurts: Drücken Sie 7. Lösen Sie den Gurt. den Gurt, und nicht den Patienten/Bewohner, für eine bessere 8. Bewegen Sie den Lifter vom Patienten/Bewohner weg Positionierung gegen die Rückseite des Stuhls/Rollstuhls. 9. Ziehen Sie die Beinlaschen unter dem/den Bein(en) bzw. Bei der Verwendung eines Gurts mit der/den Extremität(en) des Patienten/Bewohners hervor Befestigungsösen: Verwenden Sie für die... -
Page 44: P Ege Und Vorbeugende Wartung
Pfl ege und vorbeugende Wartung Bei Schmutz oder Flecken und vor WARNUNG der Verwendung für einen neuen Um Verletzungen von Patienten/Bewohnern Patienten/Bewohner und Pfl egekräften zu vermeiden, darf das Gerät nicht verändert oder mit nicht kompatiblen Reinigen/Desinfi zieren Komponenten verwendet werden. Die Pfl... -
Page 45: Fehlerbehebung
Fehlerbehebung Problem Maßnahme • Stellen Sie sicher, dass die Befestigungsösen/Schlaufen nicht verdreht sind. Der Patient/Bewohner wurde nicht richtig im Gurt • Stellen Sie sicher, dass der Patient/Bewohner auf der positioniert (beispielsweise, wenn ein Riemen Innenseite des Gurts sitzt. An der Außenseite ist ein Etikett kürzer als der andere ist). -
Page 46: Etikett Am Gurt
Etikett am Gurt Pfl ege- und Waschsymbole Artikelnummer Artikelnummer mit -X bezieht sich auf Maschinenwäsche bei 70 °C (158 °F) XXXXXX-X die Gurtgröße. Wenn die Artikelnummer ohne Nicht bleichen Größe am Ende angegeben wird, XXXXXXX bedeutet dies, dass der Gurt eine Nicht im Trockner trocknen Einheitsgröße aufweist. -
Page 47: Avant-Propos
’ OTICE D UTILISATION Table des matières Détacher les clips (3 étapes) ......... 53 Avant-propos .............47 Fixation et détachement des boucles ....53 Support après-vente ..........47 Dé nitions utilisées dans cette notice d’utilisation .. 47 Fixer les boucles (5 étapes) ........53 Détacher les boucles (2 étapes) ...... -
Page 48: Utilisation Prévue
Charge maximale admissible (CMA) du harnais pour amputé : Les produits composés de tissu maillé All Day et de tissu All • MAA2050M, MAA2080M : 190 kg (418 lb) ; Day permettent aux patients de rester installés dedans pour •... -
Page 49: Consignes De Sécurité
Consignes de sécurité AVERTISSEMENT AVERTISSEMENT Pour éviter tout risque de blessure, il convient de Pour prévenir toute blessure, veiller à ne jamais ne stocker l’équipement que pendant une période laisser le patient sans surveillance. limitée. Si le produit est stocké pendant une période plus longue que celle indiquée dans la notice d’utilisation, les matières qui le composent AVERTISSEMENT... -
Page 50: Désignation Des Pièces
Désignation des pièces 1. Étiquette de harnais (située sur la face externe du harnais) 9. Sangle d’épaule 2. Poche de renforcement 10. Tête 3. Baleine 11. Ailette en sangle à ruban autoagrippant 4. Clip de fi xation (épaule) 12. Boucle de fi xation (épaule) 5. -
Page 51: Sélection De La Taille Du Harnais
Amputé d’une jambe : utiliser un harnais pour amputé droit/gauche (selon le patient) ou un harnais-hamac. Transfert/bain Charge maximale Référence Description du produit Dimensions admissible MAA2080M 190 kg (418 lb) Double amputé en tissu maillé et All Day S, M, L, LL MAA7090M 272 kg (600 lb) Harnais maillé pour double amputé M, L, XL Transfert et déplacement... -
Page 52: Combinaisons Autorisées
190 kg (418 lb) S, M, L, LL, XL S, M, L, LL S, M, L, LL S, M, L, LL, XL MAA2080M 190 kg (418 lb) S, M, L, LL, XL S, M, L, LL S, M, L, LL... -
Page 53: Fixation/Détachement Des Clips
Lève- Maxi Sky Maxi Sky personne Maxi Move sur rail 125 kg 200 kg 272 kg 227 kg (500 lb) (275 lb) (440 lb) (600 lb) Berceau 2 points, Boucle à Boucle à 2 points, 2 points, petit Fixe mobile moyen 2 points 4 points... -
Page 54: Détacher Les Boucles (2 Étapes)
Détacher les boucles (2 étapes) Méthode 2 : 1. Tirer un côté de la boucle sur le crochet et le loquet de S’assurer que le poids du patient est bien soutenu par la sécurité à ressort.(Voir Fig. 7 ) surface de réception avant de retirer les boucles. 2. -
Page 55: Dans Un Siège/Fauteuil Roulant (22 Étapes)
19. Vérifi er que : 10. Si un harnais à boucles est utilisé, croiser les sangles de • L’ensemble des clips/boucles sont bien attachés jambes. Tirer sur l’une des sangles à travers l’autre. (Voir Fig. 4 ) et (Voir Fig. 6 ) (Voir Fig. -
Page 56: Sur Le Sol (32 Étapes)
19. En cas d’ajustement nécessaire, abaisser le patient et 11. Placer le harnais plié sur le côté du patient. S’assurer s’assurer que le poids du patient est bien soutenu par la que l’axe central est aligné avec la colonne vertébrale du surface de réception avant de retirer les clips/boucles. -
Page 57: Retrait Du Harnais
22. Attacher les boucles ou les clips au niveau des épaules. 27. S’assurer que tous les clips/boucles sont fermement 23. Relever légèrement la tête du patient. Régler le système attachés et que le patient est confortablement installé dans DPS/la boucle du berceau mobile en position assise. Plus le harnais. -
Page 58: Nettoyage Et Désinfection
4. Si un harnais à boucles est utilisé : pousser le 9. Sortir les rabats de jambes de dessous la (les) jambe(s)/ harnais, et non pas le patient, dans le fond de la chaise/du le(s) membre(s) du patient et les placer à l’envers sur le côté... -
Page 59: Entretien Et Maintenance Préventive
Entretien et maintenance préventive En cas de souillure ou de tache et AVERTISSEMENT entre deux patients Pour éviter toute blessure d’un patient ou du personnel soignant, ne jamais modifi er Nettoyage/désinfection l’équipement et ne pas utiliser d’éléments Le personnel soignant doit s’assurer que la sangle est nettoyée incompatibles. -
Page 60: Dépistage Des Anomalies
Dépistage des anomalies Problème Action • Véri er que les sangles à boucles/clips ne sont pas entrelacées. Le patient n’est pas positionné correctement • S’assurer que le patient est installé à l’intérieur du harnais. dans le harnais (par exemple, une sangle est Pour faciliter le repérage, la face extérieure est celle qui plus courte que l’autre). -
Page 61: Étiquette Sur La Sangle
Étiquette sur la sangle Symboles d’entretien et de lavage Réf. article RÉF. La référence contenant -X désigne la Lavage en machine à 70 °C (158 °F) XXXXXX-X dimension du harnais. Si le numéro d’article est indiqué Chloration interdite RÉF. sans mention de la taille à la n, cela XXXXXXX signi e qu’il s’agit d’une taille de Ne pas essorer... -
Page 62: Premessa
’ STRUZIONI PER L Indice Distacco delle clip (3 punti) ........68 Premessa ............62 Aggancio e sgancio dell’asola ......68 Assistenza Clienti ..........62 De nizioni impiegate nelle presenti IU ....62 Attacco delle asole (5 punti) ........68 Distacco delle asole (2 punti) ........ 69 Uso previsto............63 Applicazione del corsetto........69 Valutazione del paziente/degente ...... -
Page 63: Uso Previsto
I prodotti realizzati in materiali All Day e in rete All Carico di lavoro sicuro (SWL) per l’Amputee Sling: Day sono adatti per lunghi periodi in posizione seduta. • MAA2050M, MAA2080M: 190 kg (418 lb); L’articolo MAA2091M consente le operazioni di igiene • MAA2090M, MAA2091M, MAA4040M, personale. -
Page 64: Norme Di Sicurezza
Norme di sicurezza AVVERTENZA AVVERTENZA Per evitare lesioni, conservare il prodotto solo per un breve periodo di tempo. Se conservato Per evitare lesioni, accertarsi che il paziente più a lungo di quanto indicato nelle IU, può non sia mai lasciato da solo. verifi... -
Page 65: Identi Cazione Dei Componenti
Identifi cazione dei componenti 1. Etichetta corsetto (situata all’esterno del corsetto) 9. Cinghia per le spalle 2. Tasca di rinforzo 10. Sezione testa 3. Elemento di rinforzo 11. Risvolto in cinghia con gancio e cappio 4. Clip di attacco (spalla) 12. -
Page 66: Selezione Della Taglia Del Corsetto
Trasferimento/bagno Carico di lavoro Codice articolo Descrizione del prodotto Dimensioni sicuro MAA2080M 190 kg (418 lb) Amputati bilaterali rete All Day S, M, L, LL MAA7090M 272 kg (600 lb) Amputati bilaterali rete M, L, XL... -
Page 67: Combinazioni Consentite
190 kg (418 lb) S, M, L, LL, XL S, M, L, LL S, M, L, LL S, M, L, LL, XL MAA2080M 190 kg (418 lb) S, M, L, LL, XL S, M, L, LL S, M, L, LL... -
Page 68: Attacco E Distacco Della Clip
Solleva- Maxi Sky Maxi Sky Maxi Move pazienti 125 kg 272 kg 227 kg 200 kg (275 lb) (600 lb) Barra di 2 punti 2 punti Anello a Anello a 2 punti Fissa sollevamento Piccola Media 2 punti 4 punti Media Corsetto Dimensioni Dimensioni Dimensioni Dimensioni... -
Page 69: Distacco Delle Asole (2 Punti)
Distacco delle asole (2 punti) Metodo 2 1. Tirare un lato dell’asola sul gancio e sul fermo a molla Prima di rimuovere l’anello, accertarsi che il peso del (vedere Fig. 7 ) paziente sia sostenuto dalla superfi cie di appoggio. 2. -
Page 70: Su Sedia/Sedia A Rotelle (22 Punti)
19. Assicurarsi che: 10. Se si utilizza un corsetto ad anelli, incrociare le cinghie • tutte le clip/gli anelli siano fi ssati saldamente per le gambe. Tirare una cinghia attraverso l’altra. (vedere Fig. 4 ) e (vedere Fig. 6 ) (vedere Fig. -
Page 71: A Terra (32 Punti)
19. Nel caso in cui siano necessarie regolazioni, abbassare il 11. Posizionare il corsetto piegato sul lato del paziente. paziente e assicurarsi che il suo peso sia sostenuto dalla Accertarsi che la linea centrale sia allineata alla colonna superfi cie di appoggio prima di rimuovere la clip/l’anello. vertebrale del paziente a partire dal coccige. -
Page 72: Rimozione Del Corsetto
22. Fissare le clip/gli anelli per le spalle. 27. Accertarsi che tutte le clip/gli anelli siano fi ssati 23. Sollevare leggermente la testa del paziente. Regolare il saldamente e che il paziente stia comodo nel corsetto. DPS della barra di sollevamento/l’anello in posizione Regolare se necessario. -
Page 73: Pulizia E Disinfezione
4. Se si utilizza un corsetto ad asola: spingere 7. Sganciare il corsetto. il corsetto (non il paziente) verso lo schienale della 8. Spostare il sollevapazienti lontano dal paziente 9. Estrarre i risvolti per le gambe da sotto la/e gamba/e sedia/sedia a rotelle per un miglior posizionamento. -
Page 74: Assistenza E Manutenzione Preventiva
Assistenza e manutenzione preventiva Se sporco o macchiato e condiviso AVVERTENZA tra pazienti Al fi ne di evitare lesioni al paziente e all’assistente, non modifi care per nessun Pulizia/disinfezione motivo l’attrezzatura e utilizzare solo L’assistente deve accertarsi che il corsetto venga pulito componenti compatibili. -
Page 75: Risoluzione Dei Problemi
Risoluzione dei problemi Problema Soluzione • Accertarsi che le cinghie della clip e dell’anello non siano attorcigliate. Il paziente non è posizionato correttamente nel corsetto (ad esempio, una cinghia è più • Accertarsi che il paziente sia seduto all’interno del corta dell’altra). -
Page 76: Etichetta Sul Corsetto
Etichetta sul corsetto Simboli per la cura e il lavaggio Codice articolo RIF. Alla ne del codice, -X si riferisce Lavabile in lavatrice a 70 °C (158 °F) XXXXXX-X alla taglia del corsetto. Se il codice è riportato senza Non candeggiare RIF. -
Page 77: Voorwoord
EBRUIKSAANWIJZING Inhoud De clips losmaken (3 stappen) ......83 Voorwoord ............77 Lussen bevestigen & losmaken ......83 Klantenservice ............77 De nities in deze gebruiksaanwijzing ....77 De lussen bevestigen (5 stappen) ......83 De lussen losmaken (2 stappen) ......84 Beoogd gebruik ..........78 De tilband aanbrengen ........84 Beoordeling van de cliënt ........ -
Page 78: Beoogd Gebruik
Tilband met gesloten zitvlak: Hulpmiddelen die zijn gemaakt van All Day- • MAA2050M, MAA2080M: 190 kg (418 lbs); netstofmateriaal en All Day-materiaal, zijn geschikt om • MAA2090M, MAA2091M, MAA4040M, langere tijd op te zitten. Artikel MAA2091M is geschikt MAA4070M, MAA4080M, MLA7000, MLA7000A, voor toiletbezoek. -
Page 79: Veiligheidsvoorschriften
Veiligheidsvoorschriften WAARSCHUWING WAARSCHUWING Om letsel te voorkomen, mag u de cliënt nooit Sla het hulpmiddel slechts korte tijd op, alleen achterlaten. om letsel te voorkomen. Wanneer het hulpmiddel langer wordt opgeslagen dan in de Gebruiksaanwijzing staat vermeld, kan WAARSCHUWING dit leiden tot verzwakking en breuk van het materiaal. -
Page 80: Onderdelen
Onderdelen 1. Tilband-etiket (aan de buitenzijde van de tilband) 9. Schouderstrap 2. Vakken voor baleinen 10. Hoofdgedeelte 3. Baleinen 11. Klittenbandstrap 4. Bevestigingsclip (schouder) 12. Bevestigingslus (schouder) 5. Beenstrap 13. Lusband 6. Bevestigingsclip (been) 14. Bevestigingslus (been) 7. Beenslip 15. Handgrepen 8. -
Page 81: Tilbandmaat Selecteren
Hammock tilband voor amputaties. Transfer/baden Artikel- Veilig Productomschrijving Afmetingen nummer draagvermogen MAA2080M 190 kg (418 lbs) Tilband voor dubbelzijdige amputatie, All Day-netstof S, M, L, LL MAA7090M 272 kg (600 lbs) Tilband voor dubbelzijdige amputatie, netstof M, L, XL... -
Page 82: Toegestane Combinaties
190 kg (418 lbs) S, M, L, LL, XL S, M, L, LL S, M, L, LL S, M, L, LL, XL MAA2080M 190 kg (418 lbs) S, M, L, LL, XL S, M, L, LL S, M, L, LL... -
Page 83: Clip Bevestigen & Losmaken
Maxi Sky Maxi Sky Tillift Maxi Move (SWL= veilige 125 kg 200 kg 272 kg 227 kg (500 lbs) werkbelasting) (275 lbs) (440 lbs) (600 lbs) 2-punts 2-punts 2-punts Kanteljuk 2-punts lus 4-punts Lus Vast Small Medium Medium (SWL= veilige Tilband Afmetingen Afmetingen... -
Page 84: De Lussen Losmaken (2 Stappen)
De lussen losmaken (2 stappen) Methode 2 1. Trek één kant van de lus over de haak en Controleer vóór u de lus verwijdert of het gewicht van de veergrendel(Zie Afb. 7 ) cliënt volledig wordt ondersteund door het onderliggende 2. -
Page 85: In Stoel/Rolstoel (22 Stappen)
19. Zorg ervoor dat: 7. Zorg ervoor dat de middenlijn is uitgelijnd met de alle clips/lussen goed vastzitten (Zie Afb. 4 ) en • ruggengraat en het stuitbeen van de cliënt. (Zie Afb. 6 ) 8. Laat de cliënt weer naar achteren leunen. •... -
Page 86: Op De Vloer (32 Stappen)
19. Als er nog iets bijgesteld moet worden, laat de Als rollen niet mogelijk is, gebruik dan een glijlaken/ cliënt dan zakken en zorg ervoor dat het gewicht glijrol van ArjoHuntleigh om de tilband te plaatsen. van de cliënt volledig wordt ondersteund door het Zie de gebruiksaanwijzing van het betreffende onderliggende oppervlak voor u de clip/lus verwijdert. -
Page 87: Tilband Verwijderen
22. Maak de schouderclips/-lussen vast. 27. Verzeker u ervan dat alle clips/lussen goed zijn 23. Til het hoofd van de cliënt iets omhoog. Gebruik bevestigd en dat de cliënt comfortabel in de tilband het kanteljuk/de lus om naar een zittende positie ligt. -
Page 88: Reinigen En Desinfecteren
4. Bij gebruik van een tilband met 7. Maak de tilband los. lusbevestiging: duw de tilband, niet de cliënt, tegen 8. Plaats de tillift uit de buurt van de cliënt. 9. Trek de beenslips onder de benen van de cliënt uit en de rugleuning van de stoel/rolstoel voor een betere positionering. -
Page 89: Onderhoudsinstructies
Onderhoudsinstructies Bij verontreinigingen en tussen WAARSCHUWING cliënten door Om letsel bij cliënt én zorgverlener te voorkomen, mag u nooit wijzigingen aan het Reinigen/desinfecteren hulpmiddel aanbrengen of incompatibele De zorgverlener moet ervoor zorgen dat de tilband in geval onderdelen gebruiken. van vuil of vlekken of bij het wisselen van cliënten wordt gereinigd overeenkomstig “Reinigen en desinfecteren”... -
Page 90: Problemen Oplossen
Problemen oplossen Probleem Handeling • Zorg ervoor dat de clip-/lusbanden niet gedraaid zitten. De cliënt is niet correct in de tilband geplaatst • Zorg ervoor dat de cliënt aan de binnenzijde van de (de ene strap is bijvoorbeeld korter dan de tilband zit. -
Page 91: Etiket Op De Tilband
Etiket op de tilband Was- en onderhoudssymbolen Artikelnummer Artikelnummer met -X verwijst naar Machinewasbaar op 70 °C (158 °F) XXXXXX-X de tilbandmaat. Als er achter het artikelnummer Bleken niet toegestaan geen maatindicatie staat vermeld, XXXXXXX betekent dit dat de tilband een Drogen in wasdroger niet toegestaan universele maat heeft. - Page 92 Intentionally left blank...
- Page 93 Intentionally left blank...
- Page 94 Intentionally left blank...
- Page 95 AUSTRALIA FRANCE POLSKA Arjo Australia Pty Ltd Arjo SAS Arjo Polska Sp. z o.o. 78, Forsyth Street 2 Avenue Alcide de Gasperi ul. Ks Piotra Wawrzyniaka 2 O’Connor CS 70133 PL-62-052 KOMORNIKI (Pozna ) AU-6163 Western Australia FR-59436 RONCQ CEDEX...
- Page 96 At Arjo, we are committed to improving the everyday lives of people affected by reduced mobility and age-related health challenges. With products and solutions that ensure ergonomic patient handling, personal hygiene, disinfection, diagnostics, and the effective prevention of pressure ulcers and venous thromboembolism, we help professionals across care environments to continually raise the standard of safe and digni ed care.
Need help?
Do you have a question about the MAA2080M and is the answer not in the manual?
Questions and answers