Advertisement
Quick Links
Advertisement

Related Manuals for Eastwood 30721


Summary of Contents for Eastwood 30721
- Page 1 Item #30721 BENCHTOP BLAST CABINET INSTRUCTIONS...
-
Page 2: Safety Information
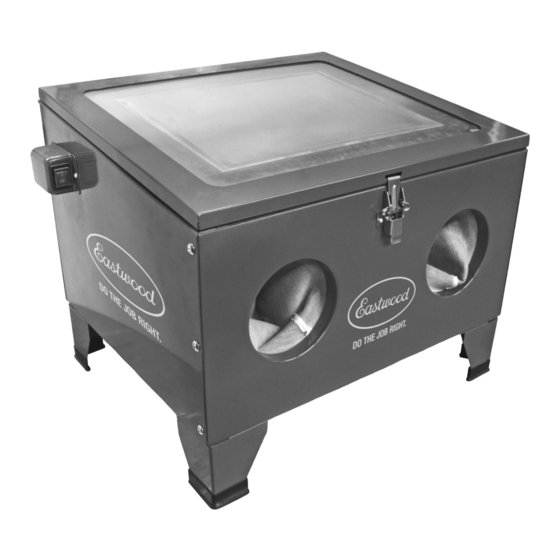
The EASTWOOD BENCHTOP BLAST CABINET is specifi cally designed with heavy-duty components and a quality powder coated fi nish to provide years of trouble free service. It features a fl uorescent work lamp for increased visibility and a baffl ed, fl ow-through ventilation design with an external vacuum connection –... - Page 3 Lamp Clamps Blast Gun/Hose Assembly Cable Tie Sealing Foam, 6mm MM Sealing Foam, 3mm TFE Thread Tape Peel-Off Glass Shields AC Lamp Adaptor Rear Filter Cover 1-1/2” Vacuum Elbow Vacuum Elbow Seal To order parts and supplies: 800.345.1178 >> eastwood.com...
- Page 4 • It is recommended to put a dab of silicone or RTV in the corners of joints to prevent air or media leaks. 4 Pcs. MM Sealing Foam, 3mm 8 Pcs. M4 x 10mm Screw Dab of Silicone or RTV Eastwood Technical Assistance: 800.544.5118 >> techelp@eastwood.com...
- Page 5 (B) and secure the (2) Lamp Clamps (JJ) with (2) M4 x 6mm screws (DD), nuts (FF) and Flat Washers (GG). 4 Pcs. M4 x 10mm Screw 2 Pcs. M4 x 6mm Screw 6 Pcs. M4 Flat Washer 6 Pcs. M4 Nut To order parts and supplies: 800.345.1178 >> eastwood.com...
- Page 6 (FIG 7B). FIG. 7A FIG. 7A FIG. 7B FIG. 7B SAFETY NOTE: If not connecting to a vacuum, it is recommended that this unit is used outdoors only when weather permits. Eastwood Technical Assistance: 800.544.5118 >> techelp@eastwood.com...
- Page 7 (PP) into the Switch Housing. Plug the Transformer into a 120 volt outlet and turn on switch to illuminate Lamp. 2 Pcs. M4 x 10mm Screw 2 Pcs. M4 Flat Washer 2 Pcs. M4 Nut To order parts and supplies: 800.345.1178 >> eastwood.com...
- Page 8 • Peel off adhesive protective strips and apply replacement shield to interior glass surface. Press on adhesive areas to ensure an abrasive proof seal. Congratulations! Your fully assembled Eastwood Bench-Top Blast FIG. 8C FIG. 8C Cabinet is now ready to be filled with media and be put to work! FIG.
- Page 9 • NOTE: Only a light amount of negative pressure needs to be generated in order to keep a dust cloud form forming in the cabinet. • To avoid vacuum damage, operate the blast cabinet with a properly fi ltered shop-type, dust collecting vacuum. (Eastwood #20098 Rockford Shop Vacuum works great).
-
Page 10: Troubleshooting
Blast Media Sifter Screen #20608 Filter/Regulator Unit #20098 Rockford Shop Vacuum #20061 Rockford Shop Vacuum Bags #22021 50lb. Eastwood 60 Grit, Aluminum Oxide Blast Media #20068 Replacement Blast Nozzles Kit #30770 5pk, Peel-off Lens Shields Eastwood Technical Assistance: 800.544.5118 >> techelp@eastwood.com... - Page 11 NOTES To order parts and supplies: 800.345.1178 >> eastwood.com...
- Page 12 See our complete line of Blasters and Accessories at www.eastwood.com If you have any questions about the use of this product, please contact The Eastwood Technical Assistance Service Department: 800.544.5118 >> email: techelp@eastwood.com PDF version of this manual is available online >> eastwood.com/30721manual The Eastwood Company 263 Shoemaker Road, Pottstown, PA 19464, USA US and Canada: 800.345.1178...