
Related Manuals for Bat-caddy X8 Series


Summary of Contents for Bat-caddy X8 Series
- Page 1 User Manual X8 Series X8 Pro ATTENTION: Please follow all assembly instructions. READ the instructions carefully to understand the operating procedures BEFORE you operate your caddy.
-
Page 2: Table Of Contents
TABLE OF CONTENTS Packing List ..………………….......…......……3 Parts Glossary ..................………..4 Assembly Instructions .....………………........5,6 Operating Instructions ..............……..7 Remote Control Operation (X8R)..............8 Additional Instructions Free wheeling, Tracking, USB, Remote synchronization........9 Electronic Systems / Battery ............………….….10 Testing Your Caddy..………………............……12 General Maintenance................…...…13 Technical Specifications................14 Trouble Shooting Guide ...................15... -
Page 3: Packing List
NOTE: THE MANUFACTURER IS NOT RESPONSIBLE FOR ANY RADIO OR TV INTERFERENCE CAUSED BY UNAUTHORIZED MODIFICATIONS TO THIS EQUIPMENT SUCH MODIFICATIONS COULD VOID THE USER’S AUTHORITY TO OPERATE THE EQUIPMENT Bat-Caddy X8R FCC ID: QSQ-REMOTE IC ID: 10716A-Remote... -
Page 4: Parts Glossary
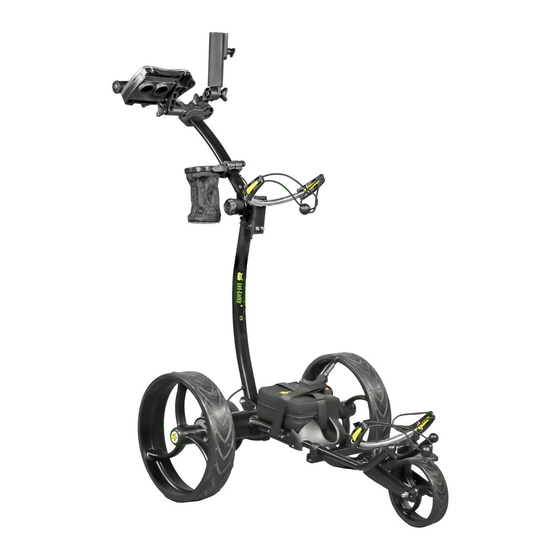
PARTS GLOSSARY X8Pro & X8R 1. Manual Rheostat Speed Control 2. Upper Bag Support 3. Bag Support Strap 4. Battery 5. Rear wheel 6. Rear Wheel Quick Release Catch 7. Dual Motors (within housing tube) 8. Lower Bag Support & Strap 9. -
Page 5: Assembly Instructions
ASSEMBLY INSTRUCTIONS X8Pro & X8R 1. Unpack all items carefully and check inventory. Place frame structure (one piece) on soft clean ground to protect the frame from being scratched. 2. Attach rear wheels to axles by pushing the wheel locking button (Pic-1) on the outside of the wheel and inserting the axle extension in to the wheel. - Page 6 ASSEMBLY INSTRUCTIONS (Continued) 4. Place the battery pack on the battery tray. Insert the 3-prong battery plug into the caddy outlet so the notch aligns properly and attach T-connector onto the battery. Then attach Velcro strap. Tightly fasten the Velcro strap underneath the battery tray and around the battery.
-
Page 7: Operating Instructions
OPERATING INSTRUCTIONS X8Pro & X8R X8 Series X8 Series Faceplate T Handle Control Timer On/Off & Start/Stop Battery Charge Pic-1 1. The rheostat speed dial on the right side of the handle is your manual speed control. It allows you to choose your preferred speed seamlessly. -
Page 8: Remote Control Operation (X8R)
Remote Control Operation (X8R Only) FUNCTIONS: 1. STOP: The red button in the middle of the directional arrows should be used for stopping the caddy abruptly or as an emergency brake. 2. TIMER: 10, 20, 30 yards/meters: press once -10 yds., twice -20 yds.; three times - 30 yds. -
Page 9: Additional Instructions Free Wheeling, Tracking, Usb, Remote Synchronization
Additional Functions Freewheeling Mode: The caddy can be easily operated without power. In order to activate the freewheeling mode, turn main power OFF. Then Release disengage rear wheels from motor/gearbox and sliding the wheel from the inner grove (Pic-1)on the Pic-2 Pic-1 axle to the outer grove (Pic-2). -
Page 10: Electronic Systems / Battery
Electronic Systems • Remote Control Range: We recommend not to exceed 20-30 yards distance. The greater the distance between you and the caddy, the greater the chance of losing control of it. • Microcomputer: The remote caddy has 3 microcomputer controls. The primary microprocessor is in its own compartment underneath the battery tray. - Page 11 Bat-Caddy will cover our batteries according to our warranty policy and any potential additional coverage is at our discretion”.
-
Page 12: Testing Your Caddy
Testing Your Caddy Test Environment First, make sure that you perform your first test of the caddy in a wide and safe area, free of obstructions or valuables, such as people, parked automobiles, flowing traffic, bodies of water (rivers, swimming pools, etc.), steep hills, cliffs or similar hazards. Manual Control Operation Test the manual function first: Press the On/Off button for 2-5 seconds. -
Page 13: General Maintenance
• The Bat-Caddy has been designed so that the user can concentrate on playing golf, while the caddy does the work of carrying your bag. In order to keep your Bat-Caddy looking its best, wipe any mud or grass from the frame, wheels and chassis after every round using a damp cloth or paper towel. -
Page 14: Technical Specifications
TECHNICAL SPECIFICATIONS Model Name X8 Pro / X8R Standard Battery 35/36Ah SLA Dimensions SLA: 8 x 5 x 6 in (20 x 13 x 15 cm) Weight: 25 lbs Average charge time: 4-8 hours Lifetime: ca. 150 charges - 27+ holes p/charge Lithium Battery 12V 25 Ah Lithium Dimensions: 7x5x4in... -
Page 15: Trouble Shooting Guide
Problems attaching wheels • Adjust quick release catch Note: Bat-Caddy reserves the right to modify/upgrade any components during a model year, so illustrations on our website, brochures and manuals may slightly vary from the actual product shipped. However, Bat-Caddy guarantees that specifications and functionality will be always equal to or better from the advertised product. - Page 16 www.batcaddy.com BC-81820...
Need help?
Do you have a question about the X8 Series and is the answer not in the manual?
Questions and answers